
Torque wrench settings:
- Cylinder head cover screws (5): 10 Nm (1.0 kg·m)
- Thermostat bridge retaining screws (6): 6 Nm (0.6 kg·m)
Removal
Drain all coolant from the cooling circuit; see 5.2.1.
Remove the spark plug; see 2.6.1.
Disconnect the electrical connector (1) at the thermistor end.
Slacken the clip (2).
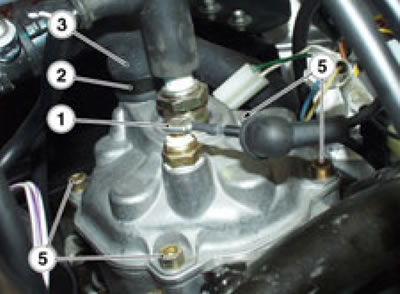
Withdraw the hose (3) from the cylinder head cover (4).
Release and remove the four screws (5).
Remove the cylinder head cover (4).
Release and remove the two screws (6).
Remove the thermostat (7) and collect bridge (10), spring (9) and thermostat mount (8).

Warning! Block off the openings to prevent the ingress of dirt.
Installation
Fit - in the order - thermostat (7), thermostat mount (8), spring (9) and thermostat bridge (10) into the cylinder head cover (4).
Tighten the two screws (6).
Refit the cylinder head cover (4).
Tighten the four screws (5).
Note. Be sure to have the special clip tweezers (no. 0277295) ready at hand and renew all clips using the same type fitted originally.
Refit the hose (3) into the cylinder head cover (4).
Refit the spark plug.
Connect the connector (1) to the thermistor.
Fill the cooling circuit; see 5.2.1.