
Caution! If there is any mechanical damage, the oil tank and the oil lines must be cleaned.
Remove starter motor. See Group 12.
Remove oil lines.
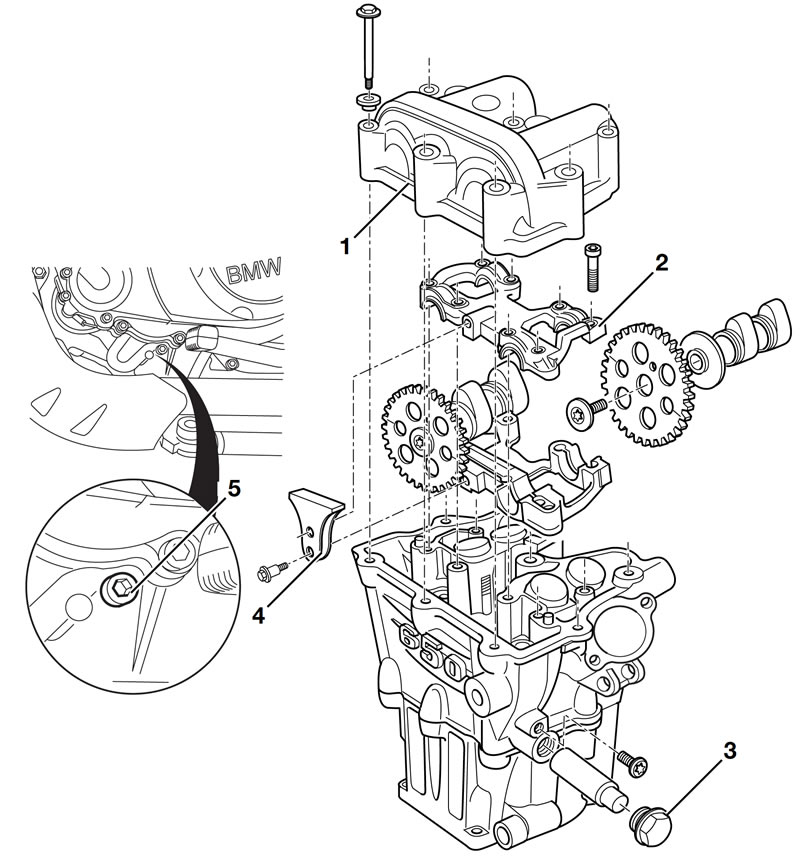
Remove valve cover (1).
Remove spark plug.
Remove centre screw plug on right in engine block.
Turn crankshaft to top dead centre position with an Allen key.
Remove screw (5) and lock the crankshaft with locating screw, BMW No. 11 6 570.
Note: Check for secure seating with Allen key.
Removing camshafts
Only unfasten chain sprockets if they need to be replaced.
Remove chain tensioner (3).
Remove chain guide (4) from between the chain sprockets.
Remove fasteners securing camshaft carrier (2).
Remove camshafts with chain sprockets.
Take off the lower camshaft carrier.
Checking camshaft for wear
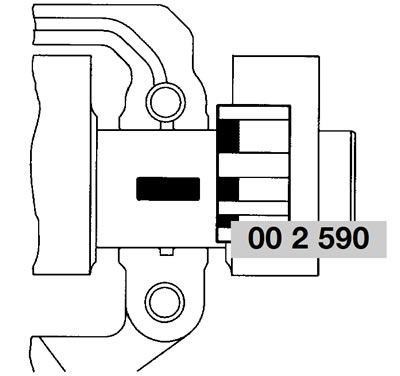
Measure bearing play with Plastigage type PG-1, BMW No. 002590.
Tighten camshaft carrier to specified torque.
Tightening torque: Camshaft carrier: 10 Nm.
Remove camshaft carrier and determine bearing clearance using comparative scale.
Wear limits:
- Cam height, inlet: min. 39.25 mm (1.545 in)
- Cam height, exhaust: min 39.05 mm (1.537 in)
- Bearing journal dia: min. 21.950 mm (0.864 in)
- Bearing dia. in bearing pedestal: max. 22.040 mm (0.868 in)
- Bearing play: max. 0.090 mm (0.0035 in)
Removing and installing timing-chain sprockets
Clamp the camshaft in a vise fitted with protective jaws.
Remove the fastener securing the sprocket to the camshaft and remove the camshaft sprocket.
Installation is the reverse of the removal procedure: pay particular attention to the following.
Before installing, oil the thread of the chainsprocket fastener.
Tightening torque: Sprocket to camshaft (thread oiled): 60 Nm.
Checking centrifugal decompressor lever
Note: Never stretch the spring, since this alters the predetermined spring force.
When activated, the lever must not project beyond the cam base circle by less than distance "B".
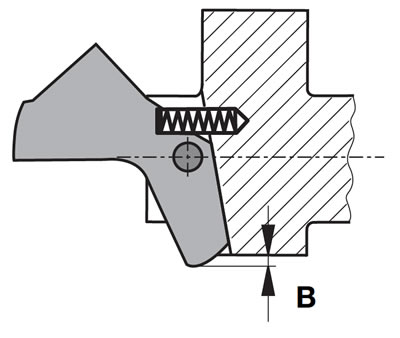
Distance "B": 0.6 mm (0.02 in).
Disassembling and assembling the centrifugal decompressor

Note: If the centrifugal decompressor is dismantled, spring (3) must always be renewed.
Use a suitable punch to press shaft (1) out of centrifugal weight (2).
Installation is the reverse of the removal procedure: pay particular attention to the following.
After assembly, check centrifugal weight for ease of movement.

Removing cylinder head
Remove front chain rail (1).
Release the coolant line hose clips with pliers, BMW No. 175500.
Allow the timing chain to slide into its cavity.
Remove the starter motor. See Group 12.
Remove collar nuts from cylinder head.
Note: If the cylinder head does not have to be dismantled, do not separate cylinder head from cylinder. In this case the next six work steps can be omitted.
Remove machine screws for chaincase (2).
Remove rear collar screw (3) from cylinder head.
Remove front collar screws from cylinder head.
Remove top collar screws from cylinder head.
Separate the cylinder head from the cylinder.
Remove cylinder head.
Checking timing chain for wear
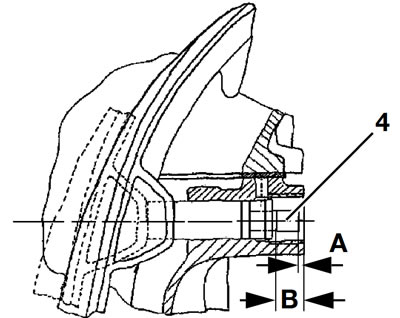
Push hydraulic chain tensioner (4) in the direction of the tensioner rail in the guide on the cylinder, until resistance to movement is felt.
Measure distance (A) from the sealing face to the chain tensioner piston.
If the wear limit, distance "B", is exceeded, first inspect the tensioner rail and the two guide rails for score-marks and renew them if necessary.
If a part has to be renewed, repeat the measurement procedure described above.
If the wear limit has been exceeded, the timing chain must be renewed.
Distance "B": max. 9.0 mm (0.354 in).