
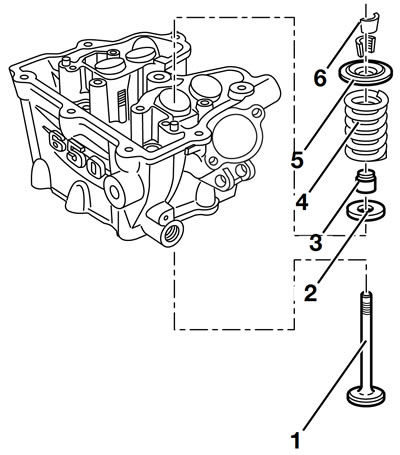
1. Valve; 2. Lower valve spring plate; 3. Valve stem seal; 4. Valvespring; 5. Upper valve spring plate; 6. Valve collets
Removing valves
Use suction device, BMW No. 113251, to pull out the bucket-type tappets.
Check that bucket tappets and guides are in perfect condition.
Bore for bucket tappet:
- In cylinder head: max. 33.600 mm (1.3229 in)
- Radial clearance of bucket tappet: max. 0.200 mm (0.0079 in)
Caution! Mark the bucket tappets to ensure that they are reinstalled in their original positions (risk of jamming).

Note: To simplify removal of the valve collets, tap the valves sharply with a plastic-faced hammer.
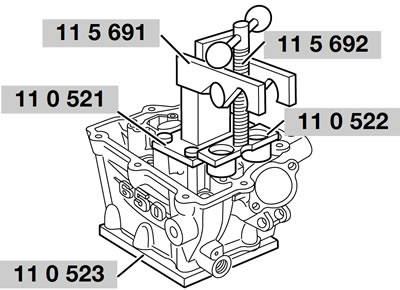
Secure the cylinder head to support plate, BMW No. 110523.
Secure adapter plate, BMW No. 11 0 521, support, BMW No. 11 5 691, spindle, BMW No. 115692, nut, BMW No. 11 5 693, and thrust plate, BMW No. 110522.
Press down the valves with the thrust plate.
Use a screwdriver to press apart and remove the valve collets.
Pull the valves down to remove.
Insert new valve from combustion chamber side into valve guide until it reaches the valve stem seal.
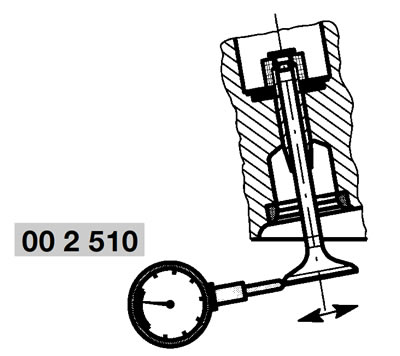
Using dial gauge, BMW No. 00 2 510, positioned vertically on the valve axis, measure maximum play at right angles to the camshaft axis.
Play:
- Max. play: 0.4 mm (0.016 in)
- Intl. dia. of valve guide: max. 5.080 mm (0.2000 in)
Removing valve guide

Caution! Do not damage sliding surfaces on bucket tappets: risk of jamming.
Pull off valve stem seal (1) with pliers, BMW No. 111250.
Remove valve spring support (2) from cylinder head.
Note: To facilitate removal, heat the cylinder head to 100°C (212°F).
Use temperature measuring device, BMW No. 00 1 900, to check the temperature.
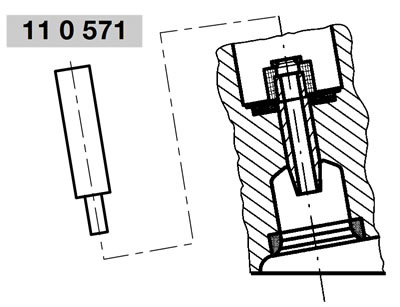
Use drift, BMW No. 11 0 571, to drive out the valve guide toward the combustion chamber.
Caution! The cylinder head has to be replaced if the bore for the valve guide is worn.
Installing valve guide

Heat the cylinder head to 100°C (212°F).
Using driving-in tool, BMW No. 11 0 571, drive valve guide (1) into the cylinder head until valve guide projection is as specified.
Projection:
- Inlet: 9.8...10.2 mm (0.39...0.40 in)
- Exhaust: 9.8...10.2 mm (0.39...0.40 in)
Note: Only use thread-cutting oil to lubricate the reaming tool.
Only rotate reaming tool in the cutting direction -never in the opposite direction.
Withdraw reaming tool at regular intervals for cleaning: always rotate the tool in cutting direction while removing.
Ream out valve guide with 5H7 reaming tool.
Checking valve seat for wear
Apply engineer's blue or a similar product to the valve seat rings.
Install relevant valve and rotate, applying slight pressure.
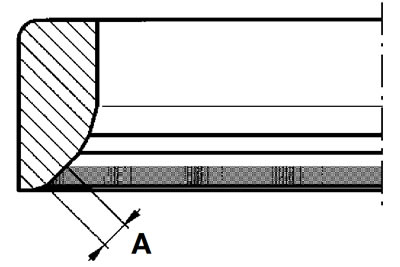
Check valve seat width "A" and contact pattern for wear.
Wear limits for valve seat width "A":
- Inlet valve: 1.6 mm (0.063 in)
- Exhaust valve: 2.2 mm (0.087 in)
Once the wear limit of the seat width has been reached, or if the contact pattern is no longer perfect, the seat can be remachined.

If necessary, remachine valve seat with valve seat turning tool (2).
Valve seat width "B":
- Inlet valve: 1.2 mm (0.047 in)
- Exhaust valve: 1.4 mm (0.055 in)
Installing valve stem seal

Install bottom valve spring retainer (1).
Use a drift, BMW No. 11 6 650, to insert valve stem seal (2).
Checking valve for wear

Check valve stem diameter and valve head seat width.
Wear dimensions for valve
Stem diameter:
- Inlet valve: min. 4.89 mm (0.177 in)
- Exhaust valve: min. 4.89 mm (0.177 in)
Check valve for runout.
Note: Remove oil carbon from valve and deburr grooves for valve collets with an oilstone. For wear limits, see Technical Data.
Check grooves for valve collets.
Installing valves
Install valve with shrink-fit tube.
Note: Remove the shrink-fit tube.
Install valve spring and valve spring retainer.
Secure the cylinder head to support plate, BMW No. 11 0 523.
Secure adapter plate, BMW No. 11 0 521, support, BMW No. 11 5 691, spindle, BMW No. 11 5 692, nut, BMW No. 11 5 693, and thrust plate, BMW No. 11 0 522.
Press down the valves with the thrust plate.
Note: Install valve collets with a small amount of grease to facilitate assembly.
Insert the valve collets.
Check bucket tappets for damage and reinstall on original valves.