Removal
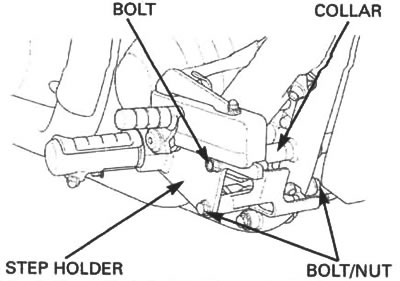
Remove the bolt, rear master cylinder reservoir cover and rear master cylinder reservoir.
Keep the master cylinder reservoir upright to prevent air from entering the hydraulic system.

Remove the right step holder bolts, nut and collar.
Remove the right step holder.

Remove the seat (page 2-2).
Disconnect the O2 sensor 4P connector.

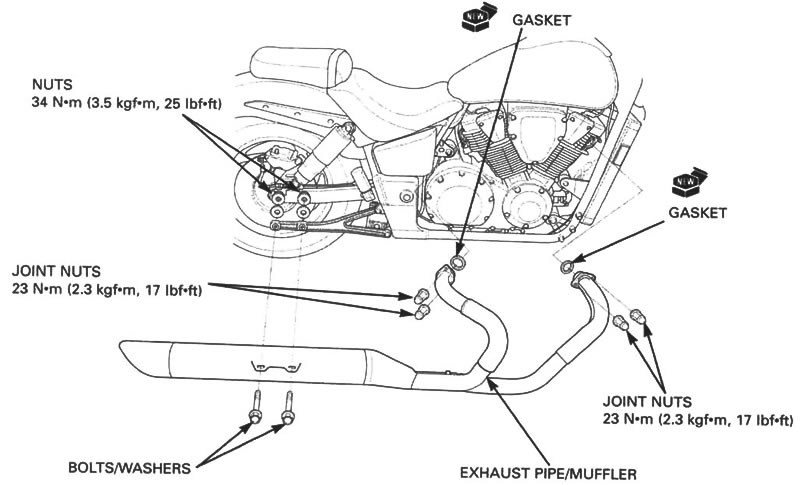
Remove the exhaust pipe joint nuts.
Remove the bolts, nuts and washer.
Remove the exhaust pipe/muffler assembly.
Remove the gaskets.

Installation
It is important to follow the lighting order.
If the exhaust system will not be disassembled, steps 1 and 2 are not necessary.
Refer to the illustration:
1. Before mounting the exhaust system, assemble the front and rear exhaust pipe by temporarily tightening the exhaust pipe band bolt (1).
2. Temporarily tighten the muffler band bolt (2).
3. Make sure the new gaskets are installed in the correct position.
Insert the exhaust flange into the cylinder head studs and loosely install the exhaust pipe joint nuts (3)/(4).
4. Hold the exhaust pipe/muffler assembly and loosely install the mounting bolts and nuts (5).

Tightening procedure
After mounting the exhaust system, tighten each fastener in the sequence below.
5. Tighten the muffler band bolt (2) to the specified torque.
Torque: 17 N·m (1.7 kgf·m, 12 lbf·ft).
6. Tighten the exhaust pipe band bolt (1) to the specified torque.
Torque: 17 N·m (1.7 kgf·m, 12 lbf·ft).
7. Tighten each pair of exhaust pipe joint nuts (3)/(4) alternately in two or three steps.
Torque: 23 N·m (2.3 kgf·m, 17 lbf·ft).
8. Tighten the mounting nuts (5) to the specified torque.
Torque: 34 N·m (3.5 kgf·m, 25 lbf·ft).
Tighten the exhaust pipe cover bolts if the exhaust cover was removed (see the following page).
After installation, inspect the exhaust system for leaks.
