
Removal
Warning! Before starting work, ensure the motorcycle is stabilised and adequately supported. This will help prevent it from falling and causing injury to the operator or damage to the motorcycle.
1. Raise and support the rear of the motorcycle.
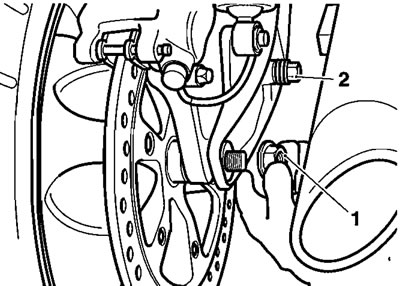
2. Release the wheel spindle nut and withdraw the spindle to a point where it clears the caliper carrier.
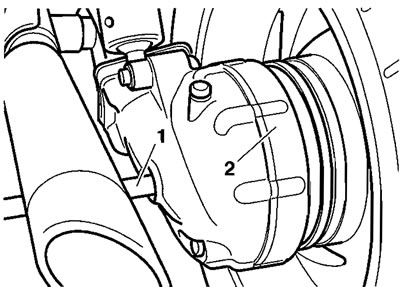
1. Wheel spindle; 2. Bevel box
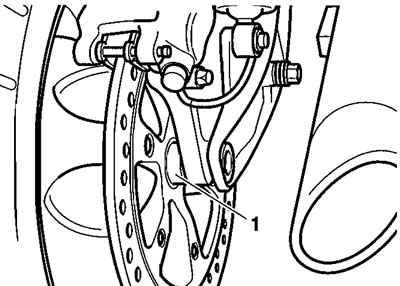
3. Release the torque reaction bolt from the caliper carrier.
Warning! Do not allow the caliper to hang on the brake hoses as this may damage the hoses and could lead to reduced brake efficiency causing loss of motorcycle control and an accident.
4. As an assembly, manoeuvre the caliper and carrier until it is clear of the brake disc and wheel, collecting the spacer once it is freed from the calliper carrier.
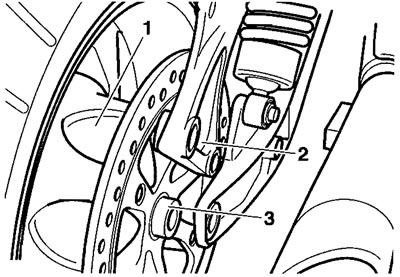
1. Wheel; 2. Caliper carrier; 3. Spacer
Note: Rest the calliper assembly on a support such that it is not allowed to hang on the brake hose.
5. Withdraw the wheel spindle completely.
6. Gently pull the wheel towards the right hand side of the motorcycle to release it from the bevel box.
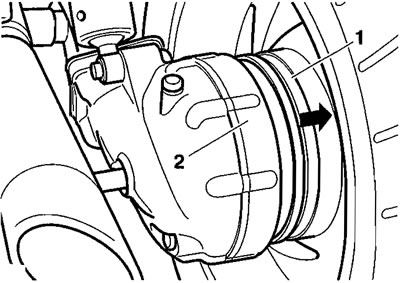
1. Wheel; 2. Bevel box
7. Manoeuvre the wheel clear of the swinging arm.
8. Place the wheel on wooden blocks with the brake disc uppermost.
Installation
1. Thoroughly clean and degrease the brake disc.
2. Apply Mobil HP222 grease (or equivalent) to the wheel driven flange.
3. Position the wheel within the swinging arm.
4. Raise the wheel and engage the driven flange with the bevel box. Once the splines are engaged, push the wheel fully home.

1. Wheel; 2. Bevel box
5. Fit the wheel spindle, pushing it through the wheel centre sufficient to support the wheel without preventing fitment of the spacer and caliper carrier.
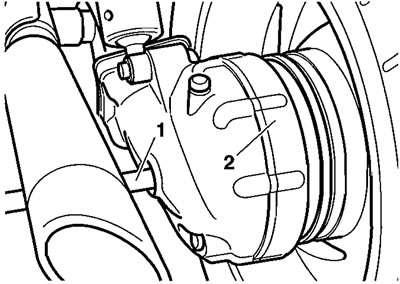
1. Wheel spindle; 2. Bevel box
6. Position the caliper and carrier over the disc ensuring both brake pads are correctly aligned either side of the disc.
7. Position the spacer between the wheel and calliper carrier.
1. Spacer
8. Align the caliper carrier with the wheel spindle, spacer and swinging arm. Once in alignment, push the wheel spindle through the caliper carrier.
9. Align the caliper carrier to the torque reaction fixing point. Once in alignment, fit a new torque reaction bolt.
10. Tighten the wheel spindle nut to 110 Nm and the torque reaction bolt to 69 Nm.
1. Wheel spindle nut; 2. Torque reaction bolt
11. Pump the brake pedal to correctly position the caliper pistons.
12. Check the operation of the rear brake. Rectify as necessary.
Warning! It is dangerous to operate the motorcycle with defective brakes and you must have your authorised Triumph Dealer take remedial action before you attempt to ride the motorcycle again. Failure to take remedial action may reduce braking efficiency leading to loss of motorcycle control and an accident.