Note: Prior to synchronizing the throttle bodies, the valve clearance and the engine idling speed should be properly adjusted and the ignition timing should be checked.
1. Stand the vehicle on a level surface.
Note: Place the vehicle on a suitable stand.
2. Remove:
- Rider and passenger seat. Refer to «General chassis».
- Fuel tank. Refer to «Fuel tank».
3. Remove:
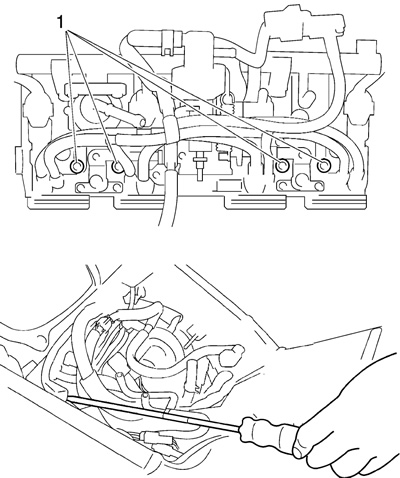
- Synchronizing hoses "1"

4. Install:
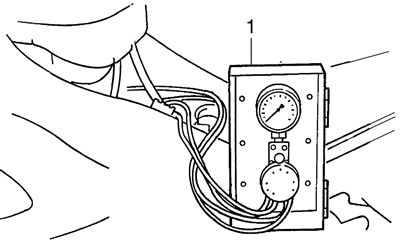
- Vacuum gauge "1" (onto the synchronizing hose)
- Digital tachometer (near the spark plug)
Vacuum gauge 90890-03094. Carburetor synchronizer YU-44456.

5. Install:
- Fuel tank. Refer to «Fuel tank».
6. Start the engine and let it warm up for several minutes.
7. Check:
- Engine idling speed. Out of specification → Adjust. Refer to «Adjusting the engine idling speed».
Engine idling speed 1100-1300 r/min.
8. Adjust:
- Throttle body synchronization
a. With throttle body #3 as standard, adjust throttle bodies #1, #2, and #4 using the air screw "1".
Note:
- After each step, rev the engine two or three times, each time for less than a second, and check the synchronization again.
- If the air screw is removed, turn the screw 3/ 4 turn in and be sure to synchronize the throttle body.
Caution! Do not use the throttle valve adjusting screws to adjust the throttle body synchronization.
Vacuum pressure at engine idling speed: 30 kPa (225 mmHg, 8.9 inHg).
Note: The difference in vacuum pressure between two throttle bodies should not exceed 1.33 kPa (10 mmHg, 0.39 inHg).

9. Measure:
- Engine idling speed. Out of specification → Adjust. Make sure that the vacuum pressure is within specification.
10. Stop the engine and remove the measuring equipment.
11. Adjust:
- Throttle cable free play. Refer to «Adjusting the throttle cable free play».
- Throttle cable free play (at the flange of the throttle grip) 3.0-5.0 mm (0.12-0.20 in).
12. Install:
- Synchronizing hoses
- Fuel tank. Refer to «Fuel tank».
- Rider and passenger seat. Refer to «General chassis».
