MotoInstruction.ru
Mobile
version
Articles
& news
Site
map
Feed
back
Add to
bookmark
English Русский
Aprilia
BMW
Ducati
Harley
Honda
Kawasaki
Suzuki
Triumph
Yamaha
Aprilia:
RS-series▾
RS125 [3] (1998-2005)
Shiver▾
SL750 (2007-2016)

Stanchion tube — slider assembly (Aprilia RS125/3)

  • Main
  • Aprilia
  • RS-series
  • RS 125 [3]
  • Running gear and frame
  • Front suspension and handlebar
  • Stanchion tube — slider assemb…
0
Read 1.2.1 carefully.

Inspect the components; see 7.10.5.

Warning!
  • Take care to prevent the ingress of dirt into slider and stanchion.
  • Never reuse the oil you have drained from the fork.


Note. Apply a light film of fork oil to the bushes and seals before assembly.


Insert the slide bush (1) and push into the slider using the spacer (2).

Insert the other slide bush (3). Push into place in the slider using a drift of adequate size.

Insert the guide bush cup (4) into the slider and push it into contact with slide bush (3).

Lubricate the oil seal (5).

Push the oil seal (5) into contact with the guide bush cap (4). The concave side of the seal must be facing into the slider.


Fit the following components to the stanchion in the order:
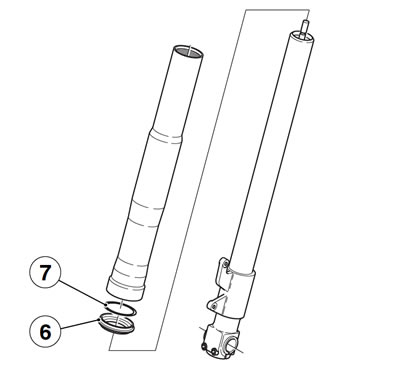
  • dust seal (6);
  • retaining ring (7);

Place the stanchion in a vice with soft (aluminium) jaws.

Fit the slider to the stanchion.

Install the retaining ring (7) and dust seal (6) so that they become seated into the slider.


Pour fork fluid into the slider.


Oil quantity: 430±2.5 cu cm.

Note. Oil level must be the same in both fork legs.


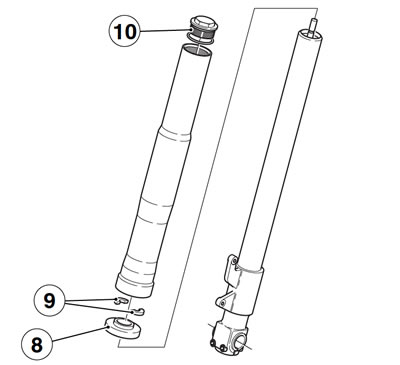
Insert the spring cup (8) and the two half-rings (9) into their seats on the damping cylinder rod.

Lift the slider.

Make sure the O-ring is in place on the top cap (10).

Screw the top cap (10) onto the slider and tighten.

See this article in russian language
◀ Previous
Aprilia RS125 3: Front suspension and handlebar
Next ▶

Front fork component inspection
Changing front fork oil
Disassembling the stanchion tubes — sliders
Removing the stanchion tubes — sliders
Front fork construction
Headstock re-assembly
Installing stanchions and sliders
Similar articles about motorcycles of other brands
BMW R 1150 GS (1999-2004): Removing and installing slider tube bridge Triumph Rocket III (2004-2018): Pistons — disassembly and assembly Yamaha FZ1 Fazer (2006-2015): Adjusting the Shock Absorber Assembly Suzuki DRZ 250 (1996-2007): Transmission assembly Honda CB 400 SF (1992-1999): Radiator electric fan — removal, disassembly, assembly and installation Ducati Monster 696 (2007-2014): Removal of the tail light-protection-number plate holder assembly Harley-Davidson V-Rod (2002-2006): Cylinder head — assembly Kawasaki ZX6R/ZX600J (2000-2002): Carburetor — assembly
Link to this article in different formats
TEXTHTMLBB Code
Comments and feedback from visitors
No comments yet, you will be the first!


Add up two numbers: 41 + 28


RS125 3 (1998-2005) 
  • Information for owner
  • Introduction to manual
  • Maintenance
  • Troubleshooting
  • Engine and systems
  • Engine repair
  • Fuel system
  • Cooling and lube system
  • Running gear and frame
  • Frame and hinged elements
  • Front suspension and handlebar
  • Rear suspension
  • Brake system
  • Wheels and tires
  • Electric equipment
  • Equipment and devices
  • Starting and charging system
Aprilia BMW Ducati Harley Honda Kawasaki Suzuki Triumph Yamaha
MotoInstruction.ru © 2021–2025 | Sitemap | Articles | Contacts | Site search | Add to bookmarks | Mobile version