
Removal
Warning: The engine must be completely cool before carrying out this procedure.
Note: If the radiators are being removed as part of the engine removal procedure, detach the hoses from their unions on the engine rather than on the radiators and remove the radiators with the hoses attached to it. Note the routing of the hoses.
1. Drain the cooling system (see Chapter 1).
2. Remove the fuel tank (see Chapter 4). On XL650V models remove the trim panel (see illustration 4.2b).
3. When removing the right-hand radiator, disconnect the fan wiring connector (see illustration 3.3a or b).
4. Slacken the clamps securing all the hoses to the radiator and detach them, noting which fits where (see illustrations).
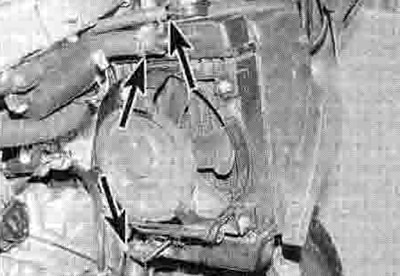
6.4a. Detach the hoses (arrowed) from the right-hand radiator...

6.4b ...and the left-hand radiator - XL600V shown
5. Support the radiator and unscrew its mounting bolts, then remove the radiator, noting how it fits (see illustrations). On XRV750 models, you will have to move a small rubber flap aside to access the bolts, and if required (for example if you are removing the engine) release the front stone guard from its mounts and remove it, noting how it fits (see illustration). Note the arrangement of the collars and rubber grommets in the radiator mounts.

6.5a. Unscrew the bolts (arrowed)...

6.5b ...and remove the radiator

6.5c. On XRV750 models move the rubber flap aside to access the bolts
6. If necessary, remove the cooling fan and its switch from the radiator (see Section 3). Remove the shroud/protective grill from the front of the radiator. Check the radiator for signs of damage and clear any dirt or debris that might obstruct air flow and inhibit cooling. If the radiator fins are badly damaged or broken the radiator must be replaced with a new one Also check the rubber mounting grommets, and renew them if necessary (see illustration).

6.6. Check the condition of the rubber grommets
Installation
Installation is the reverse of removal, noting the following.
- Make sure the collars and washers are correctly installed with the mounting bolts.
- Make sure that the fan wiring is correctly connected.
- Ensure the coolant hoses are in good condition (see Chapter 1), and are securely retained by their clamps, using new ones if necessary.
- On completion refill the cooling system as described in Chapter 1.