
Check
1. The water pump is located on the lower left-hand side of the engine. Visually check the area around the pump for signs of leakage.
2. To prevent leakage of water from the cooling system to the lubrication system and vice versa, two seals are fitted on the pump shaft. On the bottom of the pump housing there is also a drain hole (see illustration). If either seal fails, the drain allows the coolant or oil to escape and prevents them mixing. You will have to remove the belly pan to see the drain hole (see Chapter 8).
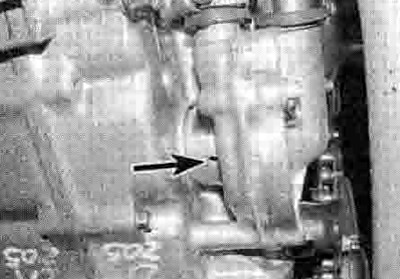
7.2. Check the drain hole (arrowed) for signs of leakage
3. The seal on the water pump side is of the mechanical type which bears on the rear face of the impeller. The second seal, which is mounted behind the mechanical seal, is of the normal feathered lip type. If on Inspection the drain shows signs of leakage, remove the pump and replace it with a new one - it comes as an assembly.
Removal
4. Drain the coolant and the engine oil (see Chapter 1). On XRV750 models, detach the oil cooler hoses from the oil distributor (see Chapter 2).
5. To remove the pump cover for inspection of the impeller, on XL models slacken the clamp securing the coolant hose to the cover and detach the hose (see illustration). On XRV models unscrew the bolt securing the pipe to the cover and detach the pipe. Discard its O-ring.

7.5. Slacken the clamp (arrowed) and detach the cover hose
6. Unscrew the four bolts and remove the cover, noting any wiring guide (see illustration). Remove the O-rlng from the cover or pump and discard it as a new one must be used. Note the locating dowels and remove them if they are loose.
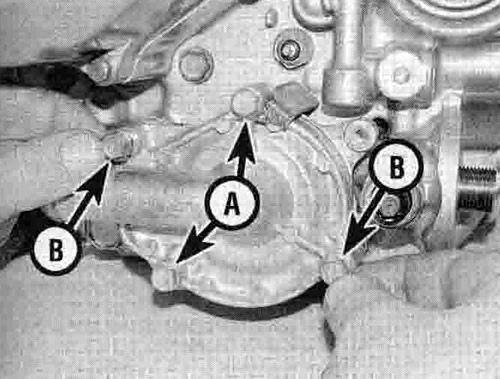
7.6. Water pump cover bolts (A and B) and mounting bolts (B)
7. Wiggle the water pump impeller back-and-forth and in-and-out. If there is excessive movement, replace the pump with a new one. Also check for corrosion or a build-up of scale in the pump body and clean or replace the pump as necessary. If you now need to remove the pump body, carefully draw it from the crankcase, noting how it fits (see illustration). It may be necessary to lever it out to overcome the О-ring on the pump body. Remove the О-ring from the rear of the pump body and discard it as a new one must be used (see illustration 7.10a).

7.7. Draw the pump out of the engine
8. To remove the pump assembly as a whole, on XL models slacken the clamps securing the coolant hoses to the pump cover and body and detach the hoses, noting which fits where (see illustration 7.5). On XRV750 models, unscrew the bolt securing the pipe to the cover and detach the pipe, then slacken the clamp securing the coolant hose to the body and detach the hose. Discard the pipe O-ring.
9. Unscrew the two pump mounting bolts and carefully draw the pump from the crankcase, noting how it fits (see illustration 7.6). It may be necessary to lever it out to overcome the О-ring on the pump body. Remove the O-ring from the rear of the pump body and discard it as a new one must be used (see illustration 7.10a).
Installation
10. Installation is the reverse of removal.

7.10a. Fit a new О-ring onto the pump body...
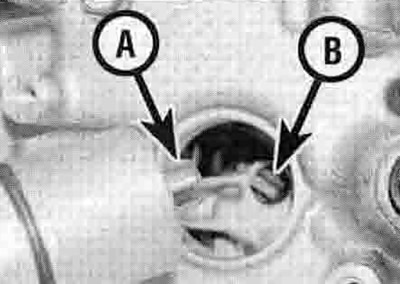
7.10b ...then install the pump, aligning the slot in the shaft (A) with the tab on the oil pump shaft (B)
Apply a smear of grease to the new pump body О-ring and fit it into the groove in the body (see illustration). Slide the pump into the crankcase, aligning the slot in the impeller shaft with the tab on the oil pump shaft (see illustration). Fit the coolant hose onto the pump body and secure it with the clamp. If the cover was not removed, install the mounting bolts and tighten them securely.
11. Smear the new cover О-ring with grease and fit it into its groove in the pump, then fit the cover onto the pump (see illustration) Install the bolts and tighten them securely.

7.11. Fit a new О-ring then install the cover
12. On XL models, fit the coolant hose onto the pump cover and secure it with the clamp (see illustration 7.5). On XRV models, fit the pipe into the cover using a new О-ring and tighten the bolt securely.
13. Use a new sealing washer on the drain bolt. Refill the cooling system (see Chapter 1).