
Check
1. A neglected drive chain won't last long and will quickly damage the sprockets. Routine chain adjustment and lubrication isn't difficult and will ensure maximum chain and sprocket life.
2. To check the chain, place the bike on its sidestand and shift the transmission into neutral. Make sure the ignition switch is OFF
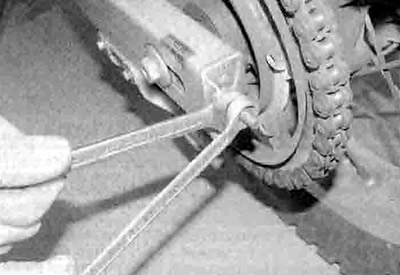
3. Push up on the bottom run of the chain midway between the two sprockets and measure the amount of slack, then compare your measurement to that listed in this Chapter's Specifications (see illustration). As the chain stretches with wear, adjustment will periodically be necessary (see below). Since the chain will rarely wear evenly, roll the bike forward so that another section of chain can be checked (having an assistant to do this makes the task a lot easier); do this several times to check the entire length of chain, and mark the tightest spot.
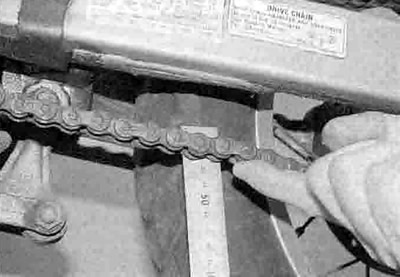
1.3 Push up on the chain and measure the slack
4. In some cases where lubrication has been neglected, corrosion and galling may cause the links to bind and kink, which effectively shortens the chain's length. Such links should be thoroughly cleaned and worked free. If the chain is tight between the sprockets, rusty or kinked, it's time to replace it with a new one. If you find a tight area, mark it with felt pen or paint, and repeat the measurement after the bike has been ridden. If the chain's still tight in the same area, it may be damaged or worn. Because a tight or kinked chain can damage the transmission bearings, it's a good idea to replace it with a new one.
5. Check the entire length of the chain for damaged rollers, loose links and pins, and missing O-rings, and replace it with a new one if damage is found.
Note: Never install a new chain on old sprockets, and never use the old chain if you install new sprockets - replace the chain and sprockets as a set.
6. Remove the front sprocket cover (see Chapter 6). Check the teeth on the front sprocket and the rear sprocket for wear (see 1 illustration).

1.6 Check the sprockets in the areas indicated to see if they are worn excessively
7. Inspect the drive chain slider on the front of the swingarm for excessive wear and damage. On some models there are wear limit lines marked on the front of the slider - replace it with a new one if it has worn down to the lines (see Chapter 6). If no lines are marked, renew the slider if it has worn to a thickness of 3 mm or less. Where fitted, similarly check the chain slipper near the rear sprocket, and renew it if it has worn to a thickness of 5 mm or less.
Adjustment
8. Move the bike so that the chain is positioned with the tightest point at the centre of its bottom run, then put it on the sidestand.
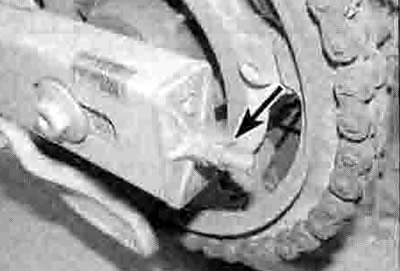
9. Slacken the rear axle nut (see illustration).

1.9 Slacken the axle nut (arrowed)
10. On XL models, slacken the locknut on the adjuster on each end of the swingarm (see illustration). Turn the adjuster nut on each side evenly until the amount of freeplay specified at the beginning of the Chapter is obtained at the centre of the bottom run of the chain (see illustration). Following adjustment, check that each chain adjustment marker is in the same position in relation to the rear edge of the axle cutout in the swingarm (see illustration). It Is important the same index line on each adjuster aligns with the rear edge of the cutout; if not, the rear wheel will be out of alignment with the front. If there is a discrepancy in the chain adjuster positions, adjust one of them so that its position is exactly the same as the other. Check the chain freeplay as described above and readjust if necessary. Also check the alignment of the wear decal on the left-hand adjustment marker with the arrow on the adjuster. When the arrow aligns with the red REPLACE CHAIN zone, the drive chain has stretched excessively and must be replaced with a new one. On completion, counter-hold the adjuster and tighten the locknut against it (see illustration).
1.10a Slacken the locknut (arrowed)...
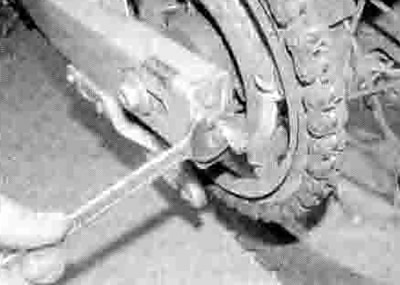
1.10b ... and turn the adjuster as required until the slack is correct
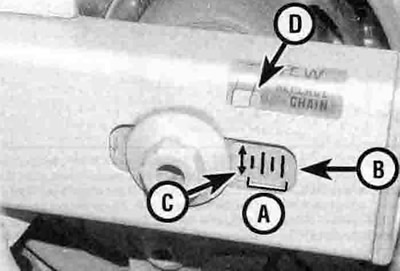
1.10c Make sure the alignment of the adjustment markers (A) in relation to the rear edge of the cutout (B) is the same on each side. Check the position of the arrow (C) in relation to the red zone (D)
1.10 On completion, counter-hold the adjuster and tighten the locknut against it
11. On XRV models, turn the eccentric adjuster on each side evenly until the amount of freeplay specified at the beginning of the Chapter is obtained at the centre of the bottom run of the chain (see illustration). Roilowing adjustment, check that each adjuster is in the same position in relation to the pin in the swingarm. It is important the same index line on each adjuster aligns with the pin; if not, the rear wheel will be out of alignment with the front. If there is a discrepancy in the chain adjuster positions, adjust one of them so that its position is exactly the same as the other. Check the chain freeplay as described above and readjust If necessary. Also check the alignment of the wear decal on the left-hand adjuster with the pin on the swingarm. When the red REPLACE CHAIN zone aligns with the pin, the drive chain has stretched excessively and must so replaced with a new one.

1.11 Adjust chain slack by turning the eccentric adjuster (A). Make sure the alignment of each adjuster in relation to the pin (B) is the same on each side. Renew the chain when the red zone (C) aligns with the pin (B)
12. Counter-hold the axle head and tighten the axle nut to the torque setting specified at the beginning of the Chapter. Recheck the adjustment as above, then place the machine on its centrestand or an auxiliary stand and spin the wheel to make sure it runs freely.
Cleaning and lubrication
13. If required, wash the chain in paraffin (kerosene) or a suitable non-flammable or high flash-point solvent that will not damage the О-rings, using a soft brush to work any dirt out if necessary. Wipe the cleaner off the chain and allow it to dry, using compressed air if available. If the chain is excessively dirty it should be removed from the machine and allowed to soak in the paraffin or solvent (see Chapter 6). Note that if the motorcycle is ridden off-road, the chain should be cleaned and lubricated more often.
Caution: Don't use petrol (gasoline), an unsuitable solvent or other cleaning fluids which might damage the internal sealing properties of the chain. Don't use high pressure water to clean the chain. The entire process shouldn't take longer than ten minutes, otherwise the О-rings could be damaged.
14. For routine lubrication, the best time to lubricate the chain is after the motorcycle has been ridden. When the chain is warm, the lubricant will penetrate the joints between the sideplates better than when cold. Note: Honda specifies SAE 80 to SAE 90 gear oil or an aerosol chain lube that it is suitable for О-ring or X-ring (sealed) chains; do not use any other chain lubricants - the solvents could damage the chain s sealing rings. Apply the oil to the area where the sideplates overlap - not the middle of the rollers (see illustration).

1.14 Use only the correct lubricant and apply it as described
Apply the lubricant to the top of the lower chain run, so centrifugal force will work the oil into the chain when
the bike is moving. After applying the lubricant, let it soak in a few minutes before wiping off any excess.
Warning: Take care not to get any lubricant on the tyres or brake system components. If any of the lubricant inadvertently contacts them, clean it off thoroughly using a suitable solvent or dedicated brake cleaner before riding the machine.