MotoInstruction.ru
Mobile
version
Articles
& news
Site
map
Feed
back
Add to
bookmark
English Русский
Aprilia
BMW
Ducati
Harley
Honda
Kawasaki
Suzuki
Triumph
Yamaha
Aprilia:
RS-series▾
RS125 [3] (1998-2005)
Shiver▾
SL750 (2007-2016)

Frame installation (Aprilia RS125/3)

  • Main
  • Aprilia
  • RS-series
  • RS 125 [3]
  • Running gear and frame
  • Frame and hinged elements
  • Frame installation
0
Read 1.2.1 carefully.

Torque wrench settings:
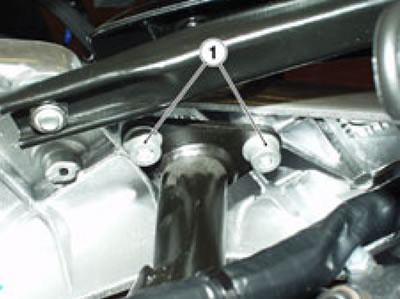
  • Upper screws (1): 22 Nm (2.2 Kgm)
  • Footpeg bracket screws (3): 22 Nm (2.2 Kgm)
  • Shock absorber to frame (4): 50 Nm (5.0 kg·m)
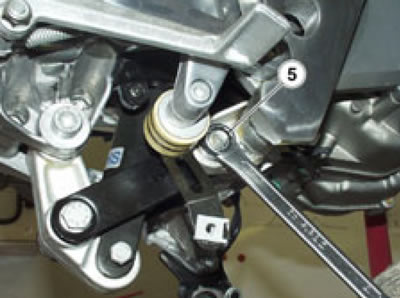
  • Linkages to frame (5): 50 Nm (5.0 kg·m)

Note. Each procedure is cross-referred to the relevant section of the manual and some of the operations described there may not be necessary for the job at hand. To avoid redundant work, always make sure you really need to remove a particular component before proceeding.


Position the frame head plate.

Working on both sides of the motorcycle, tighten the two upper screws (1).


Locate the two radiator brackets to the battery frame.

Working on both sides of the motorcycle, tighten the two screws (2) at the front end.

Install the seat subframe; see 7.4.10.

Install the side stand; see 7.4.9.

Install the front end; see 7.9.4.

Install the instrument panel/front fairing subframe; see 7.4.2.


Install the right-hand rider footpeg bracket; see 7.4.4.


Position the left-hand rider footpeg bracket.

Tighten the two screws (3).

Install the engine; see 6.2.4.


Position the rear swinging arm complete with shock absorber.

Insert the swinging arm spindle.

Insert the shock absorber top bolt (4) from the left side and tighten the nut.


Locate the linkages to the frame.

Insert the bolt from the left side and tighten the nut (5).

Adjust the swinging arm; see 2.17.3.


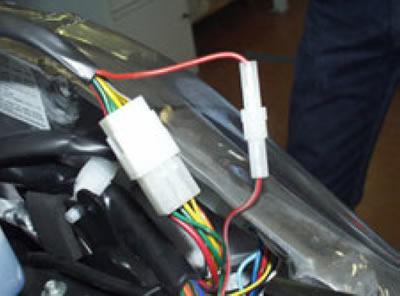
Connect the following electrical connectors in the order:


  • coil and coil ground;


  • horn;


  • starter relay;


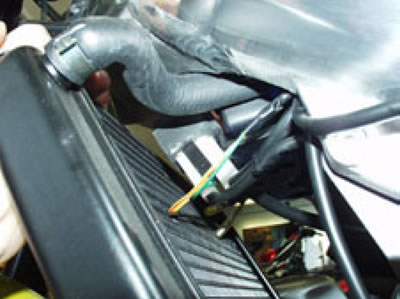
  • left light dip switch;


  • both connectors of the right light dip switch.


After re-installing the frame, check the following:
  • Ensure that all components are fastened securely.
  • Check that wiring and cables are properly routed and fastened.
  • Ensure that all electrical connectors are properly fitted to the matching connectors.
  • Turn the handlebars and check that cables and tubes do not bind.

Refit the fairings.
See this article in russian language
◀ Previous
Aprilia RS125 3: Frame and hinged elements
Next ▶

Frame removal
Seat subframe removal
Side stand removal
Passenger footpeg removal
Removing the passenger footpeg brackets
Removing the rider footpeg
Routing and connections of wiring, cables and hoses
Similar articles about motorcycles of other brands
Suzuki DRZ 250 (1996-2007): Frame Trim and Saddle Triumph Rocket III (2004-2018): Exploded view — frame and fixings Kawasaki ZX6R/ZX600J (2000-2002): Frame exploded view Honda CB 400 SF (1992-1999): Description of frame design Ducati ST2 (1997-2003): Brakes and frame — description and specification Harley-Davidson V-Rod (2002-2006): Frame and chassis specifications BMW R 1150 GS (1999-2004): Installing auxiliary frame (raising frame unit clear of engine)
Link to this article in different formats
TEXTHTMLBB Code
Comments and feedback from visitors
No comments yet, you will be the first!


Add up two numbers: 48 + 18


RS125 3 (1998-2005) 
  • Information for owner
  • Introduction to manual
  • Maintenance
  • Troubleshooting
  • Engine and systems
  • Engine repair
  • Fuel system
  • Cooling and lube system
  • Running gear and frame
  • Frame and hinged elements
  • Front suspension and handlebar
  • Rear suspension
  • Brake system
  • Wheels and tires
  • Electric equipment
  • Equipment and devices
  • Starting and charging system
Aprilia BMW Ducati Harley Honda Kawasaki Suzuki Triumph Yamaha
MotoInstruction.ru © 2021–2025 | Sitemap | Articles | Contacts | Site search | Add to bookmarks | Mobile version