MotoInstruction.ru
Mobile
version
Articles
& news
Site
map
Feed
back
Add to
bookmark
English Русский
Aprilia
BMW
Ducati
Harley
Honda
Kawasaki
Suzuki
Triumph
Yamaha
BMW:
F-series▾
F650GS (2000-2007)
R-series▾
R1150GS (1999-2004)
K-series▾
K1200LT (1998-2009)

Checking and adjusting operating clearance at front brake/clutch levers (BMW R1150GS)

  • Main
  • BMW
  • R-series
  • R 1150 GS
  • Running gear and frame
  • Front suspension and handlebar
  • Checking and adjusting operati…
0

Front brake


Remove cover from throttle-cable relay.

Remove the lower section of the brake lever fitting.
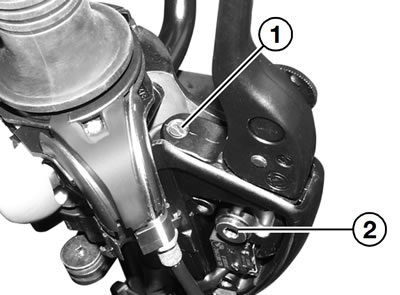


Back off adjusting screw (1).

Note: Thread is secured with Loctite, if necessary heat slightly prior to facilitate removal.


Remove pivot screw (2) of lever and remove the lever.

Clean and degrease the threads of the adjusting screw.

Coat the threads of the adjusting screw with Loctite 648 or Loctite 270 and screw it a few turns into the lever.

Apply a light coat of Optimoly MP 3 to the pressure pin of the adjusting screw.

Install the lever, making sure that the metal tab on the microswitch is correctly positioned.

Tighten the adjusting screw until the lever has zero play.

Tighten the adjusting screw another full turn.

Apply sealing lacquer to the adjusting screw.

Fully assemble the fitting.

Tightening torque: Pivot screw, handlebar lever (2) — 11 Nm


(Tuflok Blue thread-locking compound; screw can be released and tightened a number of times)

Clutch


Remove the lower section of the clutch lever fitting.

Remove the handlebar weight.

Remove the grip.

(Heated grips) Release the grip and pull it outwards.


Release the cold-start actuator and pull it outwards.

Back off the adjusting screw.

Note: Thread is secured with Loctite, if necessary heat slightly prior to facilitate removal.


Remove the pivot screw of lever and remove the lever.

Clean and degrease the threads of the adjusting screw.

Coat the threads of the adjusting screw with Loctite 648 or Loctite 270 and screw it a few turns into the lever.

Apply a light coat of Optimoly MP 3 to the pressure pin of the adjusting screw.

Install the lever, making sure that the metal tab on the microswitch is correctly positioned.

Tighten the adjusting screw until the lever has zero play.

Tighten the adjusting screw another half turn.

Apply sealing lacquer to the adjusting screw.

Fully assemble the fitting.

Tightening torque: Pivot screw, handlebar lever — 11 Nm


(Tuflok Blue thread-locking compound; screw can be released and tightened a number of times)
See this article in russian language
◀ Previous
BMW R1150GS : Front suspension and handlebar
Next ▶

Removing and installing clutch piston in handlebar fitting
Removing and installing brake piston in handlebar fitting
Removing and installing right handlebar fitting
Removing and installing left handlebar fitting
Disassembling and assembling leading link
Removing and installing leading link
Removing and installing handlebar
Removing and installing Bowden-cable divider
Disassembling Bowden-cable divider
Similar articles about motorcycles of other brands
Yamaha FZ1 Fazer (2006-2015): Checking the front brake pads Aprilia RS 125/3 (1998-2005): Checking and topping up the front brake fluid level Honda CB 400 SF (1992-1999): Front Brake Light Sensor — Removal and Installation, Checking Ducati ST2 (1997-2003): Checking front brake pad wear, changing brake pads Triumph Rocket III (2004-2018): Exploded view — front brake master cylinder Suzuki DRZ 250 (1996-2007): Checking brake hoses Kawasaki ZX6R/ZX600J (2000-2002): Front brake pad — removal and installation Harley-Davidson V-Rod (2002-2006): Front brake master cylinder and reservoir
Link to this article in different formats
TEXTHTMLBB Code
Comments and feedback from visitors
No comments yet, you will be the first!


Add up two numbers: 37 + 38


R1150GS (1999-2004) 
  • Information for owner
  • Introduction to manual
  • Maintenance
  • Engine and systems
  • Engine repair
  • Fuel and exhaust systems
  • Transmission
  • Running gear and frame
  • Frame and hinged elements
  • Front suspension and handlebar
  • Rear wheel drive
  • Wheels and tires
  • Brake system
  • Electric equipment
  • Equipment and devices
  • Starting and charging system
Aprilia BMW Ducati Harley Honda Kawasaki Suzuki Triumph Yamaha
MotoInstruction.ru © 2021–2025 | Sitemap | Articles | Contacts | Site search | Add to bookmarks | Mobile version