
Drain the clutch operating system.
Caution! Do not allow brake fluid to come into contact with painted parts of the motorcycle as brake fluid destroys paint.
Remove the lower section of the clutch lever fitting.
Remove the handlebar weight.
Remove the grip.
(Heated grips) Release the grip and pull it outwards.
Release the cold-start actuator and pull it outwards.
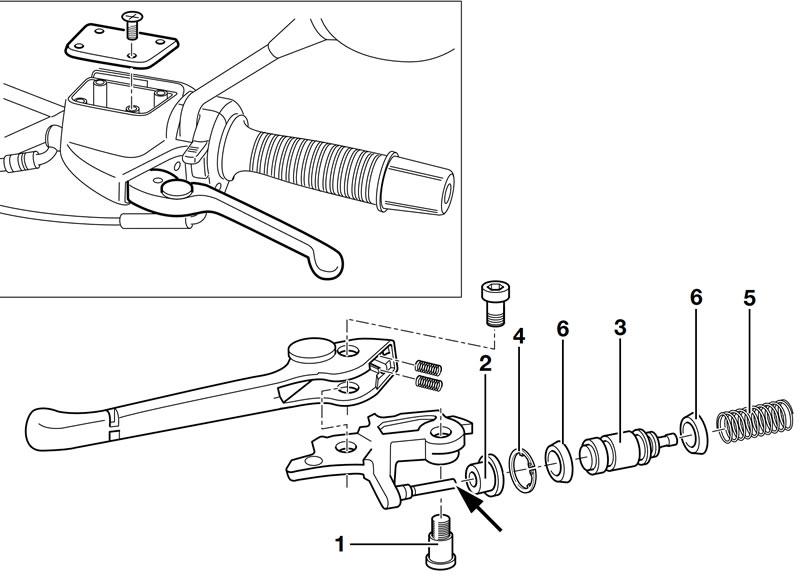
Remove pivot screw (1) of lever and remove the lever.
Remove rubber boot (2).
Caution! Note that clutch piston (3) is spring-loaded.
Carefully press back clutch piston (3) and remove retaining ring (4).
Remove clutch piston (3) with spring (5).
Installation is the reverse of the removal procedure: pay particular attention to the following.
Prior to installation, coat the piston and the boots (6) with brake fluid.
Caution! Sealing lips of the boots (6) toward the pressure chamber.
Prior to installation, carefully press back the clutch piston using an Allen key with T-bar handle, for example.
Use cranked-tip snap-ring pliers to install the retaining ring.
Apply a light coat of Optimoly MP 3 to the pressure pin (arrow) on the lever.
Caution! When installing the clutch lever, make sure that the metal tab on the microswitch is correctly positioned (otherwise switch will not work).
Fill and bleed the clutch operating system.
Check operating clearance and adjust if necessary. See 32.9
Tightening torque: Pivot screw, handlebar lever (1) — 11 Nm
(Tuflok Blue thread-locking compound; screw can be released and tightened a number of times)