MotoInstruction.ru
Mobile
version
Articles
& news
Site
map
Feed
back
Add to
bookmark
English Русский
Aprilia
BMW
Ducati
Harley
Honda
Kawasaki
Suzuki
Triumph
Yamaha
Ducati:
ST series▾
ST2 (1997-2003)
Monster▾
Monster 696 (2007-2014)

Changing the rear sprocket — inspection (Ducati ST2)

  • Main
  • Ducati
  • ST series
  • ST2
  • Engine and systems
  • Transmission
  • Changing the rear sprocket — i…
0
Contents: Inspection ↓ Reassembly ↓
To change the rear sprocket you must first remove the complete rear wheel from the bike following the instructions given above in "Removing the rear wheel".

Proceed as follows:

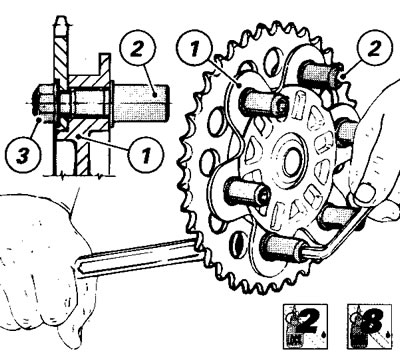
Remove the complete sprocket flange (1) from the wheel.

Clamp the pins (2) at the cush drive rubbers and unscrew the nuts (3) holding the sprocket to the flange.

Clamp the pins (2) at the cush drive rubbers and unscrew the nuts (3) holding the sprocket to the…


Remove the flange.

Inspection


The rear sprocket, the primary drive sprocket and the chain must all be changed together.

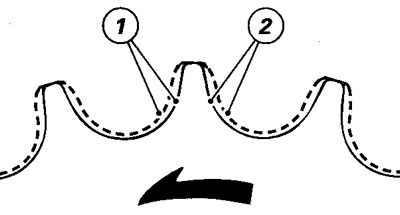
Check the wear of the primary drive and rear sprocket teeth (1 and 2). If the tooth profile is as shown by the continuous line in the figure, change the sprocket.

Check the wear of the primary drive and rear sprocket teeth (1 and 2). If the tooth profile is as…


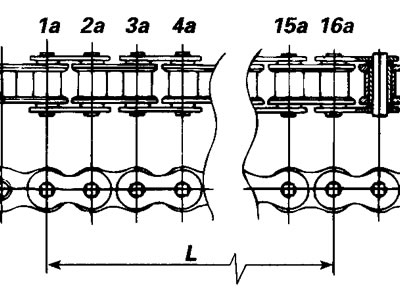
To check chain wear, stretch the chain and measure 16 links.

If the length (L) of 16 links is longer than 256.5 mm/10.098 in., change the chain.


If the length (L) of 16 links is longer than 256.5 mm/10.098 in., change the chain.


To change the primary drive sprocket, see "Removing the primary drive sprocket".

Reassembly


Check that all the pins (2) are securely fixed and tightened to the flange (1). If the pins are loose, unscrew the pins, clean the threads and apply high-strength retaining compound to the large threads.

Fit and tighten the pins to the flange to the specified torque.

Apply medium-strength threadlocker to the threads on the end of the pins (2).

Fit the new sprocket, clamp the pins and tighten the sprocket nuts against the pins to the torque specified.

Warning! Follow the above procedure closely. The pins must be fully tightened before the sprocket is fitted and tightened. If the pins are not fully tightened before the sprocket is fitted, the sprocket will be incorrectly mounted. Loose sprocket pins and an incorrectly mounted sprocket will make the bike dangerous to ride.
See this article in russian language
This article has been reviewed: Evgeny Bogomolov
◀ Previous
Ducati ST2 : Transmission
Next ▶

Removing the final drive sprocket
Removing the gear change lever, the sprocket cover and the…
Adjusting chain tension
Washing and lubrication the chain
Clutch cylinder and hose routing
Disassembly gear selector
Disassembly clutch
Similar articles about motorcycles of other brands
Rear cam chain drive sprocket Suzuki Boulevard M109R (2006-2025)
Rear sprocket carrier bearings — disassembly Triumph Street Triple 765 (2017-2024)
Removing the brake disc and rear wheel sprocket Yamaha FZ1 Fazer (2006-2015)
Rear sprocket — removal and installation Kawasaki ZX6R/ZX600J (2000-2002)
Rear sprocket coupling/rubber dampers — check and… Honda Africa Twin 750 (1989-2003)
Link to this article in different formats
TEXTHTMLBB Code
Comments and feedback from visitors
No comments yet, you will be the first!


Add up two numbers: 39 + 14


ST2 (1997-2003) 
  • Information for owner
  • Technical characteristics
  • Maintenance
  • Engine and systems
  • Engine repair
  • Fuel and exhaust system
  • Fuel injection
  • Cooling and lube system
  • Transmission
  • Running gear and frame
  • Frame and hinged elements
  • Wheels and tires
  • Brake system
  • Front suspension and handlebar
  • Rear suspension
  • Electric equipment
  • Equipment and devices
  • Starting and charging system
Aprilia BMW Ducati Harley Honda Kawasaki Suzuki Triumph Yamaha
MotoInstruction.ru © 2021–2025 | Sitemap | Articles | Contacts | Site search | Add to bookmarks | Mobile version