
Rear brake caliper
1. Remove the rear master cylinder reservoir cap. As the pistons are pushed back into the caliper, fluid level may rise more than 3.2 mm (1/8 in.). You may have to remove fluid to allow for this.
2. See Figure 1-31. Loosen, but do not remove, both pad pins (12 pt/0.25 in.).
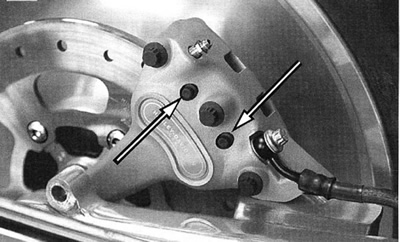
Figure 1-31. Rear caliper pad pins (12 pt/0.25 in.)
3. Pry the inside pad back. Use steady pressure to prevent scoring the brake disc. Pry between the pad and the brake disc in order to push the caliper pistons back into their bores.
Caution! Do not completely pull pad pins from caliper during the next step. Completely removing pad pins at this time will cause difficulty during assembly.
4. Once the pistons have been fully retracted into their bores, pull pad pins part way until the inside pads drop free. Note the pad’s original orientation for replacement purposes.
Note. See Figure 1-32. Install pad with two tabs (1) on the inboard side of the rear caliper.
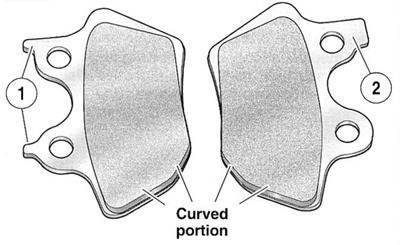
Figure 1-32. Brake pad orientation: 1. Two tabs on backing plate; 2. Single square tab on backing plate
5. Install new inside brake pad using the same orientation as the pad previously removed. Curved portion of pad must face upward.
6. Install pad pins until the pins snap into place with an audible click. Do not fully tighten at this time.
7. Pump brake pedal lever to move inside pistons out until they contact the brake pads.
8. Pry the outside pad back. Pry between the pad and the brake disc in order to push the caliper pistons back into their bores.
9. Verify that inside pads are captured between brake disc and pistons. Completely remove pad pins to free outside brake pad. Note the pad’s original orientation for replacement purposes.
10. Install new outside brake pad using the same orientation as the pad previously removed. If the inside pad moved during the previous step, reinstall. Curved portion of pad must face upward.
11. Install both pad pins through holes in inner and outer brake pads. Tighten to 20.3-22.6 Nm (180-200 in-lbs).
Warning! Whenever new pads are installed, BEFORE moving motorcycle, you must pump brake fluid until the pistons push the pads against the brake disc. If you don’t pump fluid pressure up again, the brakes will not be available to stop the motorcycle which could result in death or serious injury.
12. Pump brake pedal to move pistons out until they contact both brake pads. Verify piston location against pads.
13. Check brake fluid level in master cylinder. Fill to proper level if necessary using DOT 5 SILICONE BRAKE FLUID. Install master cylinder reservoir cap. Tighten reservoir cap screws to 0.7-0.9 Nm (6-8 in-lbs).
Warning! After completing repairs or bleeding the system, always test motorcycle brakes at low speed. If brakes are not operating properly or braking efficiency is poor, testing at high speeds could result in death or serious injury.
14. Test brake system.
- a. Turn ignition switch ON. Pump brake pedal to verify operation of the brake lamp.
- b. Test ride the motorcycle. If the brakes feel spongy, bleed the system. See 1.9 Bleeding brakes.
Note. Avoid making hard stops for the first 100 miles (160 km). This allows the new pads to become conditioned to the brake discs.
Front brake caliper
1. Remove the front master cylinder reservoir cap. As the pistons are pushed back into the caliper, fluid level may rise more than 1/8 in. (3.2 mm). You may have to remove fluid to allow for this.
2. See Figure 1-33. Loosen, but do not remove, both pad pins (3) (12 pt/0.25 in.).
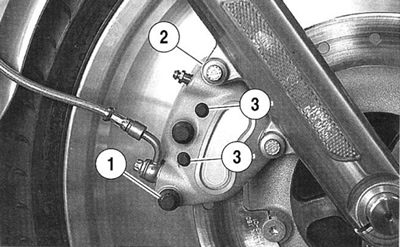
Figure 1-33. Front brake caliper (right side shown): 1. Short mounting bolt (12 pt/10 mm); 2. Long mounting bolt (12 pt/10 mm); 3. Pad pins (12 pt/0.25 in)
3. Remove both caliper mounting bolts (1, 2) (metric). Detach caliper from front forks and brake disc.
4. Pry the pads back to force all four caliper pistons into their bores.
5. With the pistons retracted, remove the pad pins and brake pads.
Notes:
- See Figure 1-32. On the right side of the vehicle, the pad with two tabs (1) installs on the inboard side of the caliper.
- On the left side of the vehicle, the pad with two tabs (1), installs on the outboard side of the caliper.
- Do not substitute front and rear brake pads.
6. Install new pads into caliper. Curved portion of pad must face rear of motorcycle.
7. Loosely install the pad pins until you hear an audible click.
8. Attach caliper to front fork.
- a. See Figure 1-33. Place caliper over brake disc with bleeder valve facing upwards.
- b. Loosely install long mounting bolt (2) (12 pt/1O mm) into top hole on fork leg.
- c. Install short mounting bolt (1) (12 pt/1O mm) into bottom hole on fork leg. Tighten bottom mounting bolt to 38.0-51.5 Nm (28-38 ft-lbs).
- d. Final tighten the top mounting bolt to 38.0-51.5 Nm (28-38 ft-lbs).
- e. Final tighten both pad pins to 20-23 Nm (180-200 in-lbs).
Warning! Whenever new pads are installed, BEFORE moving motorcycle, you must pump brake fluid until the pistons push the pads against the brake disc. If you don’t pump fluid pressure up again, the brakes will not be available to stop the motorcycle which could result in death or serious injury.
9. Pump brake hand lever to move pistons out until they contact both brake pads. Verify piston location against pads. If the front wheel is off the ground, rotate wheel to check for excessive brake pad drag.
10. Check brake fluid level in master cylinder. Fill to proper level if necessary using DOT 5 SILICONE BRAKE FLUID. Install master cylinder reservoir cap. Tighten reservoir cap screws to 0.7-0.9 Nm (6-8 in-lbs).
Warning! After completing repairs or bleeding the system, always test motorcycle brakes at low speed. If brakes are not operating properly or braking efficiency is poor, testing at high speeds could result in death or serious injury.
11. Test brake system.
- a. Turn ignition switch ON. Pump brake hand lever to verify operation of the brake lamp.
- b. Test ride the motorcycle. If the brakes feel spongy, bleed the system. See 1.9 Bleeding brakes.
Note. Avoid making hard stops for the first 100 miles (160 km). This allows the new pads to become conditioned to the brake discs.