MotoInstruction.ru
Mobile
version
Articles
& news
Site
map
Feed
back
Add to
bookmark
English Русский
Aprilia
BMW
Ducati
Harley
Honda
Kawasaki
Suzuki
Triumph
Yamaha
Honda:
Africa Twin▾
XRV750 (1989-2003) CRF1000L (2015-2020)
CB series▾
CB400SF [1] (1992-1999)
VTX series▾
VTX1800C (2001-2008)

Valve guide replacement (Honda VTX1800C)

  • Main
  • Honda
  • VTX series
  • VTX 1800 C
  • Engine and systems
  • Engine repair
  • Valve guide replacement
0
Chill the valve guides in a freezer for approximately 1 hour.

Heat the cylinder head to 130-140°C (275-290°F) with a hot plate or oven. Do not heat the cylinder head beyond 150°C (300°F). Use temperature indicator sticks, available from welding supply stores, to be sure the cylinder head is heated to the proper temperature.

Wear insulated gloves to avoid burns when handling the heated cylinder head.


Notice. Using a torch to heat the cylinder head may cause warpage.


Support the cylinder head and drive out the old guides from the combustion chamber side of the cylinder head.


Tools:
  • IN: Valve guide driver, 6.6 mm — 07942-6570100
  • EX: Valve guide driver, 8 mm — 07ZMD-MCHA100

Drive the new guides in from the camshaft side of the cylinder head while the cylinder head is still heated.

Tools:
  • IN: Valve guide driver, 6.6 mm — 07942-6570100
  • EX: Valve guide driver, 8 mm — 07ZMD-MCHA100

Valve guide projection above cylinder head:
  • IN: 16.4-16.6 mm (0.646 - 0.654 in)
  • EX: 17.7-17.9 mm (0.697 - 0.705 in)


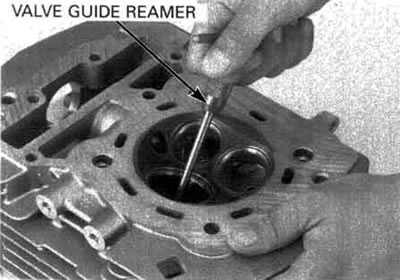
Let the cylinder head cool to room temperature, then ream the new valve guides.


Tools:
  • IN: Valve guide reamer, 6.6 mm — 07984-657010D
  • EX: Valve guide reamer, 8 mm — 07ZMH-MCHA200

When reaming, do not tilt the reamer or the valve will be slanted after installation. A slanted valve will result in oil leaking past the stem seal. This will cause improper valve seat contact resulting in a valve seat that cannot be refaced.

Insert the reamer from the combustion chamber side of the head and always rotate the reamer clockwise.

Clean the cylinder head thoroughly to remove any metal particles after reaming and then reface the valve seat.

See this article in russian language
◀ Previous
Honda VTX1800C : Engine repair
Next ▶

Cylinder head inspection
Cylinder head disassembly
Cylinder head removal
Camshaft inspection
Camshaft holder disassembly
Camshaft removal
Valve seat inspection and refacing
Cylinder head assembly
Cylinder head installation
Camshaft installation
Cylinder head cover installation
Service information of cylinder and piston
Similar articles about motorcycles of other brands
Kawasaki ZX6R/ZX600J (2000-2002): Valve guide — removal and installation Suzuki Boulevard M109R (2006-2025): Service data of valve and guide Yamaha FZ1 Fazer (2006-2015): Adjusting the valve clearance Triumph Rocket III (2004-2018): Valve clearances Harley-Davidson V-Rod (2002-2006): Valve lash measurment BMW R 1150 GS (1999-2004): Checking/adjusting valve clearances Ducati ST2 (1997-2003): Checking valve clearances Aprilia RS 125/3 (1998-2005): RAVE valve specifications
Link to this article in different formats
TEXTHTMLBB Code
Comments and feedback from visitors
No comments yet, you will be the first!


Add up two numbers: 11 + 14


VTX1800C (2001-2008) 
  • Information for owner
  • Control devices
  • Operation manual
  • Maintenance
  • Engine and systems
  • Engine repair
  • Fuel and control system
  • Cooling system
  • Lube system
  • Transmission
  • Running gear and frame
  • Frame and hinged elements
  • Front suspension and handlebar
  • Rear suspension
  • Brake system
  • Electric equipment
  • Equipment and devices
  • Ignition system
  • Starting and charging system
Aprilia BMW Ducati Harley Honda Kawasaki Suzuki Triumph Yamaha
MotoInstruction.ru © 2021–2025 | Sitemap | Articles | Contacts | Site search | Add to bookmarks | Mobile version