
Lamps in lighting devices heat up to a high temperature when the lights are on and remain hot for some time after the lights are turned off. Allow the lamp to cool before handling it.
Do not touch the headlight bulb bulb with your fingers, as grease stains on the surface of the bulb may damage it. Wear clean gloves when replacing the lamp. If you touch the lamp bulb with bare fingers, wipe it with a cloth soaked in alcohol to prevent rapid damage.
Remember to turn off the ignition when replacing the lamp.
Do not use lamps other than those recommended.
After installing a new lamp, check the functionality of the lighting device.
Headlight and parking light bulbs
1. Remove two screws (1) from the headlight housing.
2. Lightly pull the bottom edge of the headlight (2) and pull it forward from the headlight housing.
3. Disconnect the connector block (3).
4. Headlight bulb:
- remove the rubber socket (4).
- press the latch (6) and remove the lamp (5).
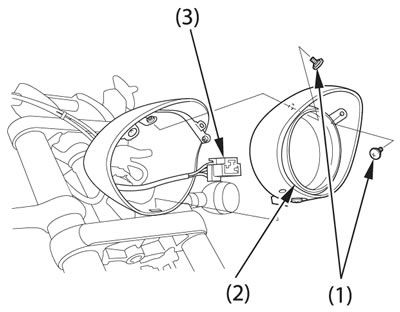
(1) Screws; (2) Headlight; (3) Connector
Parking light lamp (except type U):
- remove the cartridge (7).
- take out the lamp (8) parking light from the socket.
5. Install the new lamp by performing the steps in reverse order. Install the dust cap with the "TOP" mark " (9) up.
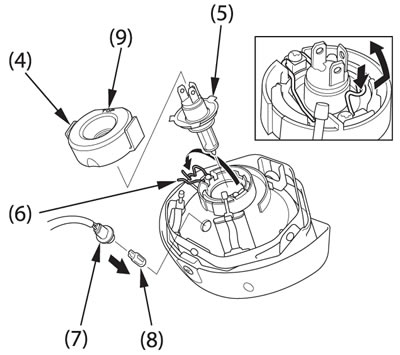
(4) Rubber socket; (5) Headlight bulb; (6) Retainer; (7) Cartridge; (8) Side lamp lamp; (9) "TOP" label "
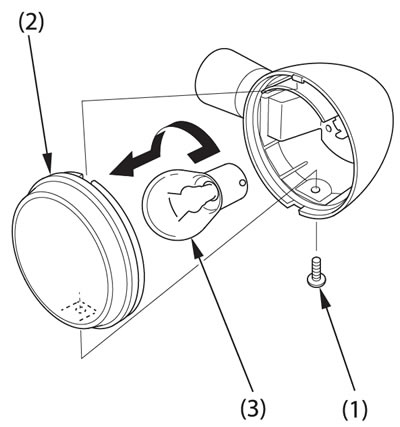
Brake and tail lamp
1. Remove two screws (1).
2. Remove the diffuser (2) rear light.
3.Press lightly on the lamp (3) and turn it counterclockwise.
4. Install the new lamp by performing the steps in reverse order.
(1) Screws; (2) Back light; (3) Lamp
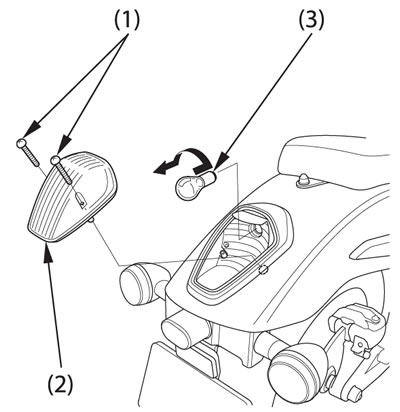
Front and rear turn signal lamps
1. Remove the screw (1).
2. Remove the diffuser (2) turn signal.
3. Take out the lamp (3) pressing it and turning it counterclockwise.
4. Install a new lamp and check how the turn signal works.
(1) Screw; (2) Turn signal lenses; (3) Lamp
Registration plate lamp
1. Remove the screen (1) lantern and diffuser (2) lamp by unscrewing two nuts (3) and removing the washers (4).

(1) Registration plate light screen; (3) Nuts; (4) Washers
2. Press lightly on the lamp (5) and turn it counterclockwise.
3. Install the new lamp by performing the steps in reverse order.

(2) Registration plate light lens; (5) Lamp