
Removal
1. Lift the rear wheel using a hoist.
2. Unscrew the nut (1) axes, holding the axle from rotating (2) using a wrench.
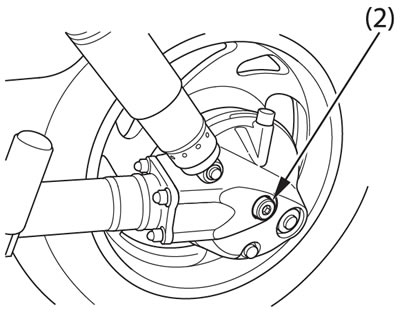
(2) Wheel axle
3. Remove the screw (3) rear brake bracket.
4. Pull the rear axle out.
5. Remove the bracket (4) rear brake.
6. Move the wheel to the left to separate it from the final drive housing.
7. Rotate the rear wheel.
Secure the rear brake caliper before removing the rear axle to prevent the caliper from hanging on the brake hose. Do not twist the brake hose. Do not allow grease, oil or dirt to come into contact with the brake disc or brake pads. Any contamination can cause poor braking performance and accelerate brake pad wear after assembly.
Do not press the brake pedal with the wheel removed. The caliper piston will be forced out of the cylinder, causing brake fluid to leak out. If this happens, the brake system will have to be repaired. Contact your authorized Honda dealer to perform this operation.

(1) Axial nut; (3) Bracket screw; (4) Brake bracket
Installation
When installing the rear wheel, perform the above steps in reverse order.
Before installing the rear wheel, make sure that the wheel hub and final drive splines are lubricated with grease.
Make sure the wheel hub splines are aligned with the final drive splines.
Tighten the screws and nuts to the following torque:
- Axle nut: 110 Nm
- Bracket screw: 69 Nm
To avoid damaging the brake pads when installing the wheel, be careful when inserting the brake disc between the brake pads.
After installing the wheel, press the brake pedal several times and then check whether the wheel rotates freely. If the wheel does not rotate freely, or the brake pads rub against the disc, recheck the wheel.
If a torque wrench was not used during assembly, have your vehicle inspected by an authorized Honda dealer as soon as possible to ensure proper assembly. Incorrect assembly may result in loss of braking properties.