
Removal
Warning! Before starting work, ensure the motorcycle is stabilised and adequately supported. This will help prevent it from falling and causing injury to the operator or damage to the motorcycle.
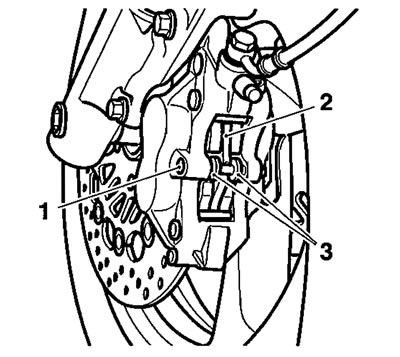
1. Retaining pin; 2. Anti-rattle spring; 3. Brake pads
1. Remove the brake pad retaining pin after removing and discarding its split pin. Inspect the retaining pin for damage.
2. Remove the anti-rattle spring and inspect the spring for damage.
Caution!
- In the following operation, never lever directly against the disc, caliper or the pad lining material as this will damage these components. Always use a levering tool made from a soft material that will not cause damage to the load bearing surfaces.
- Brake fluid will be displaced as the caliper pistons are compressed. To prevent paint damage, ensure that the displaced fluid does not come into contact with any part of the bodywork.
3. Carefully push the brake pads apart to force the caliper pistons back and allow withdrawal of the pads.
4. Remove both brake pads and inspect for damage and wear beyond the service limit.

Brake pad removal
Note: Complete the assembly of the brake pads to one caliper (see assembly for details) before removing the pads from the other caliper.
Installation
Warning!
- Never use mineral based grease in any part of the braking system or in any area where contact with the braking system is possible. Mineral based grease will damage the hydraulic seals in the calipers and master cylinders.
- Damage caused by contact with mineral based grease may reduce braking efficiency resulting in loss of motorcycle control and an accident.
1. Fit new brake pads as an axle set or, if all the pads are in a serviceable condition, clean the pad grooves before refitting all pads in their original positions.

Installing brake pads
Warning! Do not apply more than a minimum coating of grease to the pad retaining pins. Excess grease may contaminate the brake pads, hydraulic seals and discs causing reduced braking efficiency leading to loss of motorcycle control and an and an accident.
2. Lubricate the pad retaining pins using a minimum amount of proprietary high temperature "Copperslip" type grease.
3. Fit the anti-rattle spring over the pads and push down in the centre to allow the pad retaining pin to slide across the top of the spring.
4. Tighten the pad retaining pin to 18 Nm, and secure with a new split pin.
5. Pump the brake lever to correctly position the caliper pistons.
Warning! Use only DOT 4 specification brake fluid as fisted in the general information section of this manual. The use of brake fluids other than those DOT 4 fluids listed in the general information section may reduce the efficiency of the braking system leading to an accident. Observe the brake fluid handling warnings given on page 1.4.
Caution! To prevent paint damage, do not spill brake fluid onto any area of the bodywork. Spilled brake fluid will damage paintwork.
6. Check the front brake fluid level and top up as required with new DOT 4 fluid.
7. Check the operation of the front brake. Rectify as necessary.
Warning! It is dangerous to operate the motorcycle with defective brakes and you must have your authorised Triumph Dealer take remedial action before you attempt to ride the motorcycle again. Failure to take remedial action may reduce braking efficiency leading to loss of motorcycle control and an accident.