
Removal
Warning! Before starting work, ensure the motorcycle is stabilised and adequately supported. This will help prevent it from falling and causing injury to the operator or damage to the motorcycle.
1. Remove the seat and disconnect the battery negative (black) lead first.
Caution! To prevent paint damage, do not spill brake fluid onto any area of the bodywork. Spilled brake fluid will damage paintwork.
2. To drain the fluid from the master cylinder, attach a tube to the right hand caliper bleed nipple, slacken the nipple and operate the brake lever until all fluid has been expelled into a suitable container.
3. Remove the right hand switch cube as described on page 11.116.
4. Disconnect the throttle cables as described on page 11.116.
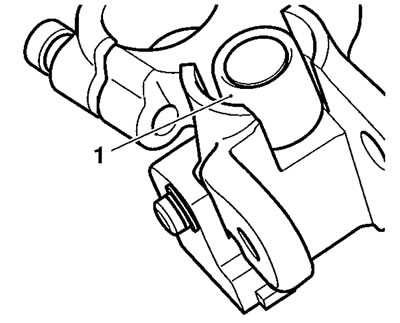
5. Note the setting of the brake lever adjuster to ensure it is returned to the same position when the overhaul operation is complete.

1. Lever; 2. Adjuster wheel; 3. Triangular mark
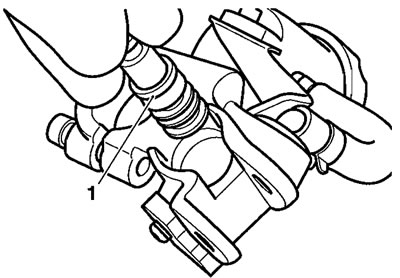
6. Disconnect the brake hose and brake light switch connections to the master cylinder.
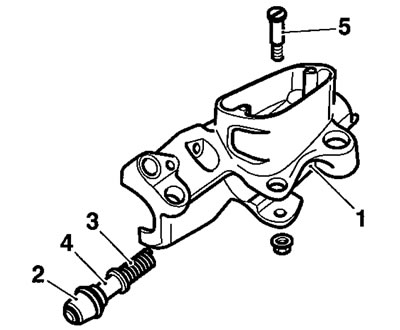
7. Release the clamp screws from the handlebar to remove the master cylinder.
Disassembly
1. Remove the pivot locknut and bolt securing the brake lever to the master cylinder. Remove the lever.
2. Detach the dust cover from the lever end of the cylinder.
1. Dust cover
3. Remove the circlip from beneath the dust cover.
1. Circlip
4. Remove the piston set from the master cylinder bore noting the relative position of the seals and piston components.
1. Piston Set
Inspection
1. Check the following for wear, damage, cracks or deterioration:
1. Cylinder bore; 2. Dust cover; 3. Spring; 4. Piston; 5. Pivot bolt
Note: Always renew the piston and seal set if the cylinder is dismantled.
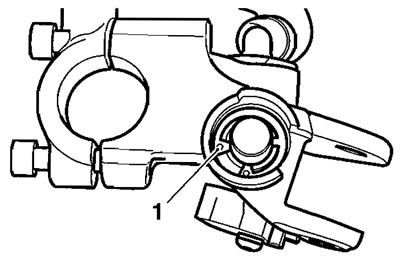
2. Check that the relief and supply ports on the cylinder are not blocked.
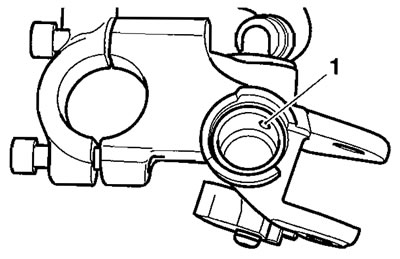
1. Ports
Assembly
Warning! Never use mineral based grease in any part of the braking system or in any area where contact with the braking system is possible. Mineral based grease will damage the hydraulic seals in the calipers and master cylinders. A dangerous riding condition leading to loss of motorcycle control and an accident could result if this warning is ignored.
1. Lubricate the piston and cylinder with new, clean brake fluid.
Warning! Ensure that the piston and piston seal are fitted facing the same way as noted during removal. A dangerous riding condition leading to loss of motorcycle control and an accident could result from incorrect assembly of the master cylinder.
2. Fit the new piston set into the master cylinder and retain with a new circlip.
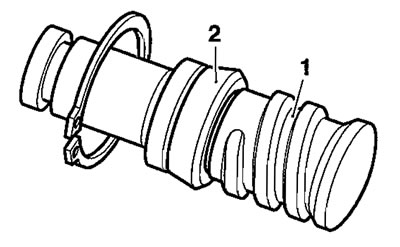
1. Piston; 2. Seal (in correct orientation); 3. Refit the master cylinder dust cover
Installation
1. Locate the master cylinder to the handlebars.
2. Position the clamp to the rear side of the handlebars.
3. Align the master cylinder/clamp split line with the dot mark on the underside of the handlebar.
1. Split line; 2. Dot mark
4. Tighten the clamp bolts, upper first and then the lower to 15 Nm.
5. Connect the brake light switch.

1. Brake light switch connections
6. Position the brake lever ensuring that pivot boss is correctly aligned to the push rod.
7. Fit and tighten the pivot bolt to 6 Nm, and the locknut to 1 Nm.
8. Connect the brake hose to the master cylinder incorporating new sealing washers to each side of the union. Tighten the union bolt to 25 Nm.
Warning!
- Use only DOT 4 specification brake fluid as listed in the general information section of this manual. The use of brake fluids other than those DOT 4 fluids listed in the general information section may reduce the efficiency of the braking system leading to loss of motorcycle control and an accident.
- Observe the brake fluid handling warnings given earlier in this section of the manual.
Caution! To prevent body damage, do not spill brake fluid onto any area of the bodywork. Spilled brake fluid will damage paintwork.
9. Reconnect and adjust the throttle cables as described on page 11.117.
10. Refit the right hand switch cube. Tighten the screws to 3 Nm.
11. Fill and bleed the front brakes as described on page 15.9.
Warning! Always return the lever adjuster to the original setting noted during removal. Operating the motorcycle with lever settings that are unfamiliar may lead to loss of control or an accident.
12. Reset the brake lever adjuster to the original setting.
13. Examine the system for correct operation and fluid leaks. Rectify as necessary.
14. Check the operation of the front brake. Rectify as necessary.
Warning! It is dangerous to operate the motorcycle with defective brakes and you must have your authorised Triumph Dealer take remedial action before you attempt to ride the motorcycle again. Failure to take remedial action may reduce braking efficiency leading to loss of motorcycle control and an accident.
15. Connect the battery positive, (red) lead first, and refit the seat.