
Warning! Before starting work, ensure the motorcycle is stabilised and adequately supported. This will help prevent it from falling and causing injury to the operator or damage to the motorcycle.
1. Remove the cap from the rear bleed nipple.
2. Attach a transparent tube to the bleed nipple.
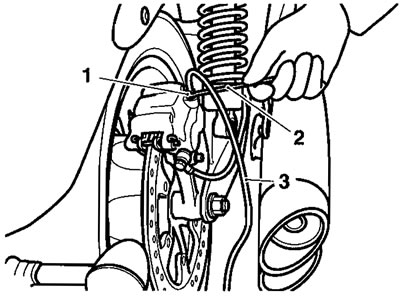
1. Bleed nipple; 2. Spanner; 3. Bleed tube
3. Place the other end of the tube in a suitable receptacle containing new brake fluid.
Caution! To prevent paint damage, do not spill brake fluid onto any area of the bodywork. Spilled brake fluid will damage paintwork.
4. Remove the reservoir protective cover. Unscrew and remove the rear brake reservoir cap taking care not to spill any fluid.

1. Rear reservoir lower level; 2. Rear reservoir upper level
Warning! Ensure absolute cleanliness when adding brake fluid to the brake fluid reservoir. Do not allow moisture or debris to enter the cylinder, as this will adversely affect the fluid properties. Always use fluid from a sealed container and do not use fluid from a container that has been opened for any period of time. Always check for fluid leakage around hydraulic fittings and for damage to hoses. A dangerous riding condition leading to loss of motorcycle control and an accident could result if this warning is ignored.
Caution! To prevent paint damage, do not spill brake fluid onto any area of the bodywork. Spilled brake fluid will damage paintwork.
5. Check the condition of the sealing diaphragm. Replace the diaphragm as necessary.
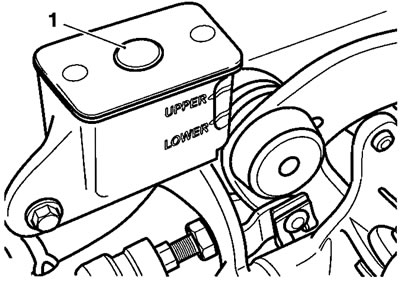
1. Diaphragm; 6. Release the bleed nipple.
Note: During bleeding, do not allow the fluid level to fall below the lower level mark in the reservoir. If the level is allowed to fall below this mark, air may enter the system and the sequence of bleeding must be repeated.
7. Slowly depress the brake pedal and, holding the pedal fully down, close the bleed nipple. Repeat steps 7 and 8 until no more air appears in the bleed tube, maintaining the brake fluid level between the upper and lower reservoir levels whilst bleeding is being carried out.
8. When all air has been expelled from the system, hold down the brake pedal and close the bleed nipple. Tighten the nipple to 7 Nm.
9. Fill the reservoir to the maximum level with new DOT 4 fluid.
Warning! Use only DOT 4 specification brake fluid as listed in the general information section of this manual. The use of brake fluids other than those DOT 4 fluids listed in the general information section may reduce the efficiency of the braking system leading to loss of motorcycle control and an accident. Observe the brake fluid handling warnings given earlier in this section of the manual.
Caution! To prevent paint damage, do not spill brake fluid onto any area of the bodywork. Spilled brake fluid will damage paintwork.
10. Fit the reservoir cover and diaphragm. Check for correct diaphragm fitment before final tightening of the cover.
11. Refit the reservoir cover. Tighten the fixings to 9 Nm.
12. Remove the bleed tube from the nipple.
13. Replace the bleed nipple dust cap.
14. Ensure the brake pedal operation has a firm resistive feel to it, does not feel spongy and that the pedal cannot be depressed through its full range of travel. Rectify as necessary.
15. Check the operation of the rear brake. Rectify as necessary.
Warning! It is dangerous to operate the motorcycle with defective brakes and you must have your authorised Triumph Dealer take remedial action before you attempt to ride the motorcycle again. Failure to take remedial action may reduce braking efficiency leading to loss of motorcycle control and an accident.