
Note: Two oil pumps are fitted to this model. A pressure pump to supply oil under pressure to various parts of the engine, and a twin-rotor scavenge pump to return oil to the oil tank from the sump.
Warning! Prolonged or repeated contact with engine oil can lead to skin dryness, irritation and dermatitis. Furthermore, used engine oil contains potentially harmful contaminants that can cause cancer. When handling used engine oil, always wear protective clothing and avoid any skin contact with the oil.
Caution! Do not pour engine oil on the ground, down sewers or drains, or into watercourses. To prevent pollution of watercourses etc., dispose of used oil sensibly. If in doubt contact your local authority.
Removal
Note: Only the pressure pump can be removed with the engine in frame. If removing the pressure pump, remove the clutch cover as described on page 4.7.
Note: To remove the scavenge pump, the engine must be removed and the crankcase halves must be separated. The following instructions describe the procedure for removal of both pumps simultaneously.
1. Remove the engine from the frame as described on page 10.2.
2. Remove the clutch assembly as described on page 4.7.
3. Prevent the oil pump drive sprocket from turning using a hand-hold only. Remove the locknut from the drive sprocket shaft.

1. Drive sprocket shaft; 2. Locknut
4. Remove the pump sprocket, drive sprocket and chain as one item by sliding them forward.
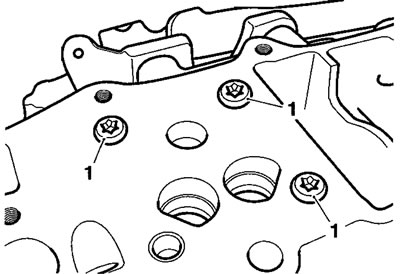
5. Note the position of the spray bar before releasing the bolts securing the pressure pump and spray bar to the crankcase. Withdraw the pressure pump and spray bar.

1. Pressure pump bolts; 2. Spray bar
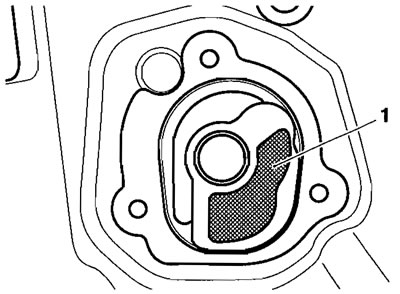
6. Recover the mesh filter situated between the pressure pump and crankcase.

1. Mesh filter
7. Separate the crankcase halves as described on page 5.5.
8. Release the screws that secure the scavenge pump to the lower crankcase.
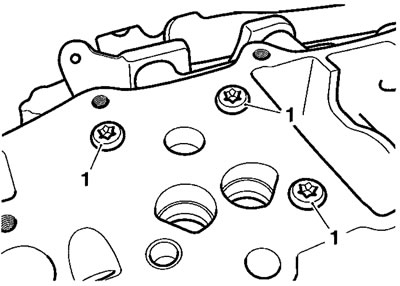
1. Scavenge pump screws
9. Ease the pump from its dowels and withdraw it from the crankcase.
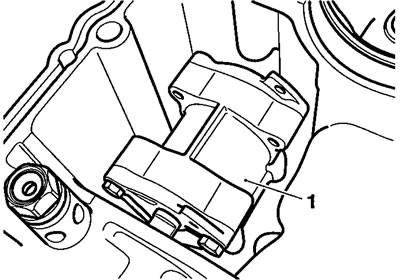
1. Scavenge pump
Inspection
Caution! If any part of either of the oil pumps is found to be outside the service limit, the complete pump must be replaced. Severe engine damage may result from the continued use of a faulty oil pump.
Clearances
| Item (both pumps) | Standard | Service limit |
| Oil pump rotor tip clearance | 0.15 mm | 0.30 mm |
| Oil pump body clearance | 0.15-0.22 mm | 0.35 mm |
| Oil pump rotor end float | 0.02-0.07 mm | 0.10 mm |
1. Measure the rotor tip clearance using feeler gauges.
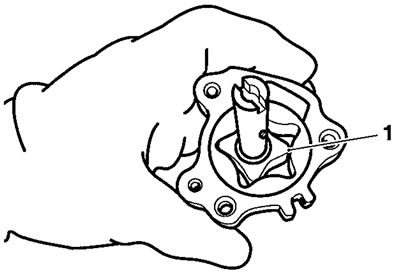
1. Rotor tip clearance
2. Measure the pump body clearance using feeler gauges.
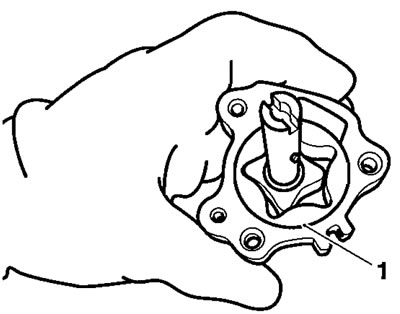
1. Pump body clearance
3. Measure the pump end clearance.
4. Clearances:
- a) If all clearances are within service limits, liberally apply clean engine oil to all internal components and refit the oil pump plate to the oil pump body.
- b) If any clearance measured is outside the service limits, renew the complete pump.
5. Inspect all the sprocket and chain for wear and/or damage. Replace the sprocket and chain if wear and/or damage is found.
Installation
Caution! As a precaution, before fitting the oil pumps to the crankcase ensure the pump internal surfaces have been 'wetted' with clean engine oil. The pumps may fail to pick-up oil from the sump if the surfaces have not been 'wetted'. This will cause the engine to run without engine oil pressure and will lead to severe engine damage.
1. Fill the oil pumps with new engine oil, turning the pump rotors as the oil is poured into the pump.
2. Position the scavenge pump to the crankcase and engage it to the mounting dowels. Ensure the drive blade is facing towards the front of the engine.

1. Mounting dowels
3. Fit and tighten the scavenge pump screws to 12 Nm.
1. Scavenge pump screws
4. Position the pressure pump and spray bar to the crankcase, aligning the drive blade on the scavenge pump with the drive slot on the pressure pump.

1. Scavenge pump - drive blade; 2. Pressure pump - drive slot
5. Clean and examine the mesh filter for the pressure pump before refitting it to the crankcase. Replace the filter if blocked, split or damaged in any way.
1. Mesh filter
6. Fit and tighten the pressure pump and spray bar screws to 12 Nm.
7. Assemble the crankcase halves as described on page 5.7.
8. Assemble the pump sprocket and drive socket to the chain ensuring the "OUT" mark on the pump socket is facing outwards.

1. Pump sprocket; 2. Drive sprocket; 3. Chain; 4. «OUT» mark
9. Secure the pump sprocket to the pump shaft with a new locknut. Tighten the nut to 30 Nm.
10. Assemble the crankcase halves as described on page 5.7.
11. Install the engine in the frame as described on page 10.5.
Oil non-return valve
The oil non-return valve, which prevents oil from draining from the oil tank while the engine is not running, is located in the upper crankcase. It can be removed by easing it gently from the crankcase against the О-ring that seals it.

1. Oil non-return valve; 2. O-ring
Oil pressure relief valve
The oil pressure relief valve is located in the lower crankcase, adjacent to the scavenge pump. It is a threaded fit in the crankcase.

1. Oil pressure relief valve
When refitting the valve, tighten it to 15 Nm.