
Warning! The following procedures often require lifting of heavy components. To avoid injury, always lift heavy components with a hoist or block and tackle and never attempt to manually lift items that are too heavy. Injury may result from failure to use the correct lifting equipment.
Caution! The upper and lower crankcases are machined as a matched set and must never be assembled to nonmatching halves. Doing so will cause seizure of the engine.
Note: The crankcase halves may be separated with the cylinder head fitted.
Removal
1. Remove the engine from the frame (see page 10.2).
2. Remove the clutch (see page 4.7).
3. Remove the starter motor (see page 18.18).
4. Remove the alternator (see page 18.15).
5. Remove the oil pump drive and pressure oil pump (see page 9.11).
6. Remove the torsional damper shaft (see page 8.11).
7. Remove the sump (see page 9.9).
8. Remove the cam chain (see page 3.6).
Disassembly
1. Remove the oil pipes from the lower crankcase.

1. Oil pipes
2. Remove the non-return valve from the scavenge oil pump, by gently pulling it outwards from its location.
1. Non-return valve
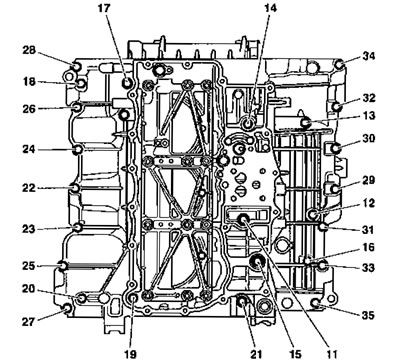
3. In the sequence shown below, release the bolts securing the main bearing ladder to the crankcases.
Main bearing ladder bolt release sequence
4. Collect the bolts, then detach the ladder and baffle plate from the crankcase noting the position of both location dowels, which should be removed for safe-keeping.
1. Dowels
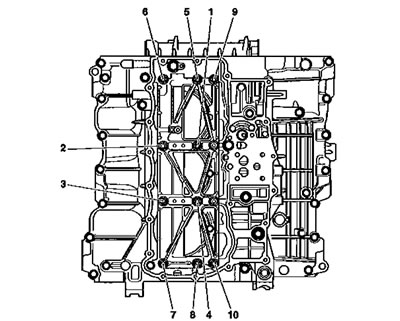
5. Starting from bolt 11, release the lower crankcase bolts in the sequence shown in the diagram below. Remove and discard the bolts.
Lower crankcase bolt release sequence
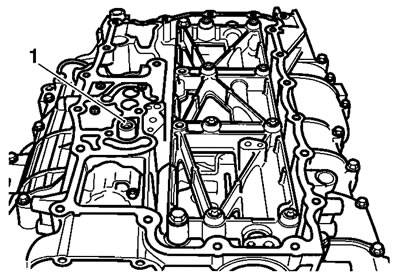
6. From inside the rear of the crankcases, collect the bearing cap securing the output shaft to the lower crankcase.

1. Output shaft bearing cap
Note: Always check that all bolts have been released before attempting to separate the cases. Bolts are fitted in discreet locations such as under the pressure oil pump and inside hollow bosses.
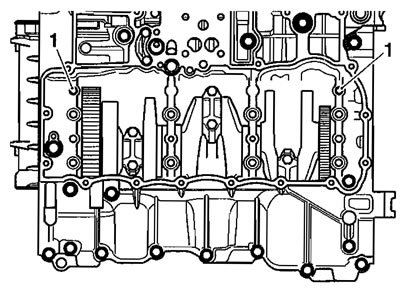
7. Separate the lower and upper crankcases noting the position of the three location dowels, which should be removed for safe-keeping.

1. Dowel locations
8. At this point, the balancer shaft may be removed. To detach the crankshaft, the big end caps must also be removed (see page 5.10).
Caution! Do not use levers to separate the upper and lower sections of the crankcase as damage to the crankcases could result.
Assembly
1. Use high flash-point solvent to clean the crankcase mating faces. Wipe the surfaces clean with a lint-free cloth.
2. Ensure that the three locating dowels are in position in the upper crankcase.

1. Dowels
3. Apply a thin bead of silicone sealant to the lower crankcase mating faces (at the factory, Three Bond 1207B is used).

Sealer areas
Caution! Do not use excessive amounts of sealer. The extra sealer may become dislodged and could block the oil passages in the crankcases, causing severe engine damage.
4. Install and lubricate the crankshaft main bearing shells with clean engine oil (see bearing selection on page 5.13 before proceeding).
5. Install the crankshaft to the upper crankcase.
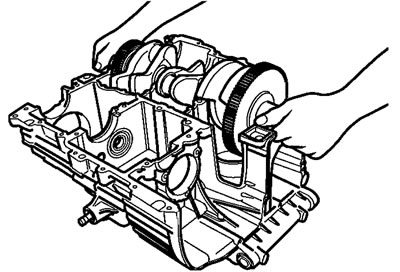
Installing the crankshaft
6. Install and lubricate the balancer ensuring it is "timed" to the crankshaft correctly (see page 7.4).
7. Lubricate the crankshaft journals with clean engine oil.
8. Position the lower crankcase to the upper. An assistant may be required to support the crankcase during alignment.
9. Fit the screws into the lower crankcase and hand tighten them.
10. Position the main bearing ladder and baffle to the crankcase (baffle lugs facing into the engine).
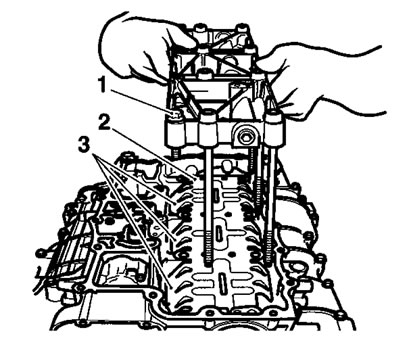
1. Main bearing ladder; 2. Baffle; 3. Baffle lugs
11. Tighten the crankcase screws as follows:
Note: The crankcase screws are tightened in stages.
Caution! Failure to follow the correct screw tightening sequence may result in permanent crankcase damage.
Stage 1 - all screws
In the correct sequence, tighten all crankcase fixings to 10 Nm.

Crankcase fixing tightening sequence, all fixings
Stage 2
in the correct sequence, tighten fixings 1 through 8 to 40 Nm.

Crankcase bolt tightening sequence, fixings 1-8
Stage 3
In the correct sequence, tighten fixings 9 through 35 to 28 Nm.

Crankcase fixing tightening sequence, fixings 9-35