

Install balancing shaft in engine housing; marking (1) must be aligned with marking (3) on housing.
Coat 1.0 mm (0.04 in) thrust washer with oil and install on crankshaft.
Rotate crankshaft before installing, so that marking (2) is aligned with marking (3).
Fit gasket.
Oil thrust washers and install on crankshaft and balancing shaft.
Note: Oil shaft bearing points. Re-shim the crankshaft and balancing shaft if the housing or either of the shafts was renewed.
Coat the balancing shaft bearing journals with Optimoly MP 3.
Shimming crankshaft
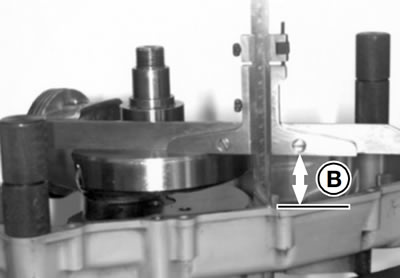
Using depth gauge, BMW No. 00 2 550, measure distance from crankshaft web to housing joint line = dimension "B".

Measure distance from left engine housing joint face to spacing washer contact face = dimension "A".
Dimension "A" minus dimension "B" = crankshaft endplay.
Note:
- Allow for the thickness of the compressed gasket (approx. 0.4 mm/0.016 in).
- On the magnet side, the spacing washer is always 1.0 mm (0.04 in) thick.
Select a suitable spacing washer to ensure that the correct endplay is obtained.
Crankshaft endplay: 0.1...0.3 mm (0.004...0.012 in).
Note:
- Shim the balancing shaft in the same way as the crankshaft.
- Install spacing washers only on the clutch side.
Fit left engine housing and screw down.
Note: Note the two fasteners in the oil filter housing.
Cut off protruding gasket.
Tightening torque:
- Threaded fasteners of engine housing: 10 Nm