
General
Crankshaft bearings MUST be replaced every time the cases are split for service. If the cam drive is not being serviced, crankshaft bearings can be replaced without removing the cam drive chain.
The alternator side and clutch side crankshaft bearings must be replaced with bearings color coded to match the color code stamped on the counterweight on the clutch side of the crankshaft. To select the correct bearing set, see 3.18 Crankshaft, piston and cylinder liner.
Alternator side
1. See Figure 3-21. Remove rotor bolt from cam drive side.
2. See Figure 3-178. Insert Snap-on # 2050 Prybar in rotor bolt hole.
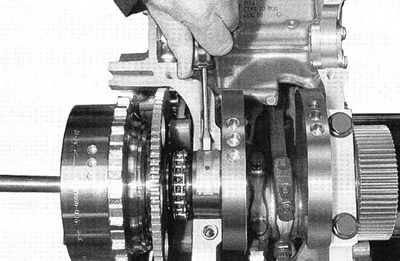
Figure 3-178. Cam drive side bearing removal
3. See Figure 3-179. Note the notch in the crankshaft bearing.

Figure 3-179. Crankshaft bearing notch (crankshaft removed for clarity)
4. See Figure 3-178. Gently lift crankshaft to take weight off the bearing.
5. Use a small screwdriver in the notch of the crankcase at the end of the bearing to lever and roll old bearing around crankshaft journal until it can be removed by hand.
Note. Remove and replace one crankshaft bearing at a time. Make sure CRANKSHAFT ASSEMBLY RETAINERS (HD-45316) are loosened. Select new bearing. Apply Lubriplate No. 105 Assembly Grease (NAPA Part No. 765-2651) and Harley-Davidson Motorcycle Oil 20W50 to the journal side of the bearing.
6. Select the alternator side bearing set to match color code on crankshaft counterweight. See 3.18 Crankshaft, piston and cylinder liner.
7. While gently lifting crankshaft with prybar move new bearing into position by hand.
Clutch side
1. See Figure 3-180. Insert a 10" long 1/2" drive extension in the square hole of the crankshaft drive gear.
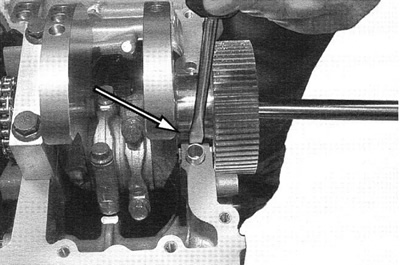
Figure 3-180. Water pump side bearing removal
2. See Figure 3-180. Apply gentle upward pressure on the 1/2" drive extension. Using a screwdriver on the side opposite the bearing notch, very carefully tap on old bearing until it is exposed enough to be removed by hand.
3. Select the clutch side bearing set to match color code on crankshaft counterweight. See 3.18 Crankshaft, piston and cylinder liner.
4. Select a new bearing and apply Harley-Davidson Motorcycle Oil 20W50 to the journal side of the bearing.
5. See Figure 3-181. Position the new bearing so the notch rolls into the case last and matches the engine case relief notch.

Figure 3-181. Water pump side bearing removal
6. While lifting gently with extension roll bearing into place with finger pressure.