Measuring wheel track offset

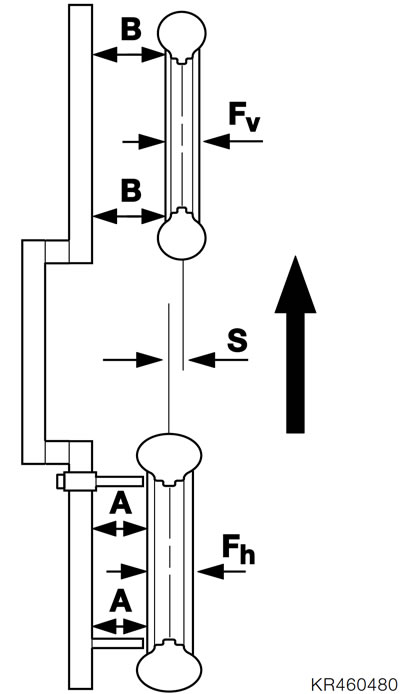
Note: Wheel track offset S is the distance to left or right between the longitudinal axes of the front and rear wheels.
- Place the motorcycle on its main (centre) stand on a flat, level surface.
- Measure wheel rim width at front and rear and make a note of the figures.
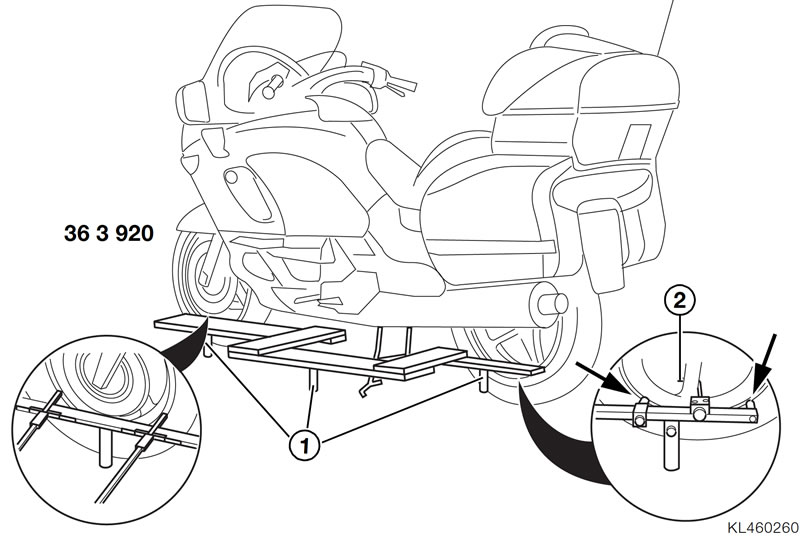
- Place track alignment gauge, BMW No. 36 3 920, against the left or right side of the motorcycle.
Note: In order to use the track alignment gauge on either the left or right side, simply screw in the supports (1) on the other side.
- Adjust supports (1) so that the measuring plane is as close as possible to the wheel centreline. The gauge must slide freely up to the motorcycle.
- Adjust measuring stops (arrows) until they contact the rim - not the tyre.
- Connect hook (2) to a wheel spoke and use it to pull the gauge firmly up to the wheel.
- Align front wheel parallel with the gauge.
- Release tension in the track alignment gauge by raising it by approx. 5 mm (0.2 in) at the front and lowering it again.

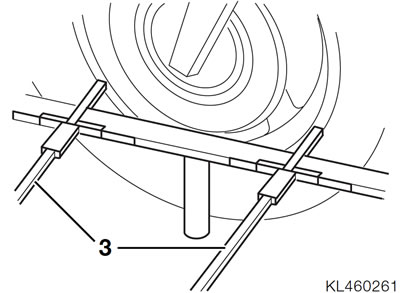
- Using a depth gauge (3), measure the distance from the outer edge of the gauge to the front wheel rim at the front and rear of the wheel and make a note of the figures.
- Subtract the width of the track alignment gauge from the measured values.
Note: The average of these two values is distance B.
- Calculate the average.

- Measure or calculate the length of the stops accordingly (distance A).
- Measure the width of the rims front (Fv) and rear (Fh) and note down the measured values.
Calculate wheel track offset S:
- Formula: S = A + Fh/2 − (B + Fv/2)
Permissible wheel track offset:
- S = -5...+14 mm (-0.20 ...+0.55 in)
Note: How to interpret the measured results: Positive sign = track offset is to the left Negative sign = track offset is to the right
Example
- Formula: S = A + Fh/2 − (B + Fv/2)
Fixed value A (length of measuring stops):
- A = 50.0 mm (1.97 in)
Half of rear wheel rim width:
- Fh/2 = 72.5 mm (2.85 in)
Measured value B (average value):
- B = 68.4 mm (2.69 in)
- Half of front wheel rim width:
- Fv/2 = 55.8 mm (2.20 in)
Track offset S:
- S = A + Fh/2 − (B + Fv/2)
- S = 50.0 mm + 72.5 mm - (68.4 mm + 55.8 mm) (1.97 in + 2.85 in - (2.69 in + 2.20 in))
- S = 122.5 mm - 124.2 mm (4.82 in - 4.89 in)
- S = - 1.7 mm (-0.07 in)
- Track offset is 1.7 mm (0.07 in) to the right; this value is within the tolerance range.
Checking the leading link for deformation
See Group 31.
