
Insert the contact into the relay socket.
Caution! The contact engages with an audible click and must be firmly located.
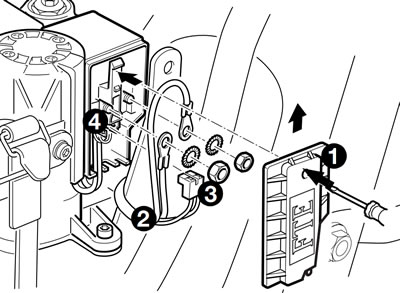
Insert the ABS relay with the FAG logo facing the detent hook.
Insert a Torx screw into the ring shoe of the red engine cable.
Note: The crimp side is towards the screw head.
Caution!
- The same Torx screws must be re-used because of their self-locking effect.
- When inserting the screws again, make sure that they pick up with the existing thread in the sheetmetal element.
- Failing this, vibration could cause the screws to work loose.
Place the ring shoe (with two cables) on the bore of the insert at the rear of the relay socket, with the crimp side towards the relay socket, and screw on together with the red engine cable, using the Torx screw.
Use the second Torx screw to secure the flat plug to the relay.
Press the contact interlock into the relay socket at the side.
Push the relay socket into the relay housing, at the same time pressing both engine cables into the left cable entries on the relay housing (red at bottom, black at top).
Secure black engine cable to left threaded pin (M5) with crimp at rear.
Caution! Make sure the cable is not at an angle, or its insulation may be damaged.
Reconnect the 2-pin plug in the correct position, pushing the two halves fully together, and press the two wires into the center (smaller) cable entries.
Push the two plugs for the connecting cable/wiring harness onto the threaded pins with the crimp at the front.
Press the two cables into the remaining free cable entries.
Tighten the nuts.
Caution! Always use new self-locking nuts.
Install a new cover (1).
Caution! When sliding the cover on, make sure that all cables are correctly located in their cable entries.