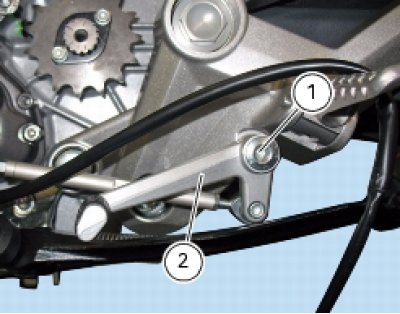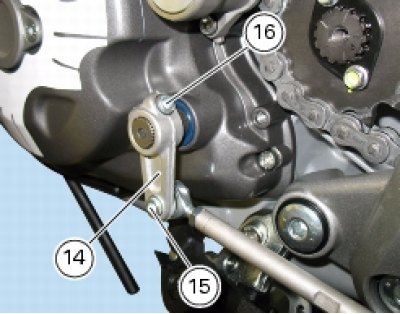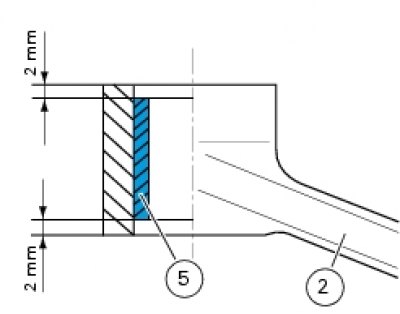
1. Pivot screw; 2. Gearchange pedal; 3. Screw; 4. Rubber; 5. Bush; 6. Washer; 7. Nut; 8. Ball joint; 9. Nut; 10. Gearchange lever tie-rod; 11. Nut; 12. Nut; 13. Ball joint; 14. Gearchange lever; 15. Screw; 16. Screw; 17. O-ring
Caution! Bold reference numbers in this section identify parts not shown in the figures alongside the text, but which can be found in the exploded view diagram.
Removal of the gearchange mechanism
Unscrew and remove the pivot screw (1) securing the gearchange pedal (2) and recover the washer (6) and the O-ring seals (17).

Unscrew and remove the clamp screw (16) securing the gearchange lever (14) to the gear selector shaft.
Withdraw the lever (14) complete with the gearchange control assembly.
Note: Mark the position of lever (14) relative to the gear selector shaft.
To remove the lever (14) from the gearchange assembly, remove the bolt (15).

Disassembly of the gearchange mechanism
Refer to the exploded view at the beginning of this section for indications on disassembly and renewal of gearchange components.
If the bush (5) inside the pedal (2) needs replacing, drive the new bush into place using a press. The bush must be seated 2 mm below the outer face of the pedal.

Warning! After working on the gearchange mechanism, check the position of the gear pedal.
To adjust the position of the gear pedal, follow the instructions provided in Adjusting the position of the gearchange and rear brake pedals.
Refitting the gearchange mechanism
To refit the gearchange mechanism, reverse the operations of the removal procedure.
Note: Fit new O-rings (17) on each reassembly.
Apply threadlocker to the clamp bolt (16), pivot screw (1) and screw (15) and then tighten them to the specified torque (Frame torque settings).


