Prepare
1. Remove main fuse. See Power disconnect.
2. Remove headlamp fairing. See Headlamp fairing.
3. Remove left hand grip. See Hand grips.
4. Remove left handlebar switch housing. See Left handlebar switch housing.
5. Lift rear of fuel tank. See Lift rear of fuel tank.
Remove
Clutch Cable
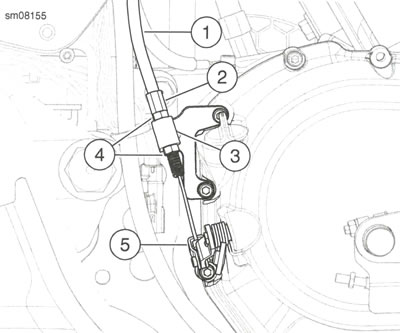
1. See Figure 3-51. Remove lower clutch cable.
- a. Loosen lower jamnut (4).
- b. Remove end of clutch cable (1) from clutch lever assembly (5).
- c. Remove lower jamnut from clutch cable.
- d. Remove clutch cable, upper jamnut and clutch cable adjuster (2) from clutch cable bracket (3).
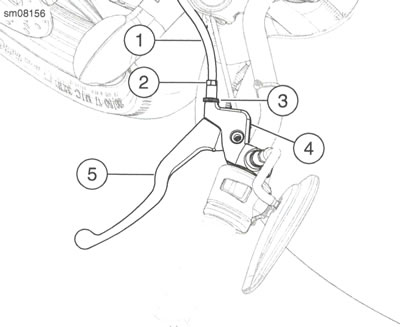
2. See Figure 3-52. Remove upper clutch cable.
- a. Loosen clutch cable adjuster (2).
- b. Align slots in clutch cable adjuster, jamnut (3) and clutch hand lever assembly (4).
- c. Remove clutch cable (1) from clutch cable adjuster, jamnut and clutch hand lever assembly.
- d. Remove end of clutch cable from clutch hand lever (5).
3. Remove clutch cable.
Clutch Hand Control
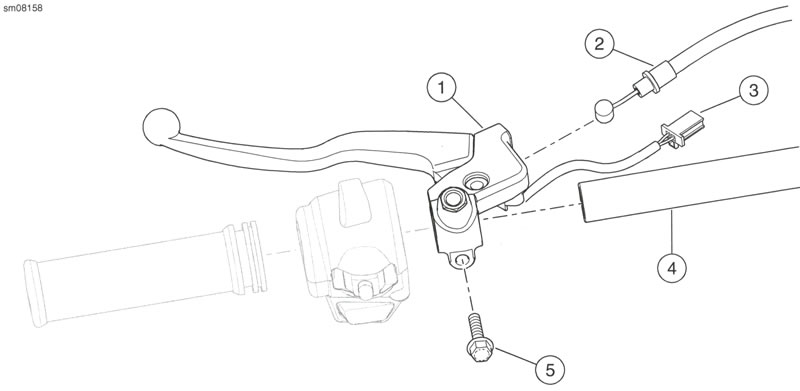
1. See Figure 3-53. Remove clutch hand control assembly.
- a. Note position of clutch hand control assembly (1).
- b. Remove upper clutch cable (2).
- c. Disconnect clutch safety switch connectors (3).
- d. Loosen screw (5).
- e. Remove clutch hand control assembly from handlebar (4).

Figure 3-51. Lower Clutch Cable: 1. Clutch cable; 2. Clutch cable adjuster; 3. Clutch cable bracket; 4. Jamnut; 5. Clutch lever assembly

Figure 3-52. Upper Clutch Cable: 1. Clutch cable; 2. Clutch cable adjuster; 3. Jamnut; 4. Clutch hand lever assembly; 5. Clutch hand lever

Figure 3-53. Clutch Hand Control Assembly: 1. Clutch hand control assembly; 2. Clutch cable; 3. Clutch safety switch connectors; 4. Handlebar; 5. Screw
Install
| FASTENER | TORQUE VALUE | |
| Clutch hand control bracket screw | 4.9-6.1 Nm | 44-53 in·lbs |
Clutch Cable
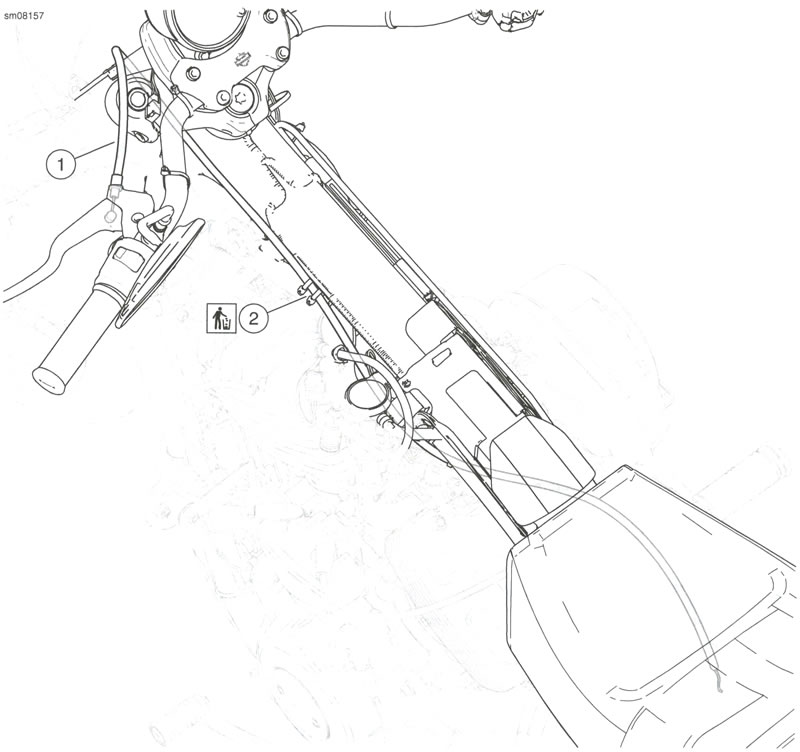
1. See Figure 3-54. Route clutch cable as shown.
- a. Insert clutch cable (1) behind headlamp fairing.
- b. Install new cable straps.
2. See Figure 3-52. Install upper clutch cable.
- a. Install end of clutch cable (1) into clutch hand lever (5).
- b. Verify slots in clutch cable adjuster (2), jamnut (3) and clutch hand lever assembly (4) are aligned.
- c. Install clutch cable through clutch hand lever assembly, clutch cable adjuster and jamnut.
3. See Figure 3-51. Install lower clutch cable.
- a. Install clutch cable (1), adjuster (2) and upper jamnut (4) through clutch cable bracket (3).
- b. Install lower jamnut on clutch cable.
- c. Install end of clutch cable into clutch lever assembly (5).
4. Adjust clutch. See Check and adjust clutch.
Clutch Hand Control
1. See Figure 3-53. Install clutch hand control assembly.
- a. Install clutch hand control assembly (1) on handlebar (4).
- b. Install screw (5). Tighten to 4.9-6.1 Nm (44-53 in·lbs).
- c. Connect clutch safety switch connectors (3).
- d. Install upper clutch cable (2).

Figure 3-54. Clutch Cable Routing: 1. Clutch cable; 2. Cable straps
Clean and inspect
1. Inspect clutch lever and cable for wear or damage. Replace or repair as necessary.
2. Inspect clutch cable.
- a. Verify smooth operation. Replace as necessary.
Notice: The clutch control cable must be oiled and adjusted periodically to compensate for lining wear. See MAINTENANCE SCHEDULING in this manual. Failure to oil and adjust the clutch control cable can result in equipment damage.
3. Lubricate clutch hand lever and cable with HARLEY ® LUBE.
Complete
1. Secure rear of fuel tank. See Lift rear of fuel tank.
2. Install left handlebar switch housing. See Left handlebar switch housing.
3. Install left hand grip. See Hand grips.
4. Install headlamp fairing. See Headlamp fairing.
5. Install main fuse. See Power disconnect.
