MotoInstruction.ru
Mobile
version
Articles
& news
Site
map
Feed
back
Add to
bookmark
English Русский
Aprilia
BMW
Ducati
Harley
Honda
Kawasaki
Suzuki
Triumph
Yamaha
Aprilia:
RS-series▾
RS125 [3] (1998-2005)
Shiver▾
SL750 (2007-2016)

Refitting the complete front wheel (Aprilia RS125/3)

  • Main
  • Aprilia
  • RS-series
  • RS 125 [3]
  • Running gear and frame
  • Wheels and tires
  • Refitting the complete front w…
0
Read 1.2.1 carefully.

Torque wrench settings:
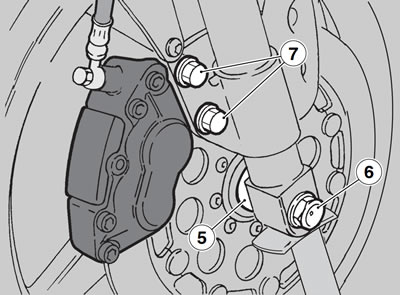
  • Caliper mounting bolts (7): 22 Nm (2.2 kg·m)
  • Wheel spindle bolt (6): 80 Nm (8 kg·m)
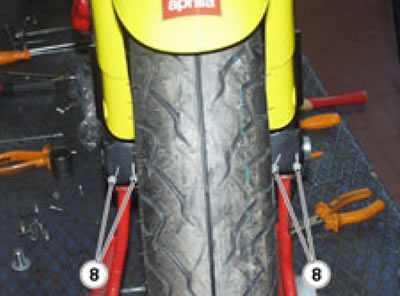
  • Wheel spindle clamp screws (8): 12 Nm (1.2 kg·m)

Smear a light coat of grease over the total length of the wheel spindle (1); see 1.8.1.

Warning! Use great care when refitting the wheel to avoid damaging the brake lines, brake discs and brake pads.


Position the housing (3) of the speedometer drive (2) correctly to the special anti-rotation peg (4).


Note. The spacer (5) must have the larger diameter face pointing to the right fork leg.


Position the spacer (5) to the wheel.

Place the wheel between the fork legs above the support.


Danger! Do not attempt to align the holes by putting your fingers into the holes. This could result in severe personal injury.


Move the wheel until the centre hole aligns with the holes in the forks.

Slide the wheel spindle (1) fully home.

Fit the washer and snug the screw (6) hand-tight.

Lock out wheel spindle (1) rotation.

Tighten the screw (6) fully.

Warning! Use great care or you might damage the brake pads.


Fit the brake caliper to the brake disc with the mounting holes aligned with the holes in the caliper carrier.

Warning! Replace both caliper mounting bolts (7) with new bolts of the same type fitted originally.


Start the two caliper mounting bolts (7) in their holes and tighten.

Hold in the front brake lever and press down on the handlebars repeatedly to pump the front fork up and down. This will allow the fork legs to seat themselves properly.

Tighten the two wheel spindle clamp bolts (8) working on both sides.

Remove the front wheel stand (OPT); see 1.7.1.

Remove the rear wheel stand (OPT); see 1.7.2.


Warning! After refitting the wheel, work the front brake lever repeatedly and check for proper operation of the brake.


Ensure that the wheel is properly centred.
See this article in russian language
◀ Previous
Aprilia RS125 3: Wheels and tires
Next ▶

Front wheel component inspection
Front wheel disassembly
Removing the complete front wheel
Front wheel construction
Rear wheel construction
Removing the complete rear wheel
Rear wheel disassembly
Final drive removal
Inspecting the rear wheel components
Refitting the complete rear wheel
Similar articles about motorcycles of other brands
Ducati ST2 (1997-2003): Refitting the front wheel Triumph Rocket III (2004-2018): Exploded view — front wheel Yamaha FZ1 Fazer (2006-2015): Disassembling the front wheel Suzuki DRZ 250 (1996-2007): Front wheel — design description Honda CB 400 SF (1992-1999): Front wheel — removal and installation Harley-Davidson XL1200 (2012-2023): Front wheel — removal and installation BMW R 1150 GS (1999-2004): Removing front wheel Kawasaki ZX6R/ZX600J (2000-2002): Front wheel — removal and installation
Link to this article in different formats
TEXTHTMLBB Code
Comments and feedback from visitors
No comments yet, you will be the first!


Add up two numbers: 17 + 46


RS125 3 (1998-2005) 
  • Information for owner
  • Introduction to manual
  • Maintenance
  • Troubleshooting
  • Engine and systems
  • Engine repair
  • Fuel system
  • Cooling and lube system
  • Running gear and frame
  • Frame and hinged elements
  • Front suspension and handlebar
  • Rear suspension
  • Brake system
  • Wheels and tires
  • Electric equipment
  • Equipment and devices
  • Starting and charging system
Aprilia BMW Ducati Harley Honda Kawasaki Suzuki Triumph Yamaha
MotoInstruction.ru © 2021–2025 | Sitemap | Articles | Contacts | Site search | Add to bookmarks | Mobile version