MotoInstruction.ru
Mobile
version
Articles
& news
Site
map
Feed
back
Add to
bookmark
English Русский
Aprilia
BMW
Ducati
Harley
Honda
Kawasaki
Suzuki
Triumph
Yamaha
Aprilia:
RS-series▾
RS125 [3] (1998-2005)
Shiver▾
SL750 (2007-2016)

Removing the complete rear wheel (Aprilia RS125/3)

  • Main
  • Aprilia
  • RS-series
  • RS 125 [3]
  • Running gear and frame
  • Wheels and tires
  • Removing the complete rear whe…
0
Read 1.2.1 carefully.

Torque wrench settings:
  • Wheel spindle nut (1): 100 Nm (10.0 kg·m)

Warning!
  • To avoid the risk of burns, allow the engine and silencer to cool down completely before proceeding.
  • Use great care during removal, to avoid damage to the brake line, brake disc and brake pads.


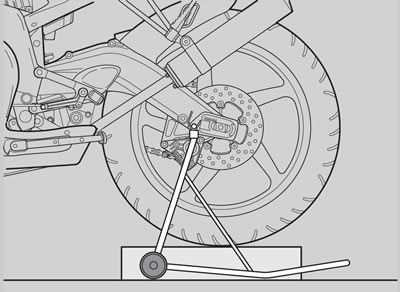
Note. Be sure to have the rear wheel stand ready at hand before proceeding to the remove the rear wheel.


Place the motorcycle on the rear wheel stand; see 1.7.2.

Place a support under the tyre to hold the wheel in position once released.

Place a support under the tyre to hold the wheel in position once released.


Undo and remove the nut (1) and collect the washer.

Withdraw the wheel spindle (2) from the left-hand side.

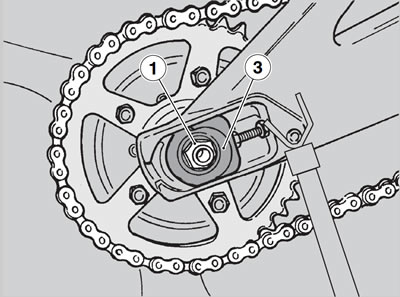
Note. Mark the positions of the right (3) and left (4) chain tensioners to refit them in the original position.


Note. Mark the positions of the right (3) and left (4) chain tensioners to refit them in the…


The article is based on materials from the website: MotoInstruction


Collect the right (3) and left (4) chain tensioners.

Collect the right (3) and left (4) chain tensioners.


Note. Take the chain off the rear sprocket routing it outboard of the sprocket.


Push the wheel forward and release the drive chain from the rear sprocket.

Slide the wheel off the swinging arm in a rearward motion. Be careful until the brake disc is clear of the caliper.

Warning! Do not operate the rear brake lever when the calipers are not in place, or the pistons might fall out leading to brake fluid spillage.


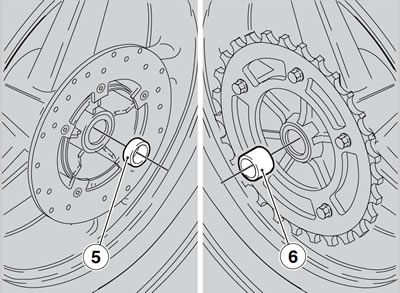
Note. Note the positions of the spacers (5) and (6) so as to refit them in the original position on assembly.


Collect the left-hand spacer (5).

Collect the right-hand spacer (6).

Collect the right-hand spacer (6).
See this article in russian language
This article has been reviewed: Artemy Kuzmin
◀ Previous
Aprilia RS125 3: Wheels and tires
Next ▶

Rear wheel construction
Refitting the complete front wheel
Front wheel component inspection
Front wheel disassembly
Rear wheel disassembly
Final drive removal
Inspecting the rear wheel components
Refitting the complete rear wheel
Similar articles about motorcycles of other brands
Removing the rear wheel (FZ1-N(X)/FZ1-S(X)) Yamaha FZ1 Fazer (2006-2015)
Removing and installing taper roller bearing in rear wheel… BMW R 1150 GS (1999-2004)
Removing and installing the rear wheel Honda VTX 1800 C (2001-2008)
Removing the rear wheel Ducati ST2 (1997-2003)
Exploded view — rear wheel and cush drive Triumph Rocket III (2004-2018)
Link to this article in different formats
TEXTHTMLBB Code
Comments and feedback from visitors
No comments yet, you will be the first!


Add up two numbers: 29 + 28


RS125 3 (1998-2005) 
  • Information for owner
  • Introduction to manual
  • Maintenance
  • Troubleshooting
  • Engine and systems
  • Engine repair
  • Fuel system
  • Cooling and lube system
  • Running gear and frame
  • Frame and hinged elements
  • Front suspension and handlebar
  • Rear suspension
  • Brake system
  • Wheels and tires
  • Electric equipment
  • Equipment and devices
  • Starting and charging system
Aprilia BMW Ducati Harley Honda Kawasaki Suzuki Triumph Yamaha
MotoInstruction.ru © 2021–2025 | Sitemap | Articles | Contacts | Site search | Add to bookmarks | Mobile version