
Pressure relief valve
The oil tank has a pressure relief valve in the top of the tank. If the vent line is pinched, restricted or if the tank is overfilled, excessive pressure is created. The valve opens if the pressure in the tank exceeds 10 psi (68.9 kPA).
Oil line routing: XL models
See Figure 3-173. The feed, vent and return ports are located on the bottom of the oil tank to reduce under seat congestion. An oil line routes the oil from the feed port at the lower right front corner to a fitting on the oil pump.
From the feed section of the oil pump, another feed line directs the flow up to the oil filter mount. Eventually, oil drains to the sump where it collects in the scavenge section of the oil pump. The return line routes the oil back to the tank where the cycle is repeated.
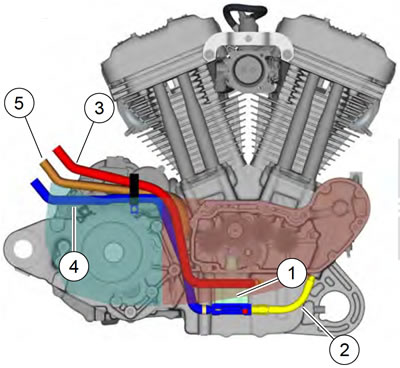
Figure 3-173. Engine hose routing: XL models: 1. Oil pump; 2. Oil feed line; 3. Return oil line; 4. Feed oil line; 5. Vent line
Oil line routing: XR 1200X
See Figure 3-174. The feed, vent and return ports are located on the bottom of the oil tank to reduce under seat congestion. An oil line routes the oil from the feed port at the lower right front corner to a fitting on the oil pump.
Oil travels to the feed pump through an internal passage in the pump housing. The feed pump pushes oil to the oil cooler, oil filter, and cylinder heads. Oil used for lubricating internal engine components eventually drains into the sump. Here the scavenge pump collects it and routes it back to the oil tank. The oil from the cylinder heads and from the scavenge pump is returned to the oil tank. See 3.6 ENGINE LUBRICATION SYSTEM, Oil Flow: XR 1200X.
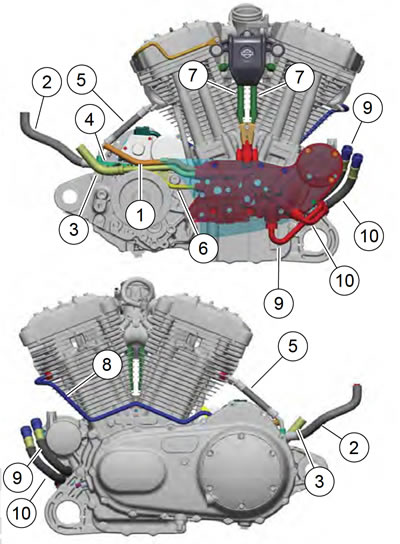
Figure 3-174. Engine oil line routing: XR 1200X: 1. Vent line; 2. Return oil to tank; 3. Oil feed line; 4. Return oil manifold; 5. Rear cylinder head return oil line; 6. Return oil from pump; 7. Cylinder head feed oil lines; 8. Front cylinder head return oil line; 9. Oil from oil cooler; 10. Oil to oil cooler
Removal
1. Remove seat.
2. Remove left side cover. See 2.18 LEFT SIDE COVER.
Warning! Prevent accidental vehicle start-up, which could cause death or serious injury. First disconnect negative (-) battery cable at engine and then positive (+) cable from battery.
3. Disconnect negative (-) battery cable from ground stud on crankcase. Disconnect positive (+) battery cables at battery.
4. Drain oil tank. See 1.6 ENGINE OIL AND FILTER, Changing Oil and Filter.
5. Remove right side cover by gently prying bottom lip off tab on oil tank. Then lift top of cover off two stanchions molded into top of oil tank.
6. Remove rear belt guard. See 2.22 BELT GUARD AND DEBRIS DEFLECTOR.
Note. For ease of assembly, mark oil tank lines, oil feed, drain, vent and return, as they are removed from oil tank.
7. Remove clamp and disconnect the drain line from oil tank.
8. Remove clamp from upper end of feed oil line and disconnect line from oil tank.
9. Remove clamp from upper end of the return oil line and disconnect the line from oil tank.
10. Remove rear fender. See 2.33 REAR FENDER: ALL XL MODELS EXCEPT XL 883N, XL 1200X/V, 2.34 REAR FENDER AND LICENSE PLATE BRACKET: XL 883N, XL 1200X/V or 2.35 REAR FENDER: XR 1200X.
11. Remove clamp from upper end of vent oil line and disconnect line from oil tank.
12. Remove three screws and remove oil tank from right side of motorcycle.
Installation
| FASTENER | TORQUE VALUE | |
| Oil tank mounting screw | 36-60 in·lbs | 4.1-6.8 Nm |
1. Slide oil tank into position in frame from right side of vehicle.
2. See Figure 3-175 or Figure 3-176. Install oil tank mounting screw (3) through bracket (4) and loosely screw into oil tank to hold tank in place.
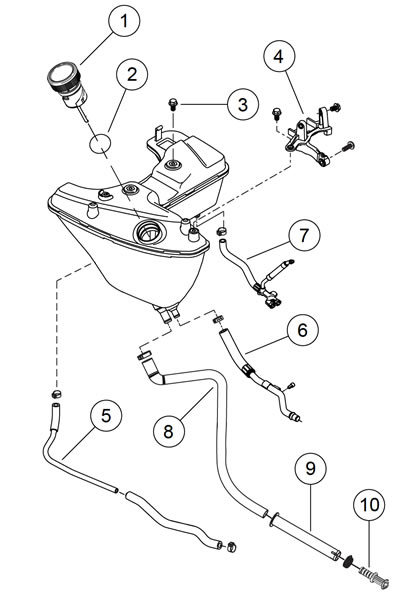
Figure 3-175. Engine oil tank assembly: XR 1200X: 1. Filler cap/dipstick; 2. O-ring; 3. Oil tank mounting screw; 4. Bracket; 5. Oil vent line; 6. Oil feed line; 7. Oil return line; 8. Oil drain line; 9. Oil drain line sleeve; 10. Drain plug
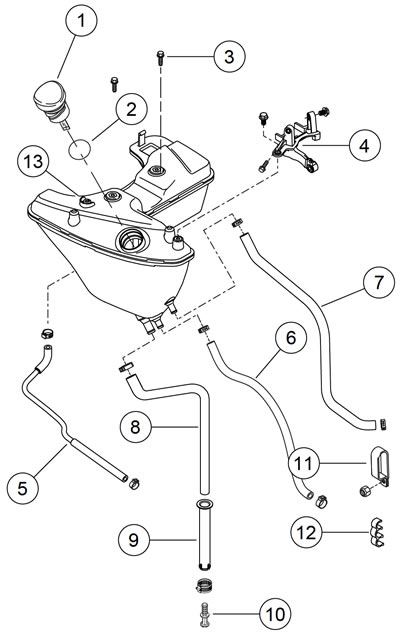
Figure 3-176. Engine oil tank assembly: XL models: 1. Filler cap/dipstick; 2. O-ring; 3. Oil tank mounting screw; 4. Bracket; 5. Oil vent line; 6. Oil feed line; 7. Oil return line; 8. Oil drain line; 9. Oil drain line sleeve; 10. Drain plug; 11. Clamp; 12. Hose clip; 13. Relief valve
3. Install remaining two mounting screws through frame and screw into oil tank. Tighten all three fasteners to 36-60 in·lbs (4.1-6.8 Nm).
Notes:
- All Models: The vent oil hose is composed of a flexible hose originating at the gearcase cover elbow fitting, mated to a hard plastic line, then another flexible hose at the oil tank vent fitting.
- XR 1200X: The return oil line is a manifold assembly that branches between the crankcase and the rear cylinder head.
4. Install the oil vent hose (5), the feed hose (8), the drain hose (9) and the return oil line (6) to the oil tank fittings. Secure with new clamps.
5. Install rear fender. See 2.33 REAR FENDER: ALL XL MODELS EXCEPT XL 883N, XL 1200X/V, 2.34 REAR FENDER AND LICENSE PLATE BRACKET: XL 883N, XL 1200X/V or 2.35 REAR FENDER: XR 1200X.
6. Install rear belt guard. See 2.22 BELT GUARD AND DEBRIS DEFLECTOR.
7. Install right side cover.
- a. Engage two holes on top of cover onto stanchions on top of oil tank.
- b. Rotate bottom end of cover downward until bottom lip of cover snaps in place on tab on bottom of oil tank.
- 8. Fill oil tank and install filler cap/dipstick. See 1.6 ENGINE OIL AND FILTER, Checking and Adding Oil.
Warning! Connect positive (+) battery cable first. If positive (+) cable should contact ground with negative (-) cable connected, the resulting sparks can cause a battery explosion, which could result in death or serious injury.
9. Connect positive (+) battery cables to battery. Connect negative (-) battery cable to ground point on engine crankcase. See 1.22 BATTERY MAINTENANCE.
10. Install left side cover.
Warning! After installing seat, pull upward on seat to be sure it is locked in position. While riding, a loose seat can shift causing loss of control, which could result in death or serious injury.
11. Install seat.