
Inspect
Brake Caliper Pins and Bushings
For this scheduled maintenance procedure, see Front brake caliper or Rear brake caliper.
Brake Lines
For this scheduled maintenance procedure, see Front brake caliper.
Brake Pad Thickness
Warning: Always replace brake pads in complete sets for correct and safe brake operation. Improper brake operation could result in death or serious injury.
1. See Figure 2-7. Measure brake pad thickness (1) above backplate (2).
2. Compare measurements to specifications. Refer to Table 2-5.
3. Replace front or rear brake pads if pad thickness is below specification. See Front brake caliper or Rear brake caliper.
Brake Disc Thickness, Lateral Runout and Warping
1. See Figure 2-7. Measure brake disc thickness.
2. Compare measurements to specifications. Refer to Table 2-5.
3. Check brake disc for lateral runout and warping.
- a. Measure brake disc runout using a dial indicator mounted to a stationary surface.
- b. Maximum brake disc lateral runout is 0.2 mm (0.008 in) when measured near the outside diameter of the disc.
4. Replace front or rear brake discs if disc thickness is below specification or disc runout is beyond specification. See Front wheel or Rear wheel.
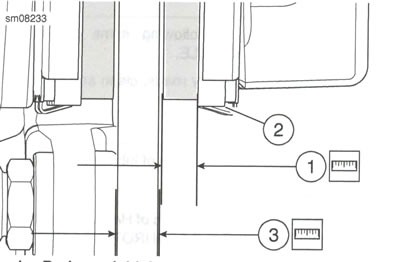
Figure 2-7. Brake Thickness: 1. Brake pad thickness; 2. Backplate; 3. Brake disc thickness
Table 2-5. Brake Specifications
| MINIMUM THICKNESS | mm | in |
| Brake pads | 1.5 | 0.06 |
| Front brake disc | 4.6 | 0.18 |
| Rear brake disc | 5.0 | 0.19 |
Replace front brake pads
| FASTENER | TORQUE VALUE | |
| Front brake pad pin | 14.8-19.5 Nm | 131-173 in·lbs |
| Front brake master cylinder reservoir cover screw | 2.0-4.0 Nm | 18-35 in·lbs |
Remove
Notice: DOT 4 brake fluid will damage painted and body panel surfaces it comes in contact with. Always use caution and protect surfaces from spills whenever brake work is performed. Failure to comply can result in cosmetic damage.
1. Set motorcycle upright. See Motorcycle general maintenance, Secure the Motorcycle for Service.
2. Turn handlebar to level reservoir.
Warning: Clean filler cap before removing. Use only DOT 4 brake fluid from a sealed container. Contaminated fluid can adversely affect braking, which could result in death or serious injury.
Notice: Do not allow dirt or debris to enter the master cylinder reservoir. Dirt or debris in the reservoir can cause improper operation and equipment damage.
3. See Figure 2-8. Remove front brake master cylinder cover.
- a. Remove screws (5).
- b. Remove reservoir cover (4).
- c. Remove diaphragm plate (3) and diaphragm (2) from master cylinder reservoir (1).
4. Remove front brake caliper bracket and front brake caliper. See Front brake caliper.
5. See Figure 2-9. Remove front brake pads.
- a. Support caliper (3).
Note: Fluid level can rise above maximum fill level as pistons are pressed into their bores. Remove fluid as necessary.
- b. Press brake pads (1) apart to press pistons back into their bores.
- c. Remove brake pad pin (3).
- d. Remove brake pads.
Inspect
1. See Figure 2-9. Inspect pad pin for wear.
- a. Measure pad pin diameter in an unworn area
- b. Measure pad pin diameter in a worn area.
- c. Replace pin if wear exceeds 0.38 mm (0.015 in).
2. Inspect brake pad spring (6) and slider (5) for wear. Replace as necessary.
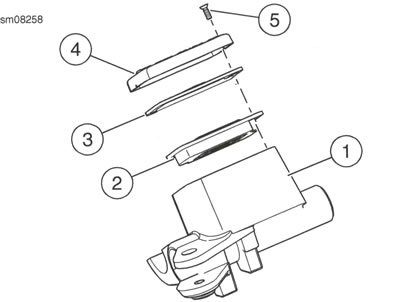
Figure 2-8. Front Brake Master Cylinder Reservoir Assembly: 1. Master cylinder reservoir; 2. Diaphragm; 3. Diaphragm plate; 4. Reservoir cover; 5. Screw (2)
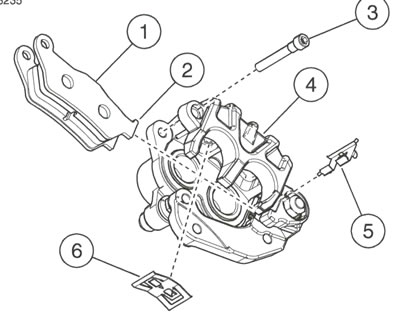
Figure 2-9. Front Brake Pads: 1. Brake pads (2); 2. Brake pad mounting tab; 3. Brake pad pin; 4. Front brake caliper; 5. Slider; 6. Brake pad spring
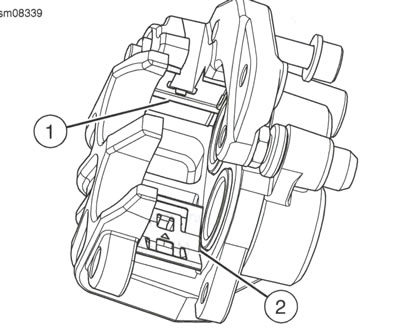
Figure 2-10. Brake Pad Spring: 1. Slider; 2. Brake pad spring
Install
1. See Figure 2-10. Install slider (1) and brake pad spring (2).
2. See Figure 2-9. Install front brake pads. a. Install new piston-side brake pad (1). b. Install pad mounting tab (2) to slider (5). c. Press pad against pistons. d. Install new wheel-side brake pad. e. Install pad mounting tab to slider. f. Press pad against mounting bracket. g. Align brake pads against brake pad spring (6).
3. Install pad pin. a. Press wheel-side pad against brake pad spring. b. Insert brake pad pin through caliper and brake pad.
- c. Press piston-side pad against brake pad spring.
- d. Install brake pad pin.
4. Install caliper and bracket. See Front brake caliper.
5. Tighten pad pin to 14.8-19.5 Nm (131-173 in·lbs).
Warning: After servicing brakes and before moving motorcycle, pump brakes to build brake system pressure. Insufficient pressure can adversely affect brake performance, which could result in death or serious injury.
6. Squeeze front brake lever to push pistons against brake pad.
7. Check fluid level in brake reservoir. Add enough DOT 4 BRAKE FLUID to reservoir to bring fluid level to maximum fill level.
8. See Figure 2-8. Install front brake master cylinder cover, a. Install diaphragm (2) and diaphragm plate (3). b. Install reservoir cover (4) and screws (5). Tighten screws to 2.0-4.0 Nm (18-35 in·lbs).
Note: Avoid making hard stops for first 160 km (100 mi) to allow new pads to become conditioned to brake discs.
Warning: After repairing the brake system, test brakes at low speed.
If brakes are not operating properly, testing at high speeds can cause loss of control, which could result in death or serious injury.
Warning: Be sure that all lights and switches operate properly before operating motorcycle. Low visibility of rider can result in death or serious injury.
9. Test brakes. a. Check operation of rear lamps. b. Test ride motorcycle. Repeat the bleed procedure if brakes feel spongy. See Bleed brakes.
Replace rear brake pads
| FASTENER | TORQUE VALUE | |
| Rear brake pad pin | 14.8-19.5 Nm | 131-173 in·lbs |
| Rear brake master cylinder reservoir cover screw | 2.0-4.0 Nm | 18-35 in·lbs |
Remove
Notice: DOT 4 brake fluid will damage painted and body panel surfaces it comes in contact with. Always use caution and protect surfaces from spills whenever brake work is performed. Failure to comply can result in cosmetic damage.
1. Set motorcycle upright. See Motorcycle general maintenance, Secure the Motorcycle for Service.
Warning: Clean filler cap before removing. Use only DOT 4 brake fluid from a sealed container. Contaminated fluid can adversely affect braking, which could result in death or serious injury.
Notice: Do not allow dirt or debris to enter the master cylinder reservoir. Dirt or debris in the reservoir can cause improper operation and equipment damage.
2. See Figure 2-11. Remove rear brake master cylinder cover.
- a. Remove screws (5).
- b. Remove reservoir cover (4).
- c. Remove diaphragm plate (3) and diaphragm (2) from master cylinder reservoir (1).
3. Remove rear brake caliper bracket and rear brake caliper. See Rear brake caliper.
4. See Figure 2-12. Remove rear brake pads.
- a. Support caliper (1).
Note: Fluid level can rise above maximum fill level as pistons are pressed into their bores. Remove fluid as necessary.
- b. Press brake pads (3) apart to press pistons back into their bores.
- c. Remove brake pad pin (6).
- d. Remove brake pads.
Inspect
1. See Figure 2-12. Inspect pad pin for wear.
- a. Measure pad pin diameter in an unworn area
- b. Measure pad pin diameter in a worn area.
- c. Replace pin if wear exceeds 0.38 mm (0.015 in).
2. Inspect brake pad spring (5) and slider (4) for wear. Replace as necessary.
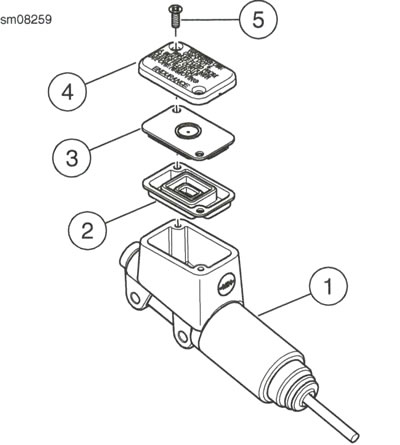
Figure 2-11. Rear Brake Master Cylinder Reservoir Assembly: 1. Master cylinder reservoir; 2. Diaphragm; 3. Diaphragm plate; 4. Reservoir cover; 5. Screw (2)
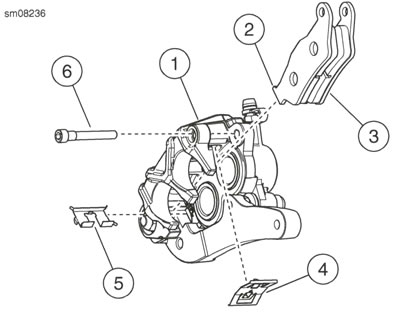
Figure 2-12. Rear Brake Pads: 1. Rear brake caliper; 2. Brake pad mounting tab; 3. Brake pads (2); 4. Brake pad spring; 5. Slider; 6. Brake pad pin
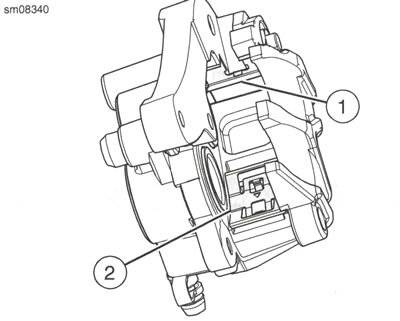
Figure 2-13. Brake Pad Spring: 1. Slider; 2. Brake Pad Spring
Install
1. See Figure 2-13. Install slider (1) and brake pad spring (2).
2. See Figure 2-12. Install rear brake pads.
- a. Install new piston-side brake pad (3).
- b. Install pad mounting tab (2) to slider (5).
- c. Press pad against pistons.
- d. Install new wheel-side brake pad.
- e. Install pad mounting tab to slider.
- f. Press pad against mounting bracket.
- g. Align brake pads against brake pad spring (4).
3. Install pad pin.
- a. Press wheel-side pad against brake pad spring.
- b. Insert brake pad pin through caliper and brake pad.
- c. Press piston-side pad against brake pad spring.
- d. Install brake pad pin.
4. Install caliper and bracket. See Rear brake caliper.
5. Tighten pad pin to 14.8-19.5 Nm (131-173 in·lbs).
Awarning
After servicing brakes and before moving motorcycle, pump brakes to build brake system pressure. Insufficient pressure can adversely affect brake performance, which could result in death or serious injury.
6. Squeeze rear brake lever to push pistons against brake pad.
7. Check fluid level in brake reservoir. Add enough DOT 4 BRAKE FLUID to reservoirto bring fluid level to maximum fill level.
8. See Figure 2-11. Install rear brake master cylinder cover.
- a. Install diaphragm (2) and diaphragm plate (3).
- b. Install reservoir cover (4) and screws (5). Tighten screws to 2.0-4.0 Nm (18-35 in·lbs).
Note: Avoid making hard stops for first 160 km (100 mi) to allow new pads to become conditioned to brake discs.
Warning: After repairing the brake system, test brakes at low speed. If brakes are not operating properly, testing at high speeds can cause loss of control, which could result in death or serious injury. Be sure that all lights and switches operate properly before operating motorcycle. Low visibility of rider can result in death or serious injury.
9. Test brakes.
- a. Check operation of rear lamps.
- b. Test ride motorcycle. Repeat the bleed procedure if brakes feel spongy. See Bleed brakes.