
Inspect
Sprockets
Note: If chrome chips or gouges to rear sprocket are large enough to be harmful, they will leave a pattern on the belt face.
1. See Figure 2-23. Inspect each tooth (1) of rear sprocket for:
- major tooth damage
- large chrome chips with sharp edges
- gouges caused by hard objects
- excessive loss of chrome plating
2. To check if chrome plating has worn off, drag a scribe or sharp knife point across the bottom of a groove (2) (between two teeth) with medium pressure.
- a. If scribe or knife point slides across groove without digging in or leaving a visible mark, chrome plating is still good.
- b. If scribe or knife points digs in and leaves a visible mark, it is cutting the bare aluminum. A knife point will not penetrate the chrome plating.
3. Replace rear sprocket if major tooth damage or loss of chrome exists.
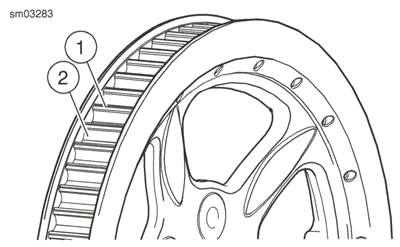
Figure 2-23. Rear Sprocket: 1. Tooth; 2. Groove
Drive Belt
See Figure 2-24. Inspect drive belt for:
- Cuts or unusual wear patterns.
- Outside edge beveling (8). Some beveling is common, but it indicates that sprockets are misaligned.
- Outside ribbed surface for signs of stone puncture (7). If cracks or other damage exists near edge of belt, replace belt immediately. Damage to center of belt will require belt replacement eventually. However, when cracks extend to edge of belt, failure is imminent.
- Inside (toothed portion) of belt for exposed tensile cords (normally covered by nylon layer and polyethylene layer). This condition will result in belt failure and indicates worn transmission sprocket teeth. Replace belt and transmission sprocket.
- Signs of puncture orcracking at the base of the belt teeth. Replace belt if either condition exists.
- Replace belt if conditions 2, 3, 6 or 7 (on edge of belt) exist.
Note: Condition 1 may develop into 2 or 3 over time. Condition 1 is not grounds for replacing the belt, but it should be watched closely before condition 2 develops which will require belt replacement.
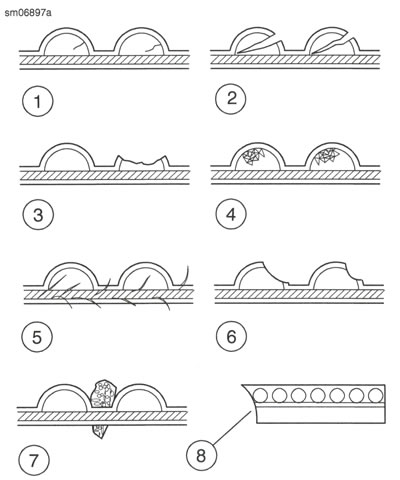
Figure 2-24. Drive Belt Wear Patterns
Table 2-8. Drive Belt Wear Analysis
| NO.* | CONDITION | REQUIRED ACTION |
| 1 | Internal tooth cracks (hairline) | OK to run, but monitor condition. |
| 2 | External tooth cracks | Replace belt. |
| 3 | Missing teeth | Replace belt. |
| 4 | Chipping (not serious) | OK to run, but monitor condition. |
| 5 | Fuzzy edge cord | OK to run, but monitor condition. |
| 6 | Hook wear | Replace belt and sprocket. |
| 7 | Stone damage | Replace belt if damage is on the edge. |
| 8 | Bevel wear (outboard edge only) | OK to run, but monitor condition. |
* See Figure 2-24.
Measure drive belt deflection
| PART NUMBER | TOOL NAME |
| HD-35381-A | Belt tension gauge |
Note: Always use BELT TENSION GAUGE (Part No. HD-35381-A) to measure belt deflection. Failure to use tension gauge may cause under-tensioned belts. Loose belts can fail due to "ratcheting" (jumping a tooth) which causes tensile cord crimping and breakage.
1. Measure drive belt deflection.
- a. Set motorcycle upright or on jiffy stand and unladen.
- b. See Figure 2-25. Use H-D BELT TENSION GAUGE (Part No. HD-35381-A).
- c. Slide O-ring (4) to 0 kg (0 lbs) mark (3).
- d. Fit belt cradle (2) against bottom of drive belt inline with belt deflection window.
- e. Press upward on knob (6) until О-ring slides down to 4.5 kg (10 lbs) mark (5) and hold steady.
- f. See Figure 2-26. Measure belt deflection as viewed through belt deflection viewing window while holding gauge steady. Each deflection graduation is 1.59 mm (0.0625 in).
2. Compare with specifications listed in Table 2-9.
3. Adjust as necessary.
Table 2-9. Belt Deflection Specifications*
| MODELS | mm | in |
| XG500 | 12.7-15.9 | 0.50-0.62 |
| XG750 | 12.7-15.9 | 0.50-0.62 |
* Deflection measured at 4.5 kg (10 lb) tension.
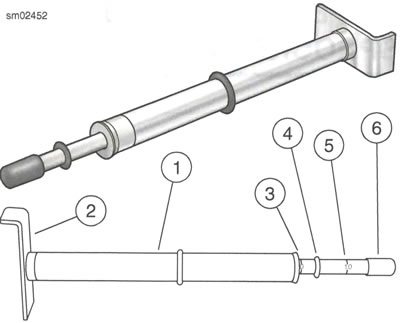
Figure 2-25. Belt Tension Gauge: 1. Belt tension gauge; 2. Belt cradle; 3. 0 kg (0 lbs) mark; 4. O-ring; 5. 4.5 kg (10 lbs) mark; 6. Knob
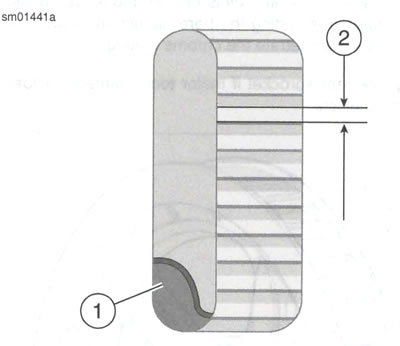
Figure 2-26. Belt Deflection Window: 1. Drive belt; 2. Deflection graduations
Adjust belt
1. See Figure 2-27. Adjust rear axle, a. Loosen rear axle nut (1).
Note: Тum both adjuster nuts same number of turns in order to maintain approximate alignment of rear wheel.
- b. Turn axle adjuster nuts (2) clockwise to decrease belt deflection (increase tension), or counterclockwise to increase belt deflection (decrease tension).
- c. Check rear wheel alignment. See Wheel alignment.
- d. Tighten rear axle nut. See Rear wheel.
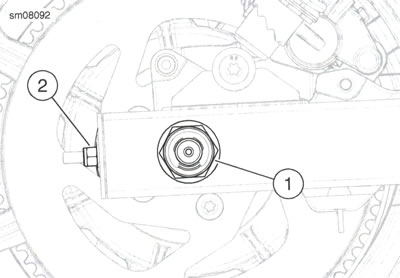
Figure 2-27. Axle Adjuster: 1. Axle nut; 2. Axle adjuster nut