
Menu MENU
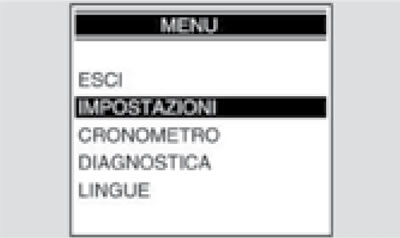
The configuration menu opens on the menu screen and contains the following options:
- EXIT (Exit)
- SETTINGS (Settings)
- CHRONOMETER (Chronometer)
- DIAGNOSIS (Diagnostics)
- LANGUAGES (Languages)
Settings (Settings)
The SETTINGS menu contains the following items:
- EXIT (Exit)
- TIME ADJUSTMENT (Setting the time)
- GEAR SHIFT (Gear shift)
- BACKLIGHTING (Backlight)
- CODE CHANGE (Change code)
- CODE RESET (Reset code)
- °C/°F
- 12/24 h
The settings menu functions are discussed in the following sections.
Once the operation is completed, the main menu is displayed again on the dashboard.
Time adjustment (Setting the time)
This item allows you to program the clock. The main display shows a message «CLOCK ADJUSTMENT» (Setting the clock).
When this function is turned on, the minutes display stops; Only the clock indication is displayed. Each time you press the MODE switch to the right, the hour value increases; and similarly, each time you press the MODE switch to the left, the clock value decreases. To save the setpoint and move to setting the minutes, press the center of the MODE switch.
When this function is turned on, the minutes display stops; Only the clock indication is displayed. Each time you press the MODE switch to the right, the minute value increases; and similarly, each time you press the MODE switch to the left, the minute value decreases.
To save the set value and exit the clock setting function, press the center of the MODE switch.
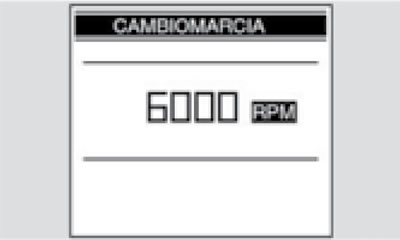
Gear shift threshold (Gear shift threshold)
This mode allows you to set a threshold value for gear shifting. A message appears on the home screen «GEAR SHIFT THRESHOLD».
Each time you press the MODE switch to the right, the threshold value increases by 100 rpm; and similarly, each time you press the MODE switch to the left, the threshold value decreases by 100 rpm.
Once the highest or lowest limit is reached, subsequent switch presses are ignored.
The procedure is completed by pressing the center part of the MODE switch, the set value is saved, the pointer returns to zero and the configuration menu is displayed on the instrument panel.
When you connect the battery for the first time, the instrument panel sets the RPM value for the break-in mode. The last set value is subsequently displayed:
- RUN-IN REVOLUTIONS (RPM DURING BREAK-IN): 6000 rpm
- MINIMUM REVOLUTIONS (MIN. REVERSES): 5000 rpm _
- MAXIMUM REVOLUTIONS (MAX. REVERSES): 12000 rpm
When a preset threshold value is exceeded, the warning lamp on the instrument panel begins to flash. It turns off when the value drops below the threshold.
Backlighting brightness (Backlight brightness)
This feature allows you to set the backlight to one of three levels. Each time you press the MODE switch to the right or left, the following icons will be displayed:
- LOW (Low)
- MEAN (Average)
- HIGH (High)


After completing the operation, pressing the center part of the MODE switch on the instrument panel displays the SETTINGS menu (Settings).
When the battery is disconnected, the display is set to its maximum brightness level.
Code change (Change code)
This function is used to change old code. After entering this function, the following message is displayed:
- «ENTER OLD CODE» (Enter old code)
After receiving the old code, a new code is requested and the following message is shown on the display:
- «ENTER NEW CODE» (Enter new code)
After the operation is completed, the DIAGNOSIS menu appears on the display (Diagnostics). If this code has already been used, the operation is not allowed.
After the operation is completed, the SETTINGS menu is displayed on the dashboard (Settings).
If a code is saved for the first time, only the new code is requested.
Code reset (Reset code)
This function is used to set a new code if the old code is unknown; in this case, at least two keys must be inserted into the ignition switch. After installing the first key, you are prompted for the second key:
- «INSERT KEY II» (Insert key 2)
While changing the keys, the dashboard lights up; If the key is not inserted within 20 seconds, the operation is completed. After the second key is recognized, you are prompted to enter a new code:
- «ENTER NEW CODE» (Enter new code)
After the operation is completed, the DIAGNOSIS menu appears on the display (Diagnostics). If this code has already been used, the operation is not allowed.
After the operation is completed, the SETTINGS menu is displayed on the dashboard (Settings).
To use this feature, select «°C/°F» V SETTINGS menu (Settings).
This function allows you to select the ambient temperature unit:°C or°F.
12h/24h (12/24 hour format)
To use this function, select 12H/24H in the SETTINGS menu (Settings).
This menu allows you to select 12- or 24-hour clock format.
Clock/Chronometer (watch / chronometer)
To access the chronometer function, select CHRONOMETER (Chronometer) in the configuration menu. When you select the CHRONOMETER function, the following items appear on the display:
- EXIT (Exit)
- START CHRONOMETER (Launch chronometer)
- VIEW TIMES (Viewing time values)
- DELETE TIMES (Deleting time values)
Starting the chronometer
When you select this item, a screen appears that allows you to choose which function should be displayed at the top of the display: clock or chronometer.
The dashboard remembers the selected configuration even after removing/inserting the key.
Viewing time values
This item is used to display saved timing values. To scroll the screen with time values, press the MODE switch to the right or left for a couple of seconds; To display the CHRONOMETER menu, press and hold it down. When the battery is disconnected, the stored values are erased.

Delete times (Deleting time values)
This item is used to erase saved timing values. Confirmation of erasure is requested. When the operation is completed, the display returns to the chronometer menu.
Diagnosis (Diagnostics)
Open the configuration menu to display the DIAGNOSIS option.
This menu provides interaction with systems installed on the vehicle for their diagnostics. To activate this menu, enter the access code, which can only be obtained from Aprilia service centers.
Languages (Languages)
To access the LANGUAGES function, open the configuration menu. Select LANGUAGES to select the interface language.
The following options are available:
- ITALIANO (Italian)
- ENGLISH (English)
- FRANCAIS (French)
- DEUTSCH (German)
- ESPAGNOL (Spanish)
When the operation is completed, the LANGUAGES menu appears again on the display.