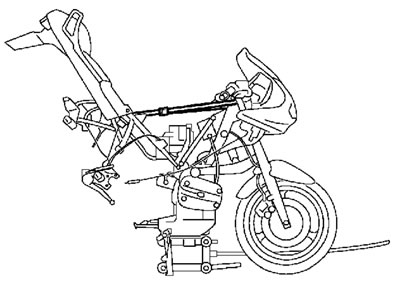
Secure stand, BMW No. 00 1 520, to motorcycle with overlength bushes and screws, BMW No. 001527.
Note:
- Mount a washer on the screw on the right as viewed in the forward direction of travel.
- Depth of thread in tapped bore has been reduced!
Remove the seat.
Remove side panel.
Disengage fuel tank.
Caution! Fuel is flammable and a hazard to health. Observe relevant safety regulations.
Seal the fuel feed and return lines with hose clips, BMW No. 13 3 010, and disconnect.
Disconnect breather lines.
Disconnect plug of fuel pump unit.
Remove fuel tank.
Remove the battery.
Caution! Disconnect the negative battery terminal first, then the positive terminal. Connect the positive battery terminal first, then the negative terminal.
Unscrew rear battery mount.
Disconnect the air temperature sensor plug.
Disconnect the diagnostic plug.
Remove air filter cover.
Remove the air filter.
Remove the intake air pipe.
Unfasten air filter box at front and rear.
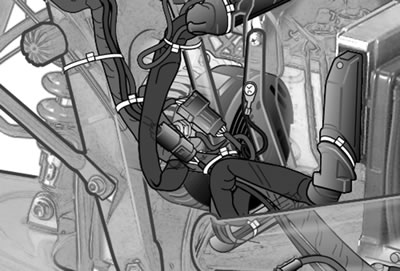
Disconnect plug of oxygen sensor and remove cable.
Disconnect hose clamps/throttle stub pipes and push the stubs into the air filter box.
Disconnect plugs of injection valves.
Remove holders of injection valves.
Remove injection valves from throttle stub pipes.
Detach retaining clip from ball head/shift linkage and remove ball head.
Remove rear-frame fasteners on left and right at front, but only loosen strut fasteners.
Remove manifold.
Remove rear silencer.
Remove front silencer.
Remove starter motor cover and disconnect cable to power socket.
Disconnect cables from starter motor.
Remove the starter motor.
Disconnect cable from oil pressure switch.

Disconnect plug of gear indicator.
Remove the fastener securing the rear spring strut at the bottom.
Remove hydraulic spring adjuster.
Disconnect plug of brake light switch and remove cable.
Remove brake master cylinder and guard from footrest plate.
Take off the footrest plates.
Note: When installing the footrest plates, use the long screws on the right and the short screws on the left.
Remove rear brake fluid reservoir from its holder.
Remove brake line from rear frame.
Remove brake line from swinging arm.
[ABS] Disconnect the plug of the rear ABS sensor.
[ABS] Remove the rear ABS sensor.
Remove rear brake caliper.
Use cable ties to secure the brake caliper to the rear frame.
Remove the clutch bleeding/filler adapter from the rear frame.

Tilt the rear frame up and secure it in this position with a strap attached to the handlebar.
Remove cable ties/wiring harness from air filter box.
Use hose clip pliers, BMW No. 17 5 500, to disconnect hose from rotary breather from air-filter box.
Remove air filter box.
Remove the fuel distributor.
Remove the clutch slave cylinder; fit a new seal when installing.
Remove rear wheel cover.
Remove rear wheel.
Caution! Support the rear wheel drive.
Remove fastener securing strut to gearbox.
Release the retaining strap securing the flexible gaiter to the swinging arm.
Push the flexible gaiter to the rear.
Swinging-arm bearing studs are secured with Loctite: heat to max. 120°C (248°F) to release.
Slacken the floating-bearing stud of the rear wheel drive in the swinging arm.
Slacken the fixed-bearing stud of the rear wheel drive in the swinging arm.
Remove floating bearing/fixed bearing stud bolts.
Remove rear-wheel drive from universal shaft.
Slacken the floating-bearing stud of the swinging arm in the gearbox.
Slacken the fixed-bearing stud of the swinging arm in the gearbox.
Remove floating bearing/fixed bearing stud bolts.
Remove swinging arm.
Press off drive shaft.
Remove the gearbox.

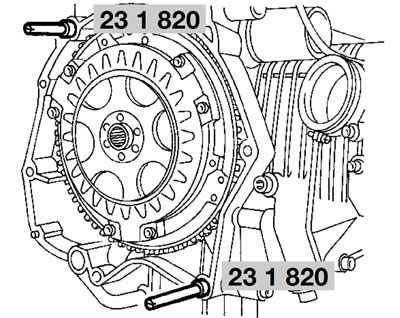
Always use oiled guide pins, BMW No. 23 1 820, when removing or installing the gearbox.
Caution! Take care to keep the gearbox at its installed height until the full length of the clutch actuating rod is visible, as otherwise the rod can be bent.
Installation is the reverse of the removal procedure.
Caution! Note correct sequence for tightening fasteners of rear frame to gearbox.
Switch on the ignition.
Without starting the engine, fully open the throttle once or twice so that the Motronic control unit can register the throttle-valve positions.
Note:
- Disconnecting the battery deletes all entries (e.g. faults, settings) stored in the Motronic control unit’s memory.
- Loss of settings can temporarily impair the operating characteristics when the engine is restarted.
Replacing the shaft sealing rings in the gearbox housing and gearbox cover

Note:
- All shaft sealing rings can be replaced with the gearbox installed, apart from the input-side shaft sealing ring on the input shaft.
- Replace all shaft sealing rings if the gearbox is fully disassembled.
- Lightly oil the sealing lips before installing the shaft sealing rings.
Caution! Take care not to damage the faces of the casing and the shafts when removing the shaft sealing rings.
Replacing the input shaft sealing ring at input end
Carefully lever out the shaft sealing ring with a screwdriver.
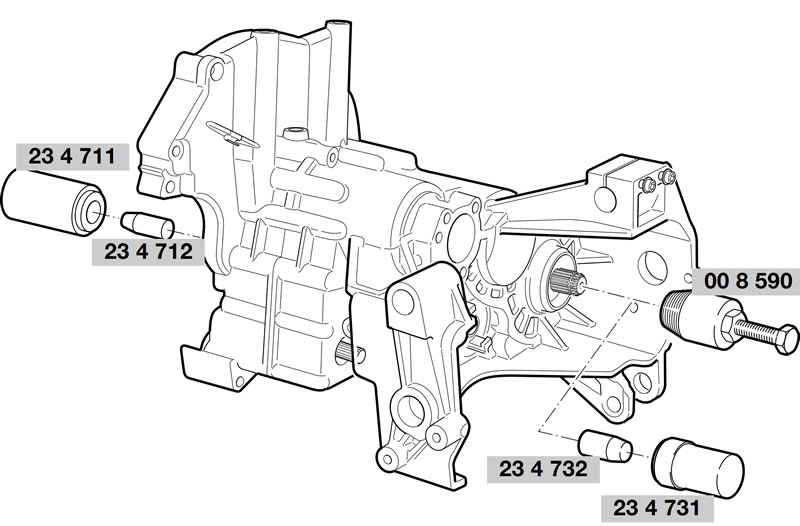
Drive the new sealing ring in with the sealing lips facing inwards, using slip-over sleeve, BMW No. 234 712, and drift, BMW No. 234711.
Replacing output shaft sealing ring
Caution: Do not use pointed tools to remove the shaft sealing ring of the output shaft, because they could damage the sealing washer of the grooved ball bearing behind the sealing ring.
Use puller, BMW No. 008590, to remove the shaft sealing ring, or alternatively pry out carefully with a screwdriver.
Install the sealing ring with the sealing lip facing inwards, using assembly sleeve, BMW No. 234 732, and drift, BMW No. 234731.
Replacing input shaft sealing ring at output end

Caution! Take care not to damage the faces of the casing and the shafts when removing the shaft sealing rings.
Caution! Do not use pointed tools to remove the shaft sealing ring of the input shaft, because they could damage the sealing washer of the grooved ball bearing behind the sealing ring.
Remove the connecting pipe.
Carefully lever out the shaft sealing ring with a screwdriver.
Install the new sealing ring with the sealing lips facing inwards, using guide, BMW No. 23 4 722, and impact driver, BMW No. 234 723.
Replacing shaft sealing ring for selector drum
Carefully lever out the shaft sealing ring with a screwdriver.
Install the new sealing ring with the sealing lip facing inwards, using impact driver, BMW No. 234750.
Replacing sealing ring for selector shaft
Carefully lever out the shaft sealing ring with a screwdriver.
Install the new sealing ring with the sealing lip facing inwards, using assembly sleeve, BMW No. 23 4 612, and impact driver, BMW No. 234740.
