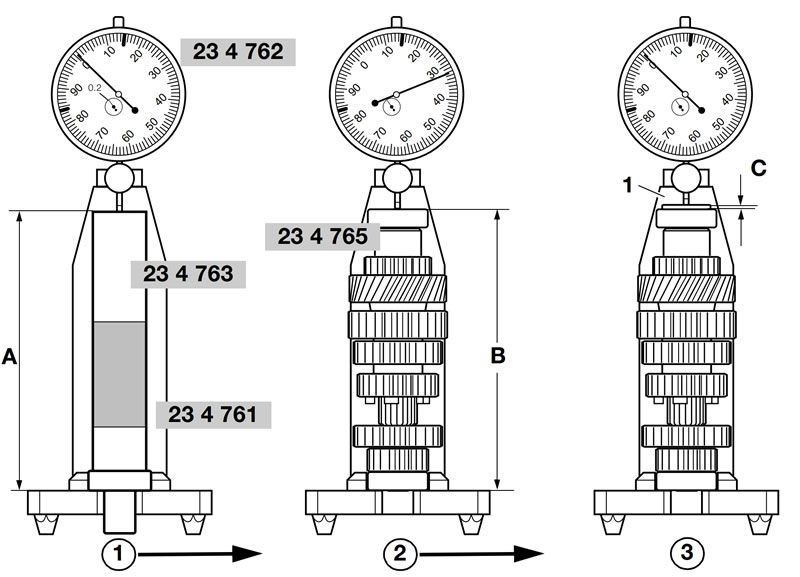
Caution:
- Check and adjust the fully assembled length as described below and install a spacing washer of the correct thickness.
- Before measuring, always make sure that the grooved ball bearings are pressed fully home, even if the shaft has not been disassembled and reassembled.
Position dial gauge, BMW No. 23 4 762, in rear locating bore of stand, BMW No. 23 4 761, and set to 0.2 mm (0.008 in) preload.
Using dial gauge, zero to dimension «A» of the zero gauge, BMW No. 234763.
Pull off the input-side grooved ball bearing with universal puller, BMW No. 007500.
Remove the spacing washer.
Place reference washer, BMW No. 23 4 765, on the intermediate shaft.
Place the grooved ball bearing on the reference washer.
Insert intermediate shaft in measuring stand.
Using the dial gauge, measure the deviation from zero of dimension «B» at the inner bearing race.
Deviation from zero is equivalent to the thickness «C» of spacer (1).
Place a spacer (1) of the correct thickness on the bearing inner ring and check deviation from zero.
A = B + C
Caution! The maximum deviation from zero must not be exceeded.
Remove the intermediate shaft from the measuring fixture.
Take off spacing washer, grooved ball bearing and reference washer.
Place a spacing washer (1) of the correct thickness on the intermediate shaft and press on the grooved ball bearing.
Reference dimension for intermediate shaft:
- Maximum deviation from zero: -0.05…0 mm (-0.002...0.00 in)
