
Removal
Warning! Do not remove the pressure filler cap when the engine is hot. The cooling system is under pressure and hot coolant and steam may escape causing severe burns. Allow engine to cool before servicing the cooling system.
1. Allow cooling system to cool.
2. Remove right side cover and maxi-fuse. See 8.5 Maxi-fuse.
3. Open seat and remove pressure cap.
4. Remove left side radiator cover. Remove radiator plug and drain engine coolant into suitable container.
5. Place a suitable container under engine and remove front engine coolant drain plug to drain coolant from engine.
Note. With the motorcycle in normal orientation, there is no need to remove the rear engine coolant drain plug.
6. Install and tighten radiator drain plug to 9-11 Nm (80-97 in-lbs).
7. Install and tighten front engine coolant drain plug to 9.7 Nm (86 in-lbs).
8. Replace left side radiator cover.
9. Remove airbox cover. Remove air filter top and air filter. See 1.4 Airbox and air filter.
10. Remove pipe clamp and p-clamp from coolant pipes. See 6.6 Coolant pipes and hoses.
11. Remove hose cover clamp from upper end of hose to coolant pipe and loosen lower hose clamp. Pull coolant pipe up.
12. See Figure 6-12. Unbolt water pump bolts and remove water pump cover.
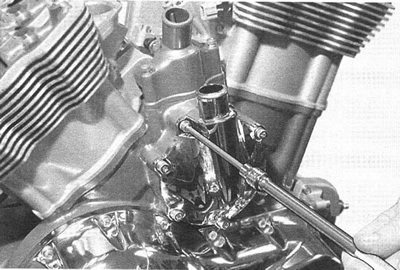
Figure 6-12. Removing cover
13. Remove the insert.
14. See Figure 6-13. Using a soft mallet, tap on side of water pump to loosen.
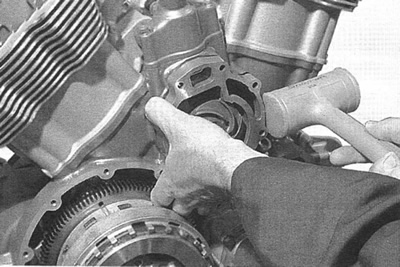
Figure 6-13. Removing water pump (clutch cover removed for clarity)
15. See Figure 6-14. Remove bearing housing assembly with the о-rings and gasket.

Figure 6-14. Water pump bearing housing assembly (clutch cover removed for clarity)
Installation
1. Clean engine cavity.
2. See Figure 6-15. Lube and install new o-ring (6) on bearing housing assembly (5).
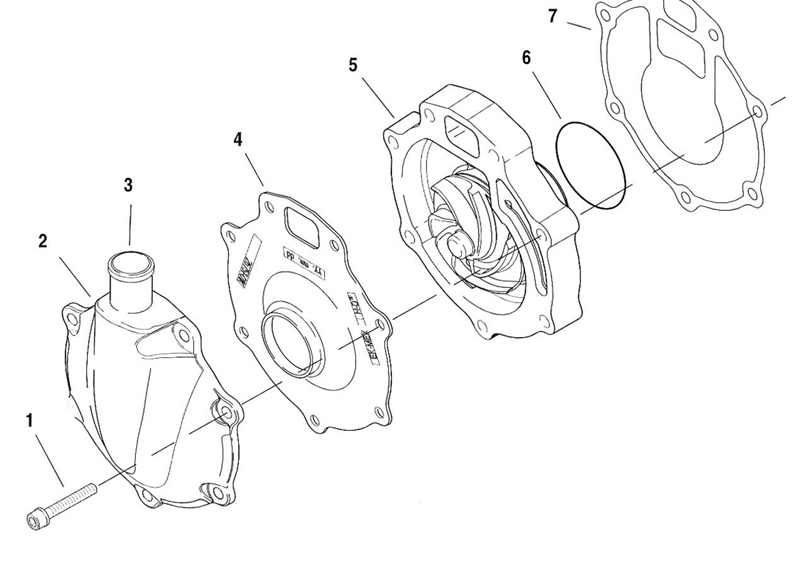
Figure 6-15. Water pump: 1. Mounting bolt @ 9.7 Nm (86 in-lbs); 2. Water pump cover; 3. Cover outlet pipe; 4. Water pump insert; 5. Bearing housing assembly; 6. O-ring (2); 7. Gasket
3. Install new gasket (7) with part numbers facing out on the face of water pump.
4. Align pump square drive with drive shaft and push water pump into engine cavity.
Note. A lubricant, as tire soap or detergent and water, can be used to lubricate the hose to aid in pushing hose over neck beads.
5. Thread on mounting bolts (1) ho'ding bearing housing assembly (5), water pump insert (4) and water pump cover (2) over water pump cavity.
6. Tighten water pump mounting bolts to 9.7 Nm (86 in-lbs).
7. Push pump to engine coolant pipe hose on cover outlet Pipe (3).
8. Install lower bright hose clamp and tighten to 3-4 Nm (27-35 in-lbs).
9. Install and tighten hose cover to 3-4 Nm (27-35 in-lbs).
10. Install pipe clamp and p-clamp. See 6.6 Coolant pipes and hoses.
11. Loosen air bleed plug. Fill with GENUINE HARLEY-DAVIDSON EXTENDED LIFE ANTIFREEZE & COOLANT through filler neck.
12. Tighten air bleed plug to 9-11 Nm (80-97 in-lbs) and replace pressure cap.
13. Replace maxi-fuse and right side cover.
14. Rinse motorcycle with water to remove any spilled coIlant.
15. After running engine, check coolant level in overflow bottle with coolant cold and motorcycle on jiffy stand. If level is below COLD FULL line, remove cap from overflow bottle and add antifreeze until fluid level reaches COLD FULL line.
16. Continue to run engine, check level, and add antifreeze until fluid level remains at COLD FULL line with motorcycle on jiffy stand.