Warning! Gasoline is extremely flammable and can be explosive under certain conditions. Turn the ignition switch OFF. Do not smoke. Make sure the area is well-ventilated and free from any source of flame or sparks; this includes any appliance with a pilot light.
Situate the motorcycle so that it is perpendicular to the ground.
Remove the fuel tank (see Fuel Tank Removal).
Prepare an auxiliary fuel tank and connect the fuel hose to the carburetors.
Prepare a fuel hose.
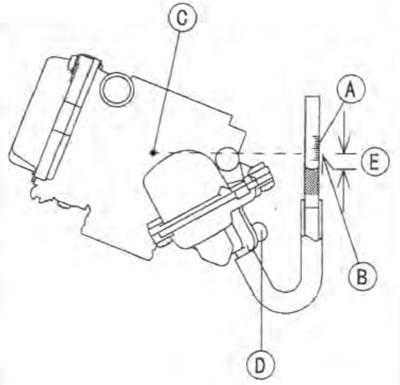
Connect the fuel level gauge [A] to the carburetor float bowl with the fuel hose.

Special Tool - Fuel Level Gauge: 57001-1017
Hold the gauge vertically against the side of the carburetor body so that the "middle" line [B] is several millimeters higher than the mark [C] on the carburetor body.
Feed fuel to the carburetor, then turn the carburetor drain plug [D] out a few turns.
Wait until the fuel level in the gauge settles.
Keeping the gauge vertical, align the "middle" line with the mark.
Note. Do not lower the "middle" line below the mark of the carburetor body. If the gauge is lowered and then raised again, the fuel level measured shows somewhat higher than the actual fuel level. If the gauge is lowered too far. dump the fuel into a suitable container and start the procedure over again.
Read the fuel level [E] in the gauge and compare to the specification.

Screw in the carburetor drain plug.
Stop feeding and remove the fuel level gauge.
★ If the fuel level is incorrect, adjust it (see Service Fuel Level Adjustment).
Service Fuel Level (below the mark on the carburetor body)
Standard: 20.2±1 mm
