MotoInstruction.ru
Mobile
version
Articles
& news
Site
map
Feed
back
Add to
bookmark
English Русский
Aprilia
BMW
Ducati
Harley
Honda
Kawasaki
Suzuki
Triumph
Yamaha
Triumph:
Rocket▾
Rocket III (2004-2018)
Street Triple▾
765 R/RS [4] (2017-2024)
Tiger▾
Tiger 800 (2010-2019)

Bevel box — removal and installation (Triumph Rocket III)

  • Main
  • Triumph
  • Rocket
  • Rocket III
  • Engine and systems
  • Transmission
  • Bevel box — removal and instal…
0

Removal


Before starting work, ensure the motorcycle is stabilised and adequately supported. This will help prevent it from falling and causing injury to the operator or damage to the motorcycle.

1. Support the motorcycle so that the rear wheel is clear of the ground.

2. Remove the rear wheel as described on page 16.8.

3. Remove the left hand rear suspension unit as described on page 13.4.

4. Release the four nuts securing the bevel box to the swinging arm.

5. Ease the bevel box towards the rear of the motorcycle, detaching the pinion coupler from the drive shaft.

Installation


Note: Prior to installation, check that the drive shaft is supported by the sleeve inside the swinging arm. Rectify as necessary.


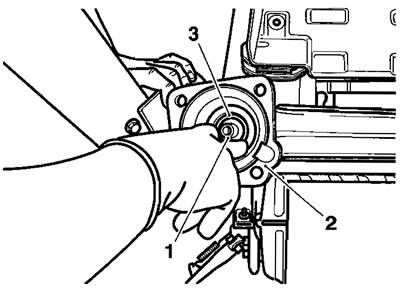
1. Drive shaft; 2. Swinging arm; 3. Sleeve


1. Apply a smear of Molybdenum Disulphide grease to the drive shaft splines and wheel driven flange.

2. Position the bevel box to the drive shaft engaging the pinion coupler and drive shaft at the same time.

Note: Before tightening the bevel box nuts, fully insert the wheel spindle through the swinging arm to ensure it will realign with the swinging arm when the wheel is installed.


Note: Bevel box to swinging arm fixings are tightened in two stages and in a specific sequence. Tighten all fixings to the lower torque before progressing to the higher figure.


3. Align the bevel box by fully inserting the wheel spindle through the bevel box and swinging arm then, in the order shown below, tighten all the bevel box nuts to 20 Nm, then to 64 Nm.


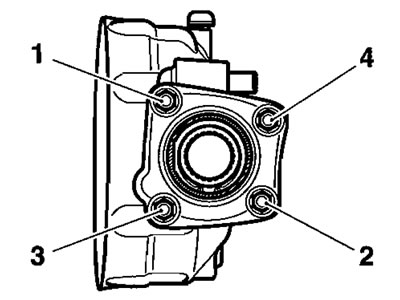
Bevel box bolt tightening sequence


4. Refit the left hand rear suspension unit as described on page 13.5.

5. Refit the rear wheel as described on page 16.9.

6. Lower the motorcycle to the ground and park it on the side stand.

7. Check and top up the bevel box oil level as described on page 6.3.

Drive shaft


Drive shaft details can be found in the rear suspension section on page 13.5.
See this article in russian language
◀ Previous
Triumph Rocket III : Transmission
Next ▶

Bevel box oil change
Bevel box oil level check
Bevel box and drive shaft specification
Sectioned view — bevel box and drive shaft
Friction plate inspection
Clutch — removal and installation
Exploded view — input and output shafts
Exploded view — gear change mechanism
Exploded view — gear selector mechanism
Exploded view — torsional damper shaft housing
Exploded view — torsional damper shaft
Selector shaft, selector forks and drum — removal and installation
Similar articles about motorcycles of other brands
Suzuki Boulevard M109R (2006-2025): Secondary bevel gears — removal, disassembly and inspection BMW R 1150 GS (1999-2004): Removing input bevel pinion
Link to this article in different formats
TEXTHTMLBB Code
Comments and feedback from visitors
No comments yet, you will be the first!


Add up two numbers: 27 + 35


Rocket III (2004-2018) 
  • Information for owner
  • Introduction to manual
  • Engine and systems
  • Engine repair
  • Cooling system
  • Lube system
  • Fuel and control system
  • Transmission
  • Running gear and frame
  • Frame and hinged elements
  • Front suspension and handlebar
  • Rear suspension
  • Brake system
  • Wheels and tires
  • Electric equipment
  • Equipment and devices
  • Starting and charging system
  • Electrical circuits
Aprilia BMW Ducati Harley Honda Kawasaki Suzuki Triumph Yamaha
MotoInstruction.ru © 2021–2025 | Sitemap | Articles | Contacts | Site search | Add to bookmarks | Mobile version