
Warning!
- Make sure the motorcycle is stabilised and adequately supported.
- A correctly supported motorcycle will help prevent it from falling.
- An unstable motorcycle may fall, causing injury to the operator or damage to the motorcycle.
1. If removed, refit the drive chain to the swinging arm, see Drive chain replacement.
Caution! Care must be taken when positioning the swinging arm, not to damage any brake hoses or electrical harnesses that are routed in close proximity to the swinging arm.
2. Position the swinging arm to the frame ensuring the drive chain is in position on the rubbing strip.
3. Refit the swinging arm spindle from the right hand side such that it will support the swinging arm, but not pass all the way through the frame adjuster sleeve. This will allow T3880104 - Swinging Arm Adjuster Wrench to engage in the slot in the frame adjuster sleeve.
4. Using T3880104 - Swinging Arm Adjuster Wrench, tighten the frame adjuster sleeve to 6 Nm.
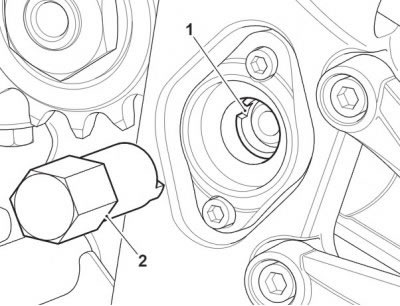
1. Frame adjuster; 2. T3880104 - Swinging Arm Adjuster Wrench
5. Fully insert the swinging arm spindle.
6. Fit the washer and a new swinging arm spindle lock nut and tighten to 110 Nm.
7. Fit the finishers to the swinging arm spindle. Tighten the screws to 1 Nm.

1. Finisher, left hand side; 2. Screw; 3. Sleeve; 4. Cylindrical nut
8. Fit the drive chain to the output sprocket.
9. Release the caliper and refit the rear brake hose clips to the swinging arm. Tighten the fixings to 6 Nm.
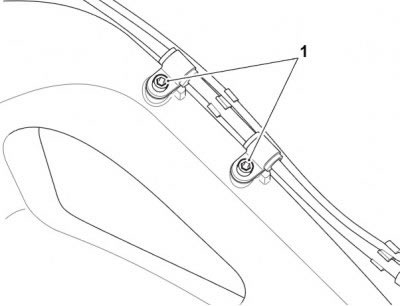
1. Rear brake hose clips
10. If fitted, refit the lower chain guard and tighten its fixings to 6 Nm.
11. Refit the left hand control plate assembly. Tighten the fixings to 24 Nm.

1. Control plate assembly; 2. Fixings
Perform the following operations:
Note: The rear suspension unit and linkage fixings (with the exception of the lower rear suspension unit mounting) should be tightened after the rear wheel has been installed, with the weight of the motorcycle on its wheels.
- Rear suspension unit - installation
- Drag and drop links - installation
- Rear wheel - installation
- Rear hugger and chain guard moulding - installation
- Front sprocket cover - installation
- Gear change linkage - installation
- Exhaust silencer - installation
- Battery - installation
- Seat - installation
Note: Pump the rear brake pedal several times to position the brake pads in the caliper. Rectify as necessary.
Warning! It is dangerous to operate the motorcycle with defective brakes; you must have your authorised Triumph dealer take remedial action before you ride the motorcycle again. Failure to take remedial action may result in reduced braking efficiency leading to loss of motorcycle control and an accident.