
Function
It tells the control unit whether combustion is lean or rich.
Operating principle
The Marelli injection control unit reads and interprets a voltage generated by the difference in oxygen content between the exhaust fumes and the ambient. It does not require an external supply source but, in order to work properly, it should reach a high operating temperature: that is why there is a heating circuit inside.
Level in wiring diagram: Lambda Probe
Location:
- on the vehicle: exhaust pipe
- connector: near the probes
Electrical characteristics:
- Oxygen probe with preheating circuit (power 7W)
- It generates voltage within: 0-1000 mV
- Heater circuit: continuity (7-9 Ohm at ambient temperature)
Pin-out:
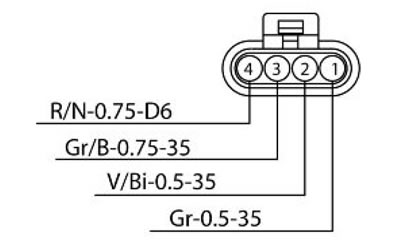
1. Sensor signal + (black wire); 2. Sensor signal - (grey wire); 3. Heater ground connection (white); 4. Heater power supply (white)
The connection diagrams are in the electrical system sections; pay attention to these diagrams as they show the connector/component as viewed from the cable harness side, that is looking at the cables when going out of the "main" cable harness and into the connector/component.
Caution! Before carrying out any troubleshooting, carefully read the general troubleshooting concepts for electrical devices at the beginning of the check and control section in the electrical system chapter.
Axone: parameters
Lambda probe
- Example value: 0 - 1000 mV
If there is a short circuit at + 5 V or above, the lambda probe parameter is not equal to the value read by the control unit; a recovery value is displayed instead.
Lambda sensor correction
- Example value: 1.00
In closed loop, the value must be close to 1.00 (values not within the 0.90 - 1.10 interval indicate a fault): for example, value 0.75 corresponds to +25% with respect to the reference injection time; 1.25 corresponds to -25%. In an open circuit, the lambda probe signal is too low. Therefore, the control unit takes it as a lean combustion condition and will try to enrich it. The value read will be 0.75: once this correction has been tried, the value shifts to 1.00 fixed and the Lambda probe error is signalled.
Axone: statuses
Lambda
Example value: Start-up_Lean_Rich_Fault due to rich value_Fault due to lean value
If the probe connector is removed (voltage almost equal to zero), the status is Fault due to lean value
Lambda check
Example value: Open loop/Closed loop/Rich in closed loop/Lean in closed loop/enriched
Closed loop indicates that the control unit is using the lambda probe signal to keep the combustion as close as possible to the stoichiometric value.
Axone: activations
Lambda probe heating
The auxiliary injection relay (No. 42 in the wiring diagram, placed under fuel tank, right side, third relay starting from the front; CHECK, however, the identification of the relay with the colour of the cables) is energised and the heating circuit is closed to ground 5 times (pin 3 of the lambda probe connector). The continuity of the wiring is necessary for correct activation: no error indications are displayed in case of lack of activation.
Axone: electrical errors
Lambda probe P0130 - short circuit to positive.
Error cause
Excessive voltage (battery voltage) has been detected at PIN 43 of the ENGINE connector. Caution: the "lambda probe" parameter is not the real value that is read; a recovery value is displayed instead.
Troubleshooting
If shorted to positive: with key set to ON, disconnect the sensor connector and measure PIN 1 voltage on the cable harness side (grey cable): if there is voltage (5 or 12 V), restore the cable harness; if there is not, replace the lambda probe.
Lambda probe heating P0135 - short circuit to positive / open circuit, short circuit to negative.
Error cause
If shorted to positive: excessive voltage has been detected at PIN 32 of the ENGINE connector.
If the circuit is open, short circuit to negative: voltage equal to zero has been detected at PIN 32 of the ENGINE connector.
Troubleshooting
If shorted to positive: disconnect the probe connector and check the sensor correct resistance: replace the sensor if not OK; if it is OK, restore the cable harness.
if the circuit is open, short circuit to negative: check the continuity from probe connector (PIN 3 and 4) towards the probe: if not OK, replace the probe; if it is correct, check the sensor connector and the Marelli control unit connector. If not OK, restore. If OK, and with key set to ON and sensor connector disconnected, check if there is battery voltage at PIN 4: if there is not, check the red/black cable between the probe connector and the auxiliary injection relay (No. 42 in the wiring diagram, located under fuel tank, right side, third relay starting from the front; however, the identification of the relay with the colour of the cables). If there are also coil and injector errors, check the relay and its excitation and power line; if there is voltage at PIN 4, check the grey/blue cable earth insulation (PIN 3): if not OK, restore the cable harness. If it is OK, check the continuity of the grey/blue cable (between the sensor connector PIN 3 and the ENGINE PIN 32) and restore the cable harness.
Axone: logic errors
Lambda probe P0134 - voltage without variation.
Error cause
An abnormal behaviour of the voltage at PIN 43 of the ENGINE connector has been detected: the voltage, that should vary over time, keeps a constant value instead.
Troubleshooting
Check circuit continuity from probe connector (PIN 1 and PIN 2) toward the probe: replace the lambda probe if there is no continuity; if there is continuity, check the sensor connector and the Marelli control unit connector: If not OK, restore. If OK, check continuity between the ENGINE connector PIN 43 and PIN 60 and restore the cable harness.
Caution! In case the lambda sensor correction parameter, with engine at idle and H2O t > 90°c, which is not within the 0.9-1.1 range, without errors, check:
- If < 0.9, the probe reads lean combustion conditions and the control unit increases injection time; causes: check for incorrect air intake, little petrol, rusty terminal contacts, defective probe.
- If > 1.1, the probe reads rich combustion conditions and the control unit reduces injection time; causes: little air, excessive petrol, defective probe.