MotoInstruction.ru
Mobile
version
Articles
& news
Site
map
Feed
back
Add to
bookmark
English Русский
Aprilia
BMW
Ducati
Harley
Honda
Kawasaki
Suzuki
Triumph
Yamaha
Aprilia:
RS-series▾
RS125 [3] (1998-2005)
Shiver▾
SL750 (2007-2016)

Crankcase — removal and installation (Aprilia Shiver 750)

  • Main
  • Aprilia
  • Shiver
  • SL 750
  • Engine and systems
  • Engine repair
  • Crankcase — removal and instal…
0

Removal


Mark the position of the original semi-bushings on the crankcase.

To reduce the installation force necessary, score an incision approximately 0.5 mm (0.02 in) deep (without cutting into the steel shell) in each semi-bushing in the area indicated in the figure.


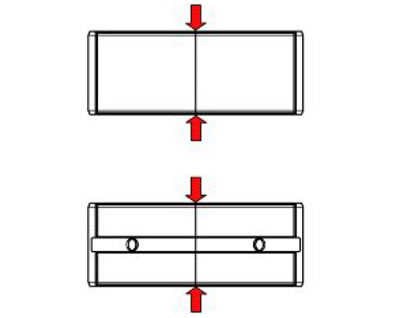
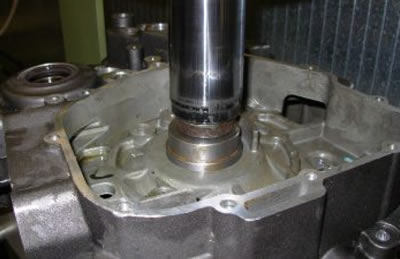
Remove the bushings with the crankcase cold, using a press and the specific tool and pushing inward from the outside of the crankcase.
  • Specific tooling: 020726Y Extractor for bushings


Installing


The orientation of the semi-bushings must match the specifications indicated in the drawing as closely as possible.


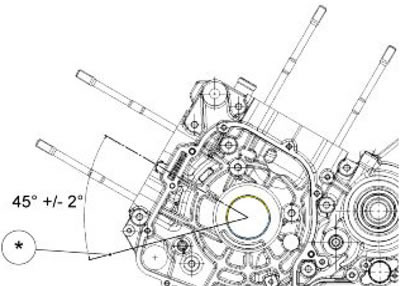
Key: * Semi-bushing joint line


Note. When replacing the semi-bushings alone, the new components must be the same colour as the removed components. If the colour of the old components is no longer visible, use the table to identify the correct components, referring to the crankcase and crankshaft classes.


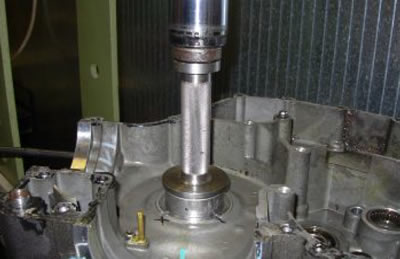
Fit the new bushings with the crankcase cold, using a press and the specific tool and pushing outward from the inside of the crankcase, until the punch comes into contact with the crankcase surface.
  • Specific tooling: 020727Y Punch for bushings


Assembling the connecting rod


Caution! To fit the connecting rods, check the coupling types indicated in the "Crankcase - crankshaft", in the "Characteristics" chapter of the workshop manual.
See this article in russian language
◀ Previous
Aprilia SL750 : Engine repair
Next ▶

Inspecting the crankshaft components
Inspecting the crankcase halves
Removing the crankshaft
Splitting the crankcase halves
Installing the head cover
Installing the cylinder head
Installing the crankshaft
Refitting the crankcase halves
Similar articles about motorcycles of other brands
Suzuki V-Strom DL-650 (2004-2011): Crankcase — disassembly and assembly Triumph Rocket III (2004-2018): Exploded view — crankcase fixings Yamaha FZ1 Fazer (2006-2015): Cheking the crankcase breather hose Kawasaki ZX6R/ZX600J (2000-2002): Crankcase — splitting Honda VTX 1800 C (2001-2008): Crankcase ventilation Ducati ST2 (1997-2003): Disconnecting the crankcase breather pipe Harley-Davidson V-Rod (2002-2006): Upper and lower crankcase — disassembly BMW R 1150 GS (1999-2004): Disassembling crankcase
Link to this article in different formats
TEXTHTMLBB Code
Comments and feedback from visitors
No comments yet, you will be the first!


Add up two numbers: 40 + 36


SL750 (2007-2016) 
  • Information for owner
  • Introduction to manual
  • Control devices
  • Operation manual
  • Technical characteristics
  • Maintenance
  • Engine and systems
  • Engine repair
  • Lubrication system
  • Cooling system
  • Fuel system
  • Transmission
  • Running gear and frame
  • Frame and hinged elements
  • Front suspension and handlebar
  • Rear suspension
  • Brake system
  • Electric equipment
  • Equipment and devices
Aprilia BMW Ducati Harley Honda Kawasaki Suzuki Triumph Yamaha
MotoInstruction.ru © 2021–2025 | Sitemap | Articles | Contacts | Site search | Add to bookmarks | Mobile version