MotoInstruction.ru
Mobile
version
Articles
& news
Site
map
Feed
back
Add to
bookmark
English Русский
Aprilia
BMW
Ducati
Harley
Honda
Kawasaki
Suzuki
Triumph
Yamaha
Aprilia:
RS-series▾
RS125 [3] (1998-2005)
Shiver▾
SL750 (2007-2016)

Inspecting the crankcase halves (Aprilia Shiver 750)

  • Main
  • Aprilia
  • Shiver
  • SL 750
  • Engine and systems
  • Engine repair
  • Inspecting the crankcase halve…
0

Bearings and oil seal check


Thoroughly clean the two sections of the crankcase, the ball bearings, the threads of the crankcase fixing screws and the bearing seats with a non-aggressive solvent. Clean the seal surfaces and check that they are not damaged.

Caution! To avoid damaging both crankcase halves place them on a flat surface.


Check that both crankcase halves are not cracked or damaged.

Check that all threads are in proper conditions.

Check that all oil seals remaining in their position are not worn or damaged.

Check all ball bearings for clearance, smoothness and potential distortions.

Caution! Lubricate ball bearings with engine oil before further checking.


If the internal ring does not rotate smoothly and silently or if there is some noise while it turns, it means that the bearing is faulty and must be replaced.

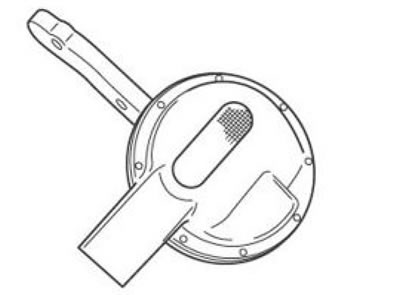
Oil filter and oil delivery pipe check


Check the oil filter for damage. If necessary, replace the part.

Clean the oil net with petrol and inspect the net links for potential damage.


Caution! Check the engine oil filter O-ring.
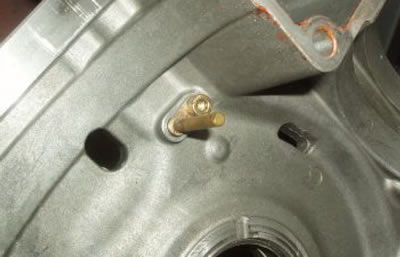

Lubrication check


Working on both crankcase halves, remove and thoroughly clean the nozzle that lubricates the piston crown.


Replace the spray nozzle O-ring if necessary.


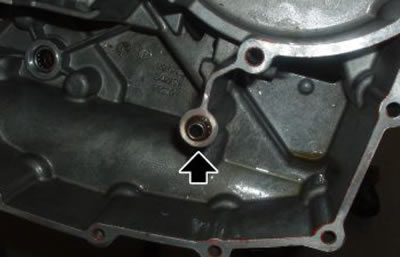
Replace the O-ring on the oil passage duct.


Before refitting


Upon refitting the crankshaft, grease the shaft bushing-connecting rod coupling.
See this article in russian language
◀ Previous
Aprilia SL750 : Engine repair
Next ▶

Removing the crankshaft
Splitting the crankcase halves
Installing the head cover
Installing the cylinder head
Selecting the base gasket
Installing the cylinder
Inspecting the crankshaft components
Crankcase — removal and installation
Installing the crankshaft
Refitting the crankcase halves
Similar articles about motorcycles of other brands
Ducati ST2 (1997-2003): Disassembly crankcase halves Triumph Rocket III (2004-2018): Exploded view — crankcase fixings Yamaha FZ1 Fazer (2006-2015): Cheking the crankcase breather hose Suzuki V-Strom DL-650 (2004-2011): Crankcase — disassembly and assembly Honda VTX 1800 C (2001-2008): Inspecting the motorcycle before the ride Harley-Davidson V-Rod (2002-2006): Upper and lower crankcase — disassembly BMW R 1150 GS (1999-2004): Disassembling crankcase Kawasaki ZX6R/ZX600J (2000-2002): Crankcase — splitting
Link to this article in different formats
TEXTHTMLBB Code
Comments and feedback from visitors
No comments yet, you will be the first!


Add up two numbers: 10 + 11


SL750 (2007-2016) 
  • Information for owner
  • Introduction to manual
  • Control devices
  • Operation manual
  • Technical characteristics
  • Maintenance
  • Engine and systems
  • Engine repair
  • Lubrication system
  • Cooling system
  • Fuel system
  • Transmission
  • Running gear and frame
  • Frame and hinged elements
  • Front suspension and handlebar
  • Rear suspension
  • Brake system
  • Electric equipment
  • Equipment and devices
Aprilia BMW Ducati Harley Honda Kawasaki Suzuki Triumph Yamaha
MotoInstruction.ru © 2021–2025 | Sitemap | Articles | Contacts | Site search | Add to bookmarks | Mobile version