MotoInstruction.ru
Mobile
version
Articles
& news
Site
map
Feed
back
Add to
bookmark
English Русский
Aprilia
BMW
Ducati
Harley
Honda
Kawasaki
Suzuki
Triumph
Yamaha
Aprilia:
RS-series▾
RS125 [3] (1998-2005)
Shiver▾
SL750 (2007-2016)

Installing the cylinder (Aprilia Shiver 750)

  • Main
  • Aprilia
  • Shiver
  • SL 750
  • Engine and systems
  • Engine repair
  • Installing the cylinder
0
Fit the stud bolts, if previously removed.

Caution!
  • The stud bolts should be fitted so that they protrude.
  • Distribute Loctite 270 (high-strength) on the thread and screw the stud bolt on the crankcase until they protrude by 137 mm (5.39 in), then make sure the Loctite has set.


Insert a new cylinder base gasket, it should be as thick as the gasket previously removed: 0.40 - 0.50 - 0.60 mm (0.0157 - 0.0197 - 0.0236 in).

The silicone side should be facing the crankcase.

Caution! If the original gasket thickness cannot be checked or should the cylinder be replaced, refer to the "base gasket selection" section.


Before fitting the cylinder, place the chain sliders and the timing chain on the crankshaft; fit the timing chain on the crankshaft from the base side.

Note. Before fitting the cylinder, carefully blow air into the lubrication duct and lubricate the cylinder liner.


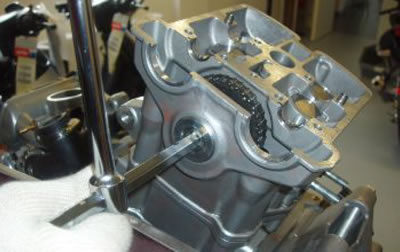
Insert the cylinder-head unit on the stud bolts.


Working in a diagonal sequence and in stages, screw the four nuts once the stud bolt threads have been greased.


Screw the screw located outside the cylinder.


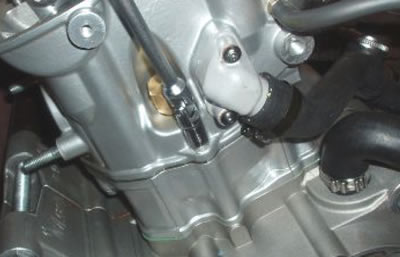
Tighten the three screws on the intake and discharge sides.

Screw the two head fixing screws located inside the timing chain compartment.


Check that the intermediate gear pin lubrication holes are clean.


With a hook, hold the timing chain.

Fit the timing chain on the intermediate gear.

Slide in the pin together with a new O-Ring and a washer.


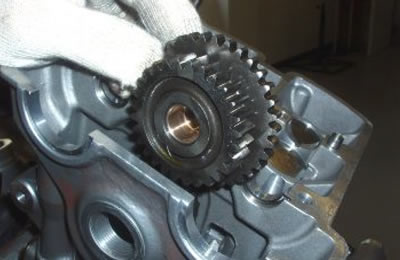
Check that the axial clearance between the pin and the gear is between 0.30 and 0.60 mm (0.0118 - 0.0236 in).


Tighten the intermediate gear pin once Loctite residues are thoroughly removed and a high-strength threadlock is applied on the thread.

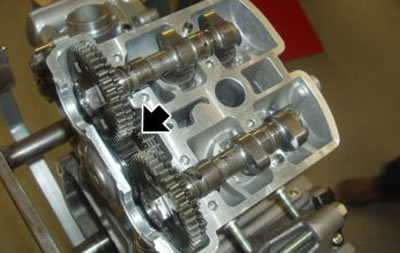
Make sure that both timing chain sliders are correctly fitted.

Refit the overhead camshafts following the procedure described in the "Timing" section.

See this article in russian language
◀ Previous
Aprilia SL750 : Engine repair
Next ▶

Fitting the piston
Checking the piston
Checking the cylinder
Disassembling the piston
Removing the cylinder
Timing chain installation
Selecting the base gasket
Installing the cylinder head
Installing the head cover
Splitting the crankcase halves
Removing the crankshaft
Inspecting the crankcase halves
Similar articles about motorcycles of other brands
Kawasaki Versys 650 (2007-2025): Removing and Installing Cylinder, Pistons Yamaha FZ1 Fazer (2006-2015): Installing the cylinder head BMW R 1150 GS (1999-2004): Installing cylinder Triumph Rocket III (2004-2018): Exploded view — cylinder head Suzuki DRZ 250 (1996-2007): Checking and servicing the camshaft/cylinder head Honda CB 400 SF (1992-1999): Cylinder head — checking and adjusting valve clearances Ducati ST2 (1997-2003): Checking the cylinder compression Harley-Davidson V-Rod (2002-2006): Cylinder leakage test
Link to this article in different formats
TEXTHTMLBB Code
Comments and feedback from visitors
No comments yet, you will be the first!


Add up two numbers: 17 + 43


SL750 (2007-2016) 
  • Information for owner
  • Introduction to manual
  • Control devices
  • Operation manual
  • Technical characteristics
  • Maintenance
  • Engine and systems
  • Engine repair
  • Lubrication system
  • Cooling system
  • Fuel system
  • Transmission
  • Running gear and frame
  • Frame and hinged elements
  • Front suspension and handlebar
  • Rear suspension
  • Brake system
  • Electric equipment
  • Equipment and devices
Aprilia BMW Ducati Harley Honda Kawasaki Suzuki Triumph Yamaha
MotoInstruction.ru © 2021–2025 | Sitemap | Articles | Contacts | Site search | Add to bookmarks | Mobile version