
Prepare
1. Remove main fuse. See Power disconnect.
Remove
Warning: Disconnecting spark plug cable with engine running can result in electric shock and death or serious injury.
1. See Figure 2-35. Remove spark plug cables from spark plugs.
2. Thoroughly clean around spark plug base.
3. Remove spark plugs.
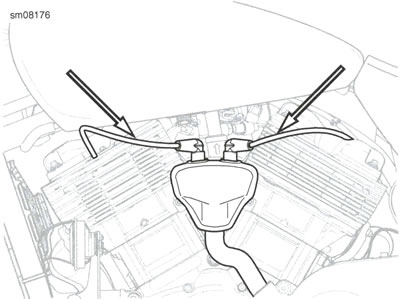
Figure 2-35. Spark Plug Cable Routing: Street Models
Install
| FASTENER | TORQUE VALUE | |
| Spark plug | 10.0-12.0 Nm | 89-106 in·lbs |
Note: The spark plug gap is within specification when there is a slight drag on the gauge.
1. Verify proper gap before installing new or cleaned spark plugs.
- a. Select a wire-type feeler gauge within specification. Refer to Table 2-11.
- b. Pass the wire gauge between the center and the outer electrodes.
- c. Adjust gap to within specification as necessary.
2. Verify spark plug threads are clean and dry.
3. Install spark plugs. Tighten to 10.0-12.0 Nm (89-106 in·lbs).
4. See Figure 2-35. Install spark plug cables.
| MODEL | TYPE | mm | in |
| XG500 | RG6HCC | 0.8-0.9 | 0.31-0.35 |
| XG750 | RG6HCC | 0.8-0.9 | 0.31-0.35 |
Clean and inspect
Spark Plugs
Note: Discard plugs with eroded electrodes, heavy deposits or a cracked insulator.
1. Inspect spark plugs. Compare plug deposits to Table 2-12.
Table 2-12. Spark Plug Deposit Analysis
| DEPOSITS | POSSIBLE CAUSE |
| Wet, black and shiny | Worn pistons Worn piston rings Worn valves Worn valve guides Worn valve seals Weak battery Faulty ignition system |
| Dry, fluffy or sooty and black | Air-fuel mixture too rich |
| Light brown and glassy* May be accompanied by cracks in the insulator or by electrode erosion. | Air-fuel mixture too lean Hot running engine Valves not seating Improper ignition timing |
| White, gray or tan and powdery | Balanced combustion Clean off deposits at regular intervals. |
* The glassy deposit on a spark plug may cause high-speed misfiring.
Spark Plug Cables
1. Inspect spark plug cables. Replace as necessary.
- a. Check for cracks or loose terminals.
- b. Check for loose fit on ignition coil and spark plugs.
2. Check cable boots/caps for cracks or tears. Replace as necessary.
3. Check spark plug cable resistance with an ohmmeter.
- a. See Figure 2-36.
- b. Replace cables not meeting resistance specifications.
Refer to Table 8-3.
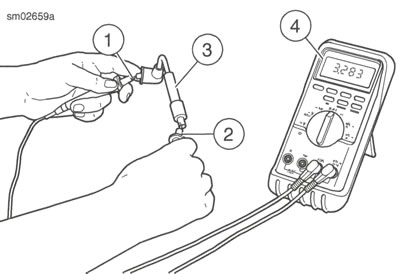
Figure 2-36. Testing Resistance: 1. Ohmmeter positive lead; 2. Ohmmeter negative lead; 3. Spark plug cable; 4. Ohmmeter
Complete
1. Install main fuse. See Power disconnect.