
Prepare
1. Remove left and right side covers. See Side covers.
2. Remove main fuse. See Power disconnect.
3. Remove vapor valve. See Vapor valve.
4. Remove front belt guard. See Belt guards.
Remove
1. See Figure 2-33. Remove electrical panel.
- a. Remove screws (3).
- b. Remove electrical panel (1).
Warning: Disconnect negative (-) battery cable first. If positive (+) cable should contact ground with negative (-) cable connected, the resulting sparks can cause a battery explosion, which could result in death or serious injury.
2. Remove battery.
- a. See Figure 2-32. Disconnect negative battery cable (1) from ground stud (2).
- b. See Figure 2-33. Disconnect positive battery cable (6) from positive battery terminal (5).
- c. Remove battery (4).
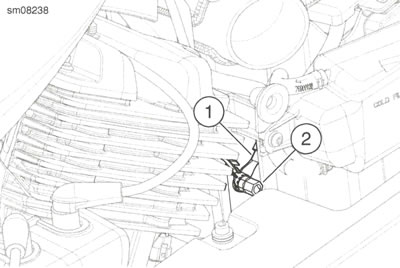
Figure 2-32. Battery Ground Cable: 1. Negative battery cable; 2. Ground stud
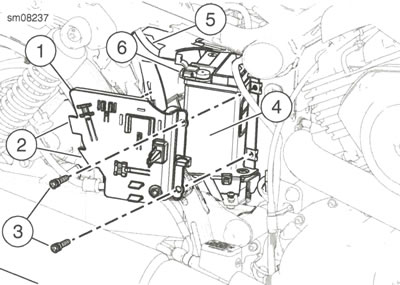
Figure 2-33. Battery: 1. Electrical panel; 2. Tabs; 3. Screw (2); 4. Battery; 5. Positive battery cable; 6. Positive battery terminal
Install
| FASTENER | TORQUE VALUE | |
| Negative battery terminal screw | 6.8-7.9 Nm | 60-70 in·lbs |
| Positive battery terminal screw | 6.8-7.9 Nm | 60-70 in·lbs |
| Battery ground stud | 6.0-10.0 Nm | 54-88 in·lbs |
| Electrical panel screw | 2.3-3.3 Nm | 21-29 in·lbs |
Warning: Connect positive (+) battery cable first. if positive (+) cable should contact ground with negative (-) cable connected, the resulting sparks can cause a battery explosion, which could result in death or serious injury.
Notice: Connect the cables to the correct battery terminals. Failure to do so could result in damage to the motorcycle electrical system.
1. See Figure 2-33. Install negative battery cable.
- a. Install negative battery cable to negative battery terminal. Tighten to 6.8-7.9 Nm (60-70 in·lbs).
- b. Cover negative battery terminal with rubber boot.
- c. Route negative battery cable through battery box.
2. Install battery.
- a. Install battery (4) in battery box.
- b. Connect the positive battery cable (6) to the positive battery terminal (5). Tighten to 6.8-7.9 Nm (60-70 in·lbs).
- c. Cover positive battery terminal with rubber boot.
- d. See Figure 2-32. Connect negative battery cable (1) to ground stud (2). Tighten to 6.0-10.0 Nm (54-88 in·lbs).
3. See Figure 2-33. Install electrical panel.
- a. Install electrical panel (1).
- b. Verify electrical panel tabs (2) are inserted into slots.
- c. Install screws (3). Tighten to 2.3-3.3 Nm (21-29 in·lbs).
Clean and inspect
Note. Battery top must be clean and dry. Dirt and electrolyte on top of the battery causes battery to self-discharge.
1. Clean battery top.
- a. Mix a solution of five teaspoons of baking soda (sodium bicarbonate) per liter or quart of water.
- b. Apply to battery top.
2. When the solution stops bubbling, rinse off the battery with clean water.
3. Clean cable connectors and battery terminals using a wire brush or sandpaper. Remove any oxidation.
4. Inspect the battery screws, and cables for breakage, loose connections and corrosion.
5. Check the battery terminals for melting or damage.
6. Inspect the battery for discoloration, raised top or a warped or distorted case. Replace as necessary.
7. Inspect the battery case for cracks or leaks.
Voltage test
Warning: Never remove warning label attached to top of battery. Failure to read and understand all precautions contained in warning, could result in death or serious injury.
The voltage test provides a general indicator of battery condition. Check the voltage of the battery to verify that it is fully charged.
1. If the open circuit (disconnected) voltage reading is below 12.6 V:
- a. Charge the battery.
- b. Check the voltage after the battery has set for at least one hour.
2. If the voltage reading is 12.7 V or above:
- a. Perform a battery diagnostic test. See the electrical diagnostic manual for the load test procedure.
- b. Refer to Table 2-10.
Table 2-10. Voltage Test For Battery Charge Conditions
| VOLTAGE (OCV) | STATE OF CHARGE |
| 12.7 V | 100% |
| 12.6 V | 75% |
| 12.3 V | 50% |
| 12.0 V | 25% |
| 11.8 V | 0% |
Storage
| PART NUMBER | TOOL NAME |
| 99863-01A | GLOBAL BATTERY CHARGER |
See Figure 2-34. A battery is affected by self-discharge whether stored in or out of the vehicle. A battery that is stored in the vehicle is also affected by parasitic loads. A parasitic load is caused by things like diode leakage or maintaining computer memory with the vehicle turned off.
Batteries self-discharge at a faster rate at higher ambient temperatures. To reduce the self-discharge rate, store battery in a cool, dry place.
Charge the battery every two weeks if stored in the vehicle. Charge the battery once per month if removed the vehicle.
Note: Use the GLOBAL BATTERY CHARGER (Part No. 99863-01A) to maintain battery charge for extended periods of time without risk of overcharging or boiling.
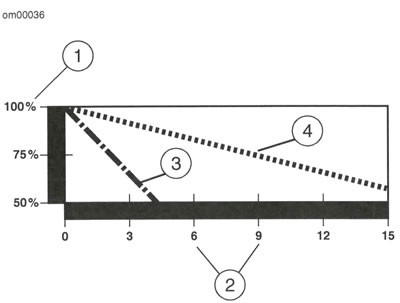
Figure 2-34. Effective Rate of Temperature on Battery Self-discharging Rate: 1. Capacity; 2. Months of non-use; 3. Measured at 40°C (105°F); 4. Measured at 25°C (77°F)
Complete
1. Install front belt guard. See Belt guards.