
Caution!
- The camshaft sprockets are attached to the camshafts using slotted bolt holes. This allows for very accurate valve timing and therefore improved performance and fuel economy.
- Never fit the camshaft sprockets without correctly setting the camshaft timing using the service tools and timing procedure described below. Severe engine damage will result from incorrect valve timing adjustment.
1. Check that the dot mark on the primary gear is still aligned with the line on the crankcase and the T3880601 - Camshaft Timing Pin is installed. Ensure the crankshaft cannot rotate.
2. Thoroughly clean the camshafts and journals. Inspect the ends of the camshafts for correct fitment of the sealing plugs. Lubricate the camshafts with clean engine oil before fitting to the head.
3. If removed, refit the camshaft sprockets noting their orientation, and secure using the original bolts. DO NOT tighten the fixings at this stage; the sprockets must be free to rotate.
4. Refit the camshaft drive chain and, if removed, the tensioner blade and rubbing strip (see Camshaft drive chain - installation).
Note: Locate each camshaft to the head ensuring the camshafts are correctly identified (inlet and exhaust) and are also correctly located over their respective valve banks.
5. Refit the exhaust camshaft to the cylinder head, hooking the camshaft drive chain over the sprocket as you do so.
6. Ensure there is no slack between the crankshaft and exhaust sprocket when the sprocket fixings are centrally located within the slotted holes. Ensure alignment marks on the end of the camshaft journals are pointing inwards.
7. Refit the inlet camshaft to the cylinder head, hooking the chain over the sprocket as you do so.
8. Ensure the fixings on the inlet sprocket are also centrally located within the slotted holes when there is no slack between the exhaust and inlet sprockets. Ensure alignment marks on the end of the camshaft journals are pointing inwards.
9. Check that the chain is correctly located around the crankshaft, and both camshaft sprockets.
10. Rotate the camshafts until the alignment marks on the end of the camshaft journals are pointing inwards.
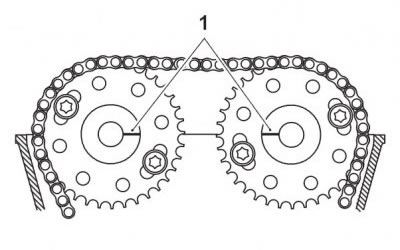
Camshaft alignment marks
Caution! The T3880640 - Camshaft Timing Plate must be located centrally between the camshafts. Incorrect positioning of the tool may prevent the camshaft ladder locating correctly to the cylinder head during fixing tightening, resulting in incorrect valve timing being set. Severe engine damage will result from incorrect valve timing adjustment.
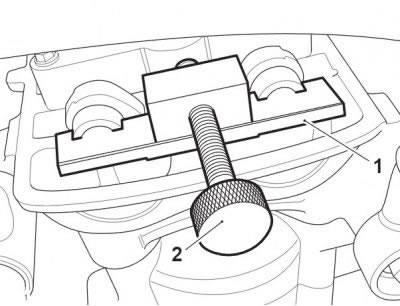
11. Insert the T3880640 - Camshaft Timing Plate into the camshaft slots, ensuring the removal screw is unscrewed fully, as shown below. Ensure that the tool is centrally located between the camshafts.

1. T3880640 - Camshaft Timing Plate; 2. Camshaft slots; 3. Removal screw
12. Assemble the dowels, spark plug tower O-rings, camshaft ladder and top pad in the same location and orientation as prior to removal.
Note: The bolts for the camshaft cap ladder are tightened in two stages.
Stage 1
1. Fit and evenly tighten the fixings to 5 Nm, in the sequence shown below.
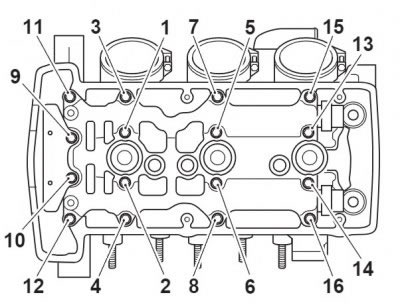
Camshaft cover fixings tightening sequence
Stage 2
1. In the sequence shown above, tighten the bolts to 10 Nm.
2. Fit the T3880607 - Camshaft Timing Tensioner using the original fixings and tighten to 9 Nm.

1. T3880607 - Camshaft timing tensioner
Caution! The torque value stated is very important to accurate timing. Always use the correct value of 0.6 Nm, as set using the T3880609 - Timing Torque Limiter. Using an incorrect torque value will result in incorrect valve timing being set, or damage to the tensioner blade or other valve train components. Either condition may result in serious damage to the engine, reduced engine performance, or reduced fuel economy.
3. Using the T3880609 - Timing Torque Limiter and a 6 mm Ball Ended Allen Key, tighten the T3880607 - Camshaft Timing Tensioner to 0.6 Nm preset by the T3880609 - Timing Torque Limiter.

1. T3880607 - Camshaft Timing Tensioner; 2. T3880609 - Timing Torque Limiter; 3. 6 mm Ball Ended Allen Key
4. Tighten the two accessible (uppermost) camshaft sprocket fixings to 16 Nm.

1. Uppermost fixings
5. Remove the T3880601 - Camshaft Timing Pin by rotating the removal screw clockwise as shown below.
1. T3880640 - Camshaft Timing Plate; 2. Removal screw
6. Remove the T3880601 - Camshaft Timing Pin.
Caution! Always check that the T3880640 - Camshaft Timing Plate has been removed before rotating the engine. Severe damage will result to the camshafts or T3880640 - Camshaft Timing Plate if engine rotation is attempted with the tool installed.
7. Rotate the engine until the remaining two sprocket fixings are accessible.
8. Tighten the two remaining camshaft sprocket fixings to 16 Nm.
9. Place a suitable wedge between the camshaft drive chain tensioner blade and crankcase, to hold the camshaft drive chain taut during removal of the T3880607 - Camshaft Timing Tensioner.
10. Release the tension on Camshaft Timing Tensioner T3880607 and remove it.
11. Refit the timing chain tensioner, incorporating a new gasket and O-ring (see Camshaft drive chain tensioner - installation).
12. Rotate the crankshaft clockwise 2 complete turns, using the bolt fitted to the end of the crankshaft. Stop rotation when number 1 cylinder is at Top Dead Centre (TDC), that is when the dot mark on the primary gear aligns with the line on the crankcase.
Note: Before inserting the timing pin, ensure the 'dot' on the primary gear is aligned with the line on the crankcase.
13. Insert the T3880601 - Camshaft Timing Pin into the timing holes in the crankcase and crankshaft.
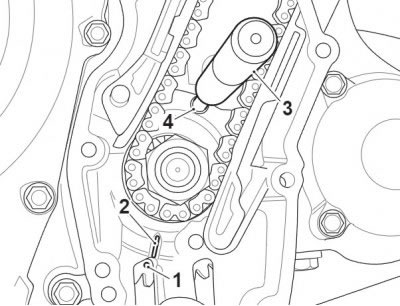
1. Dot mark; 2. Marker line; 3. T3880601 - Camshaft Timing Pin; 4. Timing hole in crankcase
14. Check that the timing marks are still approximately aligned (to check that the camshaft timing has not moved during T3880607 - Camshaft Timing Tensioner removal).
15. Remove the T3880601 - Camshaft Timing Pin.
16. Check the valve clearances. Adjust as necessary (see Valve clearance measurement).
17. Refit the camshaft cover (see Camshaft cover - installation).
18. Fit the crankcase right hand cover and tighten its fixings to 10 Nm in the sequence shown below.
19. Re-tighten the fixings one and two to 10 Nm.
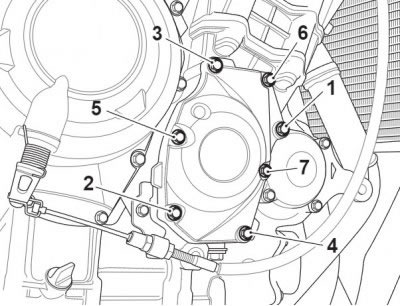
Crankcase right hand cover fixings tightening sequence