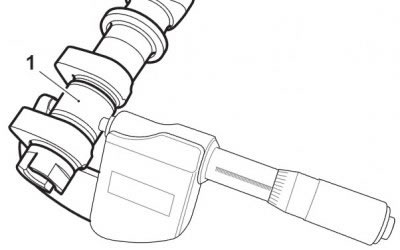
2. Measure the camshaft journals with a micrometer. If any journal is outside the specified tolerance, replace the camshaft. For specifications refer to Camshafts.

1. Camshaft journal
3. Examine all camshaft and camshaft bearing caps for excessive wear and damage.
4. Check the journal-to-head clearances, using Plastigauge (Triumph part number 3880150-T0301) as follows:
- Wipe the exposed areas of both the camshaft journal and a single cap or cap area of the ladder.
- Apply a thin smear of grease to the journal and a small quantity of silicone release agent to the cap.
- Size a length of the Plastigauge to fit across the camshaft journal. Fit the Plastigauge to the camshaft journal using the grease to hold the strip in place.
- Ensuring that the camshaft sprocket alignment marking is located as for removal, refit the camshaft cap ladder then evenly and progressively tighten the ladder bolts to 5 Nm and then to 10 Nm in the correct sequence (see Camshaft - installation and timing).
- Release the bolts and remove the ladder. Using the gauge provided with the Plastigauge kit, measure the width of the now compressed Plastigauge.

Measuring the compressed plastigauge
Note: The camshaft ladder is unique to each cylinder head and is, therefore, not available separately. If the camshaft ladder is worn or damaged, the complete cylinder head must be replaced.
5. Calculate the journal clearance using the Plastigauge chart supplied with the Plastigauge kit.
6. For specifications refer to Camshafts.
7. If the clearance measured is within the specified tolerance, remove the cap/ladder and clean off all traces of Plastigauge. Assemble the camshafts (see Camshaft - installation and timing).
Caution! Although Plastigauge is oil soluble, all traces of the material must be removed to prevent blockage of the oil drillings and resultant engine damage.
