
Warning: Before starting work, ensure the motorcycle is stabilised and adequately supported. This will help prevent it from falling and causing injury to the operator or damage to the motorcycle.
Removal
Warning: Always return the handlebars and risers to their original position as noted in paragraph 1. Operating the motorcycle with a handlebar position that is unfamiliar may lead to loss of control or an accident.
1. Note the original position of the handlebars, and orientation of the adjustable risers, in order that they can be returned to the same position when the repair operation is complete.
2. Remove the rider's seat (see page 16-13) and disconnect the battery negative (black) lead first.
3. Tiger 800 only: Undo the fixing screws and remove the end weights from the handlebars.
4. Tiger 800XC only: Remove the fixings and remove the handguards. Discard the fixings.

1. Handguard (left hand shown); 2. Fixings
5. Undo the screws and free the left switch gear assembly from the handlebar. Without disconnecting any wiring, lay the switch aside.
6. Unscrew the bolts and remove the clamp from the clutch lever assembly. Without disconnecting the clutch cable, lay the lever aside.
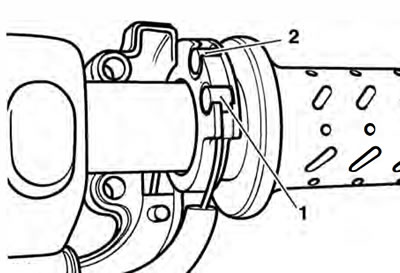
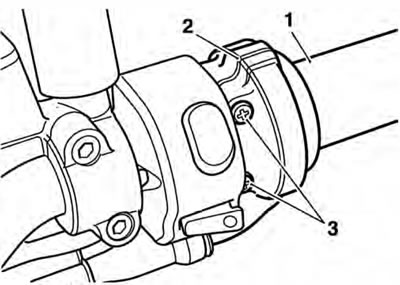
7. Slide off the rubber boot and release the screws which secure the two halves of the twist grip guide to each other.
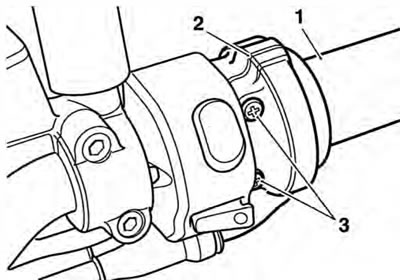
1. Twist grip; 2. Twist grip guide; 3. Screws
8. Note the position of the guide relative to the handlebar then separate the two halves of the twist grip guide.
9. Note and mark the position of each cable relative to the twist grip in order to correctly identify their location during reassembly.
10. Release the inner cables from the twist grip.
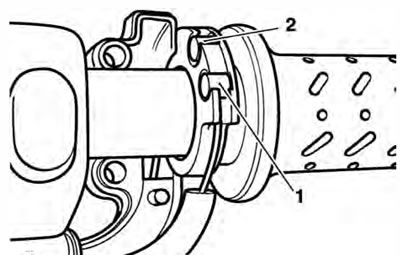
1. Closing inner cable; 2. Opening inner cable
11. Slide the twist grip off the handlebar.
12. Undo the screws and free the right hand switch gear assembly from the handlebar. Without disconnecting any wiring, lay the switch aside.
13. Unscrew the bolts and remove the clamp from the front brake master cylinder. Taking care to not invert the brake fluid reservoir, lay the assembly aside.
14. Release the fixings securing the handlebar clamps to the risers, detach the clamps and collect the handlebar.
1. Upper Clamp; 2. Handlebar; 3. Riser
15. If required, remove the left hand handlebar grip.
Installation
1. Locate the handlebar assembly in the lower halves of the clamps. Fit the upper clamps and 10 mm bolts.
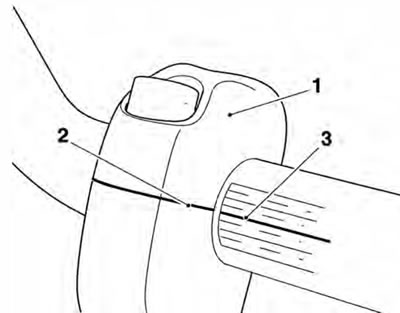
2. Rotate the handlebar so that the etched centre (longer) marking on the handlebar aligns with the split line on the upper clamps/risers.
3. Tighten the 10 mm bolts to 35 Nm.
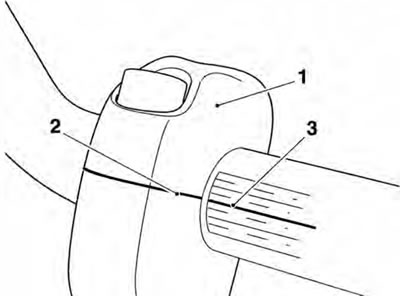
1. Upper clamp; 2. Clamp split line; 3. Centre marking
4. Refit the 8 mm bolts and tighten to 26 Nm.
5. Fit the left hand handlebar grip.
6. Position the clutch lever to the handlebar. Fit the clamp (UP arrow pointing upwards) and clamp bolts.
7. Align the split line of the clutch lever with the '+' mark on the upper surface of the handlebar, then tighten the clamp bolts, upper first, to 12 Nm.
8. Align the left hand switch cube to the handlebar and secure with the screws. Tighten the screws to 3 Nm.
9. Slide the twist grip onto the right hand side of the handlebar.
10. Reconnect the inner throttle cables as noted during removal. Ensure that the positions of the opening and closing cables are not transposed.
1. Closing inner cable; 2. Opening inner cable
11. Assemble the two halves of the cable guide ensuring that the outer cables are correctly located in the guide and the guide is positioned on the handlebars as prior to removal.
1. Twist grip; 2. Twist grip guide; 3. Screws
12. Tighten the cable guide fixings to 3 Nm.
13. Position the right hand switch cube to the handlebar and tighten the fixings to 3Nm.
14. Position the front brake master cylinder assembly to the handlebar. Fit the clamp (Up arrow pointing upwards) and clamp fixings.
15. Align the split line of the master cylinder clamp to the '+' mark on the upper surface of the handlebar and tighten the clamp fixings to 12 Nm.
16. Tiger 800 only: Fit the handlebar end weights, tightening the fixings to 5 Nm.
17. Tiger 800XC only: Position the handguards to the handlebar and secure with the two fixings, using new fixings at the handguard to spacer position. Tighten the handguard to spacer fixing to 6 Nm and the handguard to bracket fixing to 9 Nm.
18. Check the throttle cable free play setting. Adjust as necessary (see page 10-104).
19. Reconnect the battery, positive (red) lead first.
20. Refit the seats.
21. Check for correct operation of the front brake and clutch. Check that the throttle opens and closes without sticking and that the cables do not bind or restrict the steering when the handlebars are turned from lock-to-lock. Rectify as necessary.
Warning: Operation of the motorcycle with incorrectly adjusted, incorrectly routed or damaged throttle cables could interfere with the operation of the brakes, clutch or the throttle itself. Any of these conditions could result in loss of control of the motorcycle and an accident.
Warning: Move the handlebars to left and right full lock while checking that cables and harnesses do not bind or that the steering feels tight or difficult to turn. A cable or harness that binds, or steering that is tight/difficult to turn will restrict the steering and may cause loss of control and an accident.